

Choosing and Tuning Quest 2 Comfort Straps: A Practical Guide for Longer Sessions
If you're logging long VR sessions on a Quest 2—whether for gaming, fitness, or social meetups—the stock strap can quickly become the weak link in your experience. This guide walks you through choosing the right comfort strap, installing and fine-tuning it, and maintaining it so hours in VR feel effortless rather than exhausting. ⏱️ 10-min read
You'll get clear, actionable steps for assessing your needs, comparing standard, Elite, and third‑party options, and dialing in fit for glasses wearers. Practical tips on weight, balance, compatibility with accessories, cleaning, and simple daily practices round out the advice so your next session stays comfortable from start to finish.
Assess Your Comfort Needs for Quest 2
Start by being honest about how you use your Quest 2. Short sessions under 30 minutes favor light, minimal straps that are easy to slip on and off. If you regularly stay in VR for an hour or more, or use the headset for workouts, prioritize a strap that spreads weight evenly and resists shifting when you move. Track where you feel discomfort today—temples, nose bridge, cheeks, or neck—and let those pain points drive your priorities.
Consider these personal details when choosing a strap: do you wear glasses, do you have sensitive skin, and how much facial hair affects the seal? Glasses require extra temple and nose clearance and softer, wider padding. Sensitive or acne-prone skin benefits from breathable, hypoallergenic materials and designs that avoid sharp pressure points. Facial hair changes how the facial interface seals and where pressure lands—sometimes a slightly raised strap or a firmer crown support helps.
Make a short checklist: typical session length, primary pain locations, glasses or inserts, sweat and hygiene needs, and cleaning preferences. Rank attributes—weight, even pressure distribution, adjustability, and wipeable/removable pads—so you can quickly compare models. This simple audit saves you from buying the “best-looking” strap and ends up delivering the comfort you actually need.
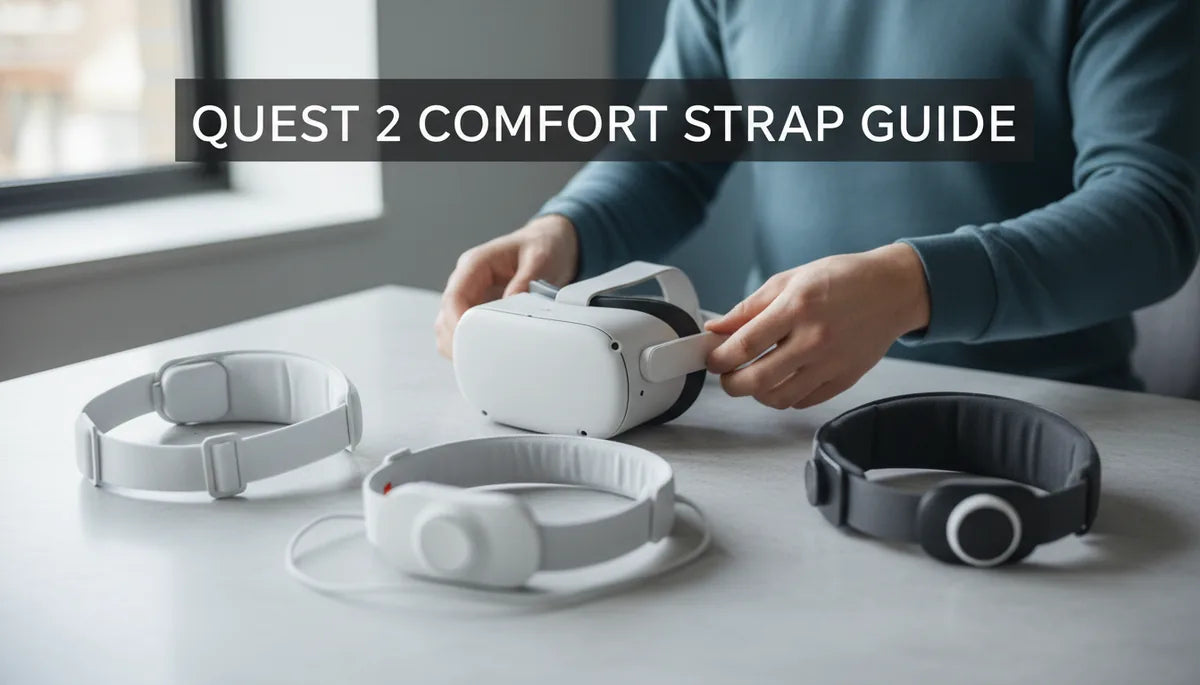
Strap Options at a Glance: Standard, Elite, and Third‑Party
Comfort straps fall into three practical families: the lightweight standard strap, the sturdier Elite-style strap, and a wide ecosystem of third‑party options. Each serves a different user profile, and the trade-offs are about weight, adjustability, cushion material, and price.
Standard straps are what most users start with: inexpensive, minimal padding, and quick adjustments like sliders or Velcro. They’re great for casual sessions because they keep the headset light and allow fast swaps. The downside is less cushion and poorer pressure distribution—standard straps tend to create hotspots during extended play.
Elite-style straps are built for longer sessions. Expect thicker padding, broader contact areas across the crown, and stronger lateral support. Many offer rear-mounted battery or counterweight mounts to shift mass away from the face and reduce neck strain. These benefits come with extra bulk and cost, so they’re best for heavy users who want stability and comfort over style.
Third‑party straps are the most varied: fabric, foam, leather, neoprene, magnetic clips, wrap-around designs, and adjustable ratchets. They let you match specific needs—sweat‑resistant materials for fitness, memory foam for long sessions, or slim profiles for glasses wearers. Compatibility can vary, so check attachment styles and reviews to confirm how they fit the Quest 2 mounts and how they feel in real use.
Fit and Ergonomics for Glasses Wearers
Wearing glasses in VR introduces predictable friction points: temple squeeze, nose pressure, and lens fog. The solution is less about a single product and more about tuning three things: strap height, padding width/thickness, and temple clearance.
Set the top strap so the headset rests on your brow and crown rather than pulling down on the nose. Raising the rear strap slightly creates a bit more nose clearance, reducing pinching and the tendency for lenses to fog from your breath. Look for padding with a broader contact area—wider foam distributes pressure away from the frame and softens sharp contact at temple tips.
Temple clearance matters: if the headset edge presses the temples, try adjusting the strap path or using thinner temple arms. Some third‑party straps curve differently or route the side straps slightly higher to avoid the temple zone. If your frames are thick, test a spacer or a replacement facial interface with a slightly deeper cut to prevent frame contact.
Finally, improve airflow to reduce fog: a small gap near the nose, anti‑fog wipes, or low-profile fans can help. After any change—new padding, a top‑strap adjustment, or a different facial interface—test for at least 20–30 minutes to ensure temples and nose stay comfortable through typical movements.
Installation and Quick‑Adjust Setup
Installing a comfort strap properly is half the battle. A bad install wastes a great strap; a precise setup makes even modest straps feel far better. Follow these step-by-step instructions for a repeatable, balanced fit.
- Remove the original strap: release the clips at the headset mounts and slide off the stock strap carefully to avoid damaging the plastic rails.
- Attach the new strap: align the connector points with the Quest 2’s mounting rails or clip locations. Press until you hear a click and tug gently to confirm a solid attachment.
- Set vertical position: adjust the top strap so the headset sits on your brow rather than the nose. The goal is to rest weight on the crown and upper forehead.
- Adjust side tension: tighten the side straps gradually and evenly. Small increments are better than big pulls—aim for even pressure at both temples without pinching.
- Fine-tune angle and seal: look straight ahead and use the loosen/tighten adjustments to center the lenses. Tilt slightly up or down to find where the seal is secure but not uncomfortable.
- Test with movement: look up and down, turn your head quickly, and squat slightly. If the headset shifts, tighten a notch and retest until it remains stable.
As you fine‑tune, keep in mind that small changes—half a notch on the top strap or a millimeter of side tension—can dramatically alter pressure points. Recheck fit after a 20–30 minute session; some materials settle and straps can relax slightly, requiring a quick re-tighten for longer sessions.
Weight and Balance: How to Reduce Strain
The Quest 2 headset weighs roughly 503 g (headset-only). Where that weight sits determines neck strain: a front-heavy setup pulls the face forward and increases pressure on the nose and temples. The simplest fix is shifting weight rearward to balance the headset across the whole head.
Back-mounted counterweights or slim battery packs are effective because they move mass behind the head, turning a lever that reduces forward pull. Many Elite-style straps are designed to accept these accessories, but you can also attach third‑party counterweights to the rear strap. Start with a small mass (100–200 g) and increment until the headset feels balanced without creating a heavy feeling on the neck.
If you prefer not to add weight, consider lighter front padding or a thinner facial interface to move the center of gravity closer to the head. Dense foams can shift the headset forward slightly, so swapping to a lower-profile insert can help. Memory‑foam pads improve comfort but sometimes increase front projection; balance them with rear support.
Test balance dynamically: do quick head turns and put on the headset for an extended session. Neck strain often appears after 30–60 minutes; if you feel a steady pull, experiment with back counters or incremental changes in padding rather than drastic swaps. The goal is an even distribution that stays stable during movement without forcing your neck into constant compensation.
Compatibility with Accessories and Cross‑Platform Gear
Most third‑party comfort straps are built around the Quest 2’s mounting points and should attach cleanly, but verify details before you buy. Look at the product photos and listing text to confirm it matches the Quest 2 rail design or uses the same clip and screw pattern. Small differences in connector shape can mean a strap won’t click securely.
Accessories that change seal thickness—different facial interfaces, lens inserts, or prescription adapters—affect how the strap fits. Prescription inserts add thickness inside the lens frame; after installing them, re-check top strap tension and side adjustments to avoid a pushed‑forward headset. Similarly, thicker foam or silicone seals can raise the headset slightly, shifting pressure points toward the temples. If you add a thicker interface, consider a rear counterweight or a strap designed to accommodate the increased front offset.
Battery packs, counters, and stands typically mount to the rear strap or headband. Prefer rear attachment points over front-mounted additions, which only increase forward pull. Be mindful that cross‑compatibility with non‑Quest ecosystems (for example, accessories designed for entirely different headsets) varies—do not assume a universal fit. Manufacturer pages and user photos are invaluable for confirming real-world compatibility.
Finally, if you plan to mix and match components—aftermarket facial interfaces, lens inserts, and third‑party straps—assemble and test everything together before committing. A 20–30 minute trial under movement will reveal whether components work in harmony or create new hotspots.
Care, Maintenance, and Longevity
Comfort and hygiene go hand in hand. Regular cleaning prevents odors, skin irritation, and degradation of materials. After intense sessions or workouts, wipe foam and surfaces with a mild cleanser or an alcohol wipe, using gentle motions. Avoid soaking foams; instead, let them air dry completely before reuse. Removable covers should be washed according to the manufacturer's instructions—gentle cycle and line dry are usually safest.
Rotate or replace pads when they show creasing, compression, or a noticeable loss of cushioning. Small inconsistencies in padding quickly become hotspots during long sessions. Inspect seams, zippers, and attachment points regularly—early signs of wear (loose stitching, fraying fabric) predict where a strap will fail under repeated use.
Avoid harsh chemicals, bleach, or solvents that break down foam and adhesives. If you use alcohol wipes, keep them light and follow with a full air-dry. For antibacterial needs during fitness sessions, choose straps with moisture-resistant, fast-drying materials and look for antimicrobial finishes when available.
Finally, plan for spare parts: extra covers, replacement foam, or a backup strap. Rotating them extends the life of each piece and gives you a fresh option while one set dries or is replaced. Proper maintenance keeps a strap comfortable and ensures it continues to support long sessions without sudden breakdowns.
All‑Day Comfort Practices and Quick‑Tip Checklist
Even the best strap benefits from user habits. Breaks, posture, and small in-session adjustments keep discomfort from escalating. Use this checklist to manage long sessions and spot issues before they become pain.
- Initial test: wear a new strap for 20–30 minutes and note any hotspots. Re-adjust and test again before a longer session.
- Micro-breaks: every 45–60 minutes pause for 2–3 minutes. Remove or loosen the strap, relax your jaw, and roll your shoulders to reset neck tension.
- Jaw and mouth: clenching increases facial pressure. Consciously relax your jaw during intense moments to reduce temple pressure.
- Posture: sit or stand with an upright spine and neutral head position. Slumped posture increases forward pull and neck strain.
- Reassess fit: straps settle. Re-check tension halfway through a long session and after sweaty segments.
- Hygiene: wipe sweat-prone areas immediately after use and rotate covers to avoid bacterial buildup.
- Carry spares: bring a small microfiber cloth and spare padding if you move between sessions or players.
When shopping, use a short decision loop: verify compatibility, review return policy, and test for at least 20–30 minutes upon arrival. Prioritize weight distribution and adjustability over price if you play often—spending a bit more on the right strap nearly always pays off in comfort and longer, more enjoyable VR sessions.
Next step: pick the top two straps that match your checklist, install one, and follow the installation and micro‑adjustment routine above. If discomfort persists after these steps, try swapping to a different padding profile or adding a small rear counterweight—small changes often unlock big comfort gains.


Share:
Upgrading Quest 2 Facial Interfaces with Padding Materials That Boost Comfort
How to Fit Oculus Quest 2 with Glasses Without Pinching or Slipping