

Designing Weightless VR: A Practical Guide to Flit Lift and the GraviPro Dynamic Lifting System
Long VR sessions should feel immersive, not like a workout for your neck. Flit Lift and the GraviPro dynamic lifting system approach that problem differently: instead of rigid counters or heavy cradles, they actively redistribute the headset’s load to the torso in real time, creating a buoyant, weightless sensation that preserves natural head movement. ⏱️ 11-min read
This guide walks VR enthusiasts, hardware designers, developers, and long-session gamers through the practical steps of shaping a Flit Lift-compatible setup with GraviPro. You’ll get clear explanations of the mechanics, ergonomics, installation tips, calibration routines, safety checks, and developer patterns to integrate lift telemetry with your app—so the Vision Pro and other headsets feel lighter, longer.
How Flit Lift Creates Weightless Comfort for Vision Pro
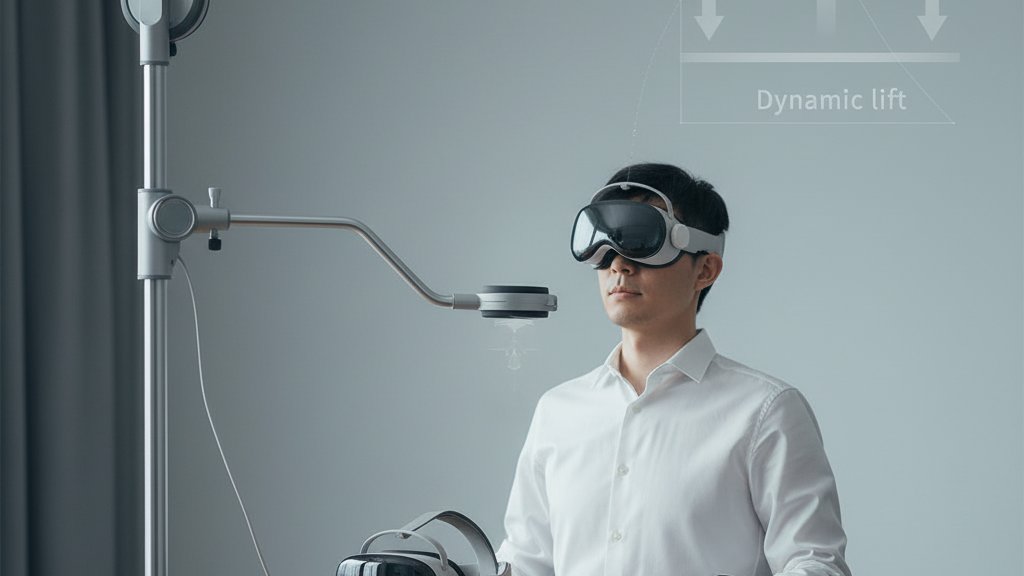
At its core, Flit Lift is a micro-lift strategy: tiny, rapid elevations that offset perceived weight and reduce neck torque without locking the head into a rigid frame. Rather than supporting the headset on a fixed rail, Flit Lift follows the head’s motion with quick, subtle actuator strokes timed to orientation and movement. The result is a buoyant feel—users report the headset “hovering” rather than pulling them forward.
Real-time sensing underpins this illusion. A compact sensor suite—IMUs on the headset and torso, pressure sensors in the harness, and a fast controller—measures orientation and posture and commands lightweight actuators. The control loop focuses on minimal lag and gentle transitions so lift changes stay in harmony with breathing and natural motion. For the Vision Pro specifically, the system accounts for gasket geometry and the forward front module so the seal and facial pressure remain even while the front feels lighter.
Fitting Flit Lift to the Vision Pro involves both hardware alignment and perceptual acclimation. When you first wear the system, observe these points:
- Neutral spine: the head should rest in a natural forward-facing position without forced tilt.
- Even gasket contact: no pinching or visible gaps at the face seal during small head movements.
- Subtle cues: lift shifts should be perceivable but never jarring—if you’re aware of the mechanics, reduce gain.
Perform an initial 2–3 minute dynamic wear test—slow nods, turns, and leaning—to confirm the headset remains centered and the perceived front weight is reduced. Adjust until stabilization feels natural; small changes in gain and anchor points make an outsized difference.
GraviPro Dynamic Lifting System: Core Mechanics
GraviPro translates the Flit Lift idea into a physical system that moves load from the head to the torso. Its architecture centers on a quiet actuation suite, a counterweight and linkage geometry that preserve belt level, and sensor fusion that tracks both head and torso. The hardware sits low-profile on a shoulder-to-torso belt—out of the way during play but close enough to deliver responsive support.
Actuators are compact servos or short-stroke linear units designed for small, frequent corrections. Instead of large, single movements, GraviPro performs short, controlled strokes at the lifting point. This keeps motion smooth and aligns lift with breathing and ambient motion. A back-mounted counterweight, paired with parallelogram arms or a compact scissor linkage, keeps the belt level as lift changes. That mechanical advantage smooths the transfer of force so users feel balanced rather than pitched forward.
Sensor fusion is the control system’s brain. IMUs on the headset and belt provide orientation quaternions; belt pressure sensors detect harness loading; and optional optical cues help correct drift. A central controller fuses these inputs to estimate torso orientation and lift error, then applies damping to avoid oscillations. Power and thermal management are designed for long sessions—efficient motor drivers and staged actuation reduce draw and keep the system quiet. Batteries use smart management so peak demand is spread across micro-movements rather than a few large draws.
Adjustability matters: GraviPro supports tuning across torso heights and seating positions and offers manufacturer-defined safe operating limits for different user profiles and headset masses. When configuring, always respect those limits and validate lift behavior at the edges of the recommended range to avoid unexpected torque or belt misalignment.
Ergonomic Principles for VR Weight Distribution
Good ergonomics are not an afterthought in weight-distribution systems—they’re the core design constraint. Three principles guide a comfortable Flit Lift experience: aligning the combined center of mass (head + lift system) with the body’s natural pivot, avoiding concentrated pressure points, and encouraging a neutral posture that reduces sustained muscle activation.
Center-of-mass alignment is practical: move perceived weight closer to the body’s center—roughly near the lower sternum—so neck muscles don’t have to counterbalance the headset. A simple proxy calculation helps designers and power users estimate the effect: perceived neck torque ≈ headset mass × g × horizontal offset from neck pivot. While you don’t need to compute newtons for every session, reducing that horizontal offset (through lift and strap routing) noticeably lowers fatigue.
Dynamic load sharing matters because posture changes—leaning, turning, or reaching—shift forces. Flit Lift-style systems distribute support across chest, shoulders, and hips with adjustable attachments so hotspots don’t form. Contact quality plays a large role: breathable padding, tissue-friendly fabrics, and even pressure across contact areas prevent pinching and edge pressure that cause hotspots during long sessions. Aim for distributed contact rather than a few tight anchor points.
Practical comfort metrics you can use right away:
- Neck fatigue proxy: subjective rating on a 1–10 scale after a 5-minute static hold—track over sessions.
- Pressure spread score: visualize harness contact with a pressure map or handheld sensor—prefer broad, low-pressure coverage.
- Stability index: frequency of corrective movements required to re-center the headset during quick turns—fewer corrections = better alignment.
These metrics let you iterate: if neck fatigue remains high, move anchor points lower or increase dynamic gain slightly to carry more load on the torso.
Designing a Flit Lift Compatible Setup
Translating principles into a usable room setup requires both hardware and spatial planning. Core components include a GraviPro belt and actuator pack, a mounting frame (ceiling/wall/freestanding), headset cradle or quick-release coupling, adjustable harness, and cable management accessories. For Vision Pro compatibility, confirm the cradle accommodates the front module geometry and that straps won’t pinch the headset gasket.
Mounting choices depend on room and use. Ceiling anchors are the most stable for full-range motion—anchor into joists and allow 6–8 feet of clear movement. Freestanding frames offer portability and are ideal for multipurpose rooms; choose one rated for the expected loads and with secure anchor points for cable channels. Wall-mounted tracks save floor space and are fine for primarily seated or limited-motion use. Wherever you mount, map doorways and traffic paths to keep play areas clear.
Cable management is often overlooked but essential. Route power and data along rigid supports and include strain relief near the harness and at the headset coupling. Use quick-disconnects at safe locations so the headset can be released without tugging the belt. Clips, channels, and braided sleeves reduce snag risk; keep cable slack predictable so it doesn’t change balance as you move.
Harness geometry influences balance. Use adjustable shoulder straps, a chest band, and a hip belt to distribute load. Tool-free adjustments and quick-release buckles save time and encourage regular fitting checks. For Vision Pro, ensure straps interface cleanly with the gasket—either by routing around the face seal or by adding a soft interface pad to prevent pinching while maintaining even lift contact.
Headset Pairings and Balance: Vision Pro and Other Headsets
Every headset has its own weight distribution fingerprint. The Vision Pro, with a forward-leaning front module, tends to shift the center of gravity toward the face. Other headsets might be rear-heavy or have a more even spread. Flit Lift and GraviPro adapt by tuning anchor points and lift profiles to maintain a neutral feel across different shapes.
Start pairing by assessing where the headset’s mass concentrates: front, center, or back. Route lift straps so they contact the headset’s shell in places that translate load without compressing delicate seals. For Vision Pro, avoid routing across the gasket; route straps along the outer shell and use soft interface pads at the contact points. When swapping headsets, visually confirm that straps still clear vents and sensors—obscuring cameras or IR sensors will impair tracking and the lift control loop.
Balancing heavier headsets requires distributing tension more evenly and possibly increasing full-lift gain. Lighter headsets need less lift—maintain snugness without over-supporting, which can introduce an unnatural buoyancy. If you frequently switch devices, use adapter plates or modular cradles that let you reposition anchor points quickly. Popular solutions include sliding plates for fore-aft adjustment and interchangeable pads that change the effective balance point.
Safety quick-release mechanisms are mandatory in multi-user setups: make sure quick releases are reachable and tested for both hardware and perceived comfort. If a user feels pinched or dizzy, the release should allow immediate detachment without interrupting the headset’s safety systems.
Calibration, Fit, and Comfort Testing
Calibration is where the system becomes personalized. A repeatable protocol ensures consistent comfort across sessions and users. The goal is to align IMUs, tune gain and damping, and record a comfort baseline so you can measure improvements or regressions.
- Profile capture: Record torso length, shoulder width, and a neutral posture photo. Log preferred tension using a 1–5 scale (1: light, 5: snug).
- Sensor alignment: Mount helmet and belt IMUs to the body midline. Zero orientation with the user in a comfortable, neutral stance.
- Guided lift routine: Run low, medium, and full-lift sequences. Observe for oscillations and adjust damping or gain to remove overshoot.
- Dynamic checks: Have the user perform slow head nods, horizontal turns, and lean-forward/lean-back movements while monitoring pressure spread and headset centering.
- Save profile: Store gains, anchor points, and preferred tension under a user profile for quick recall.
Comfort testing should combine objective and subjective measures. Use a pressure mat or belt sensors to verify distributed load and capture neck-tension proxies (e.g., EMG if available or simple sustained-neck-force estimation). Have users report a comfort score after a 10-, 30-, and 60-minute block and note hotspots. Track these over time—incremental improvements from tuning often add up to large subjective gains.
Safety, Maintenance, and Durability for Long Sessions
Reliable performance over long sessions comes from regular inspection and modest maintenance. Pre-use checks are quick but essential: inspect harness webbing for frays, verify buckles and quick releases function, and check that actuator linkages show no play. For commercial settings, log each inspection with usage hours so wear-prone components are replaced predictively rather than reactively.
Cleaning prolongs life. Wipe padding with a damp microfiber cloth and mild soap; avoid bleach or solvents that degrade foam. Allow pads to air dry fully before reassembly. Clear lint from Velcro and store harness components away from direct sunlight—UV exposure weakens fibers over time. Frames and metal parts should be wiped with a damp cloth and dried immediately to prevent corrosion.
Wear-and-replace schedules depend on use intensity. Track components with the highest cycle count—buckles, strap webbing, actuator joints, and battery packs—and set replacement intervals based on logged hours. Replace any plastic buckle that shows cracking, straps with loss of elasticity, or foam that compresses beyond its comfort threshold. For batteries, follow manufacturer guidance: use supplied chargers, avoid overcharging, and retire cells showing abnormal heat, swelling, or rapid discharge.
Finally, safety in the power domain matters. Never bypass battery management systems or use unapproved chargers. During firmware updates, allow actuators to park in a safe state—avoid mid-update power interruptions that might leave the system in a non-recoverable lift position.
Developer Guide: Integrating GraviPro with VR Headsets
For developers, GraviPro offers telemetry and control hooks that turn lift state into part of the immersive experience. The platform exposes low-latency streams for orientation (quaternions), lift state (height, velocity), and comfort metrics (posture tilt, pressure surrogates). Access typically comes through a WebSocket API or a native plugin with bindings for common engines—Unity/C# and Unreal/C++—so you can subscribe to live data and react inside your game loop.
Runtime integration patterns are straightforward but require discipline around timing. Tie GraviPro updates to your render loop via a frame-synced queue: ingest the latest lift state during the engine’s update phase and apply smoothing before altering camera or avatar transforms. Provide hooks so the lift state can drive subtle avatar posture changes—small adjustments in neck position or shoulder roll help maintain visual coherence between body and headset motion.
Latency and smoothing deserve special attention. Perceptual seamlessness comes from prioritizing frame-synced updates and applying lightweight smoothing: exponential moving averages for height, deadbands to ignore micro-drift, and jerk-limiting to prevent sudden changes. Calibrate smoothing values per device to avoid input lag; too much filter and the system will feel sluggish, too little and jitter becomes noticeable.
Build debugging tools into your workflow: a simulator that injects synthetic lift profiles, visual overlays showing harness pressure and lift height, and exportable logs for calibration sequences. Provide sample code that demonstrates subscribing, parsing, and applying updates in your engine of choice, and include a startup calibration routine that runs during scene initialization to align IMUs and user profiles.
Finally, surface comfort metrics in your telemetry so you can evolve features based on real-world use: session fatigue scores, pressure hotspot frequency, and corrective-movement rates. These help prioritize firmware and UI tweaks that directly improve long-session comfort.
Takeaway: Start with a short, guided calibration and save a user profile. From there, iterate—small changes to anchor points, damping, and strap routing will compound into noticeably longer comfortable playtimes. If you’re a developer, tie lift telemetry into the avatar and camera systems and prioritize frame-synced smoothing to keep the illusion of weightlessness believable and stable.


Share:
Engineering a Weightless Feel: Materials, Balancing, and Straps That Distribute Pressure
Holiday gift guide: VR headset accessories that boost usability for all skill levels