

Align First: How Posture, Padding, and Weight Distribution Stop VR Neck Strain for Vision Pro, Quest, and PSVR
Wearing a VR headset for hours doesn’t have to mean a sore neck, tight shoulders, and headaches. The single most effective strategy for long-session comfort is posture first: align the head and spine so headset weight travels through the body instead of tugging the skull forward. That idea—centering mass, balancing contact points, and tuning padding—is simple in concept but often executed poorly. ⏱️ 13-min read
This guide walks VR players and accessory designers through the anatomy of VR neck strain, universal weight-distribution rules, device-specific tips (especially for Vision Pro), cross-device upgrades from Quest and PSVR, practical hardware choices, room setup, and a repeatable routine for long sessions. You’ll get testable checks, incremental adjustments, and concrete examples to tune comfort until long sessions feel sustainable rather than punishing.
The anatomy of VR neck strain and posture cues
VR headsets often feel front-heavy because the optics, displays, and facial interface sit forward of your head’s neutral pivot. The resulting forward torque is subtle but continuous: even a small forward tilt multiplies the load on the cervical extensors and deep stabilizers. Over hours, that continuous load produces fatigue at the base of the skull, stiffness across the neck and shoulders, and tension headaches.
Think of the skull like a bowling ball perched on a broomstick: when the ball shifts forward, muscles at the back and sides work harder to keep it balanced. In human anatomy the sternocleidomastoid, levator scapulae, upper trapezius and scalene group pick up the slack; the deeper cervical stabilizers hold the segmental alignment. Those muscles weren’t designed for prolonged static contraction, so they respond with tightness and ache.
Observable posture checkpoints—use these often:
- Ears stacked over shoulders: if your ears sit in front of the shoulder line, you’re in a forward-head posture.
- Neutral chin position: a gentle chin tuck (not nodding) aligns the cervical curves and reduces torque.
- Shoulders relaxed, not shrugged: raised shoulders add upper-trap load and increase neck tension.
- Eyes roughly level to the horizon: looking down increases anterior head weight and strain.
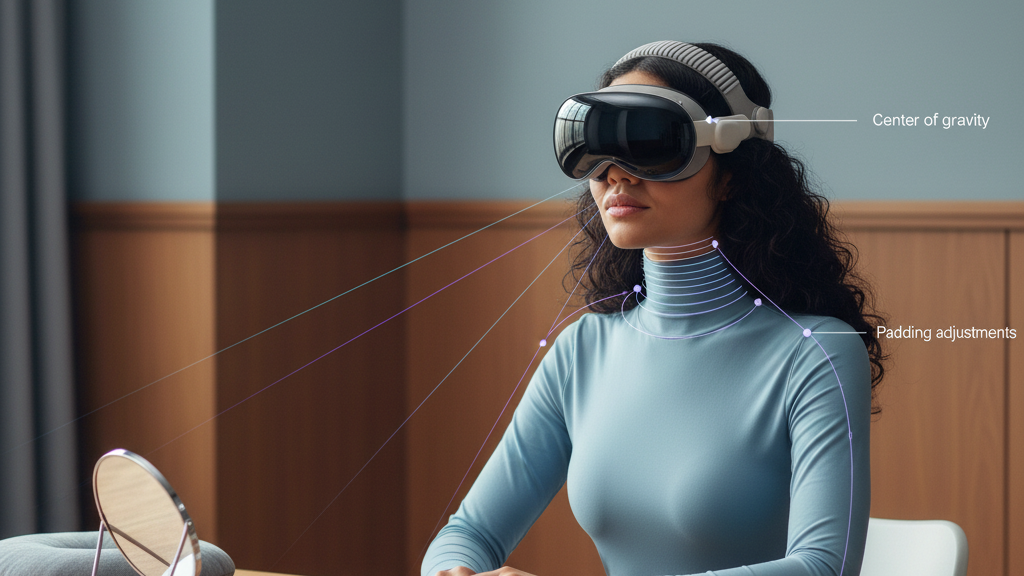
Common compensations to avoid: over-tightening crown straps (creates pressure points and tilts), letting the headset ride low on the face (forces neck flexion), and slumping the upper back (changes head center-of-mass relative to the spine). Use a mirror, phone camera, or a friend to check alignment at the start of a session and again when you progress beyond 20–30 minutes.
Core weight distribution principles for all headsets
Whether you’re using Vision Pro, a Meta Quest, or PSVR, the physics are the same: keep the headset’s center of mass close to your skull’s midline and aligned with your cervical spine. The goal is not to make the headset feel weightless but to direct that weight through the skeleton rather than through sustained muscle tension.
Key principles to follow:
- Center the mass near the crown and occiput. Slight rear bias is preferable to constant forward pull.
- Use multiple contact points to spread pressure—forehead, temples, crown, and an occipital cradle—so no single spot bears the load.
- Aim for a neutral head: chin level, spine elongated, and eyes looking straight ahead when the headset is in its natural fit position.
- Minimize forward tilt: if you find yourself persistently tucking your chin or looking downward, change the headset height, angle, or seat position.
Baseline checks you can perform in under two minutes:
- Mirror audit: Put the headset on, stand sideways to a mirror and check if your ear is over your shoulder. Adjust straps so the ear-to-shoulder alignment centers.
- Weight-balance test: With the headset on, gently let your head relax. If the headset feels like it’s pulling you forward, add rear padding or loosen the front padding until weight shifts backward.
- One-finger strap test: You should be able to slide one finger under the top or side strap without the headset wobbling. Snug, not tight, is the rule.
Real-time comfort cues: heat, pressure hotspots, and creeping chin tuck are early indicators to stop and retune. Small changes—shifting a pad by a centimeter, loosening a crown strap a notch—can shift the center of gravity enough to transform fatigue into sustainable comfort.
Vision Pro-specific weight distribution and padding strategies
The Vision Pro’s engineering—with a dense display block, sensors and a sealed facial interface—creates a predictable forward bias. Expect the tendency; don’t fight it. Instead, plan how you’ll route the device’s load toward the occiput and shoulders so the neck becomes a passive column rather than an active brace.
Practical Vision Pro steps:
- Inspect contact points: start with the forehead pad, temple cushions and crown strap. These three regions set the headset’s pitch.
- Create an occipital cradle: add a thin layer of memory foam behind the base of your skull so the rear of the headset bears more weight. A small, contoured pad behind the occiput moves the center of mass rearward without heavy counterweights.
- Dial tilt, not tightness: adjust the headset’s angle so your eyes sit at the natural midline. If the visor faces down forcing you to lift your chin, raise the headset slightly or reduce front pressure. If it tilts up and forces neck extension, reduce rear padding or loosen the top strap.
- Test in short bursts: Vision Pro’s seal and fit can change subtly after minutes of wear. Put it on for two minutes, step away, and note any face hotspots or forward pull. Re-seat as needed.
Accessories and setup tweaks that consistently help Vision Pro users:
- Thin occipital pads (8–12 mm memory foam) to shift load back without changing fit dramatically.
- Soft, sweat-wicking covers for facial seals to reduce slippage so you’re not compensating with neck tension.
- Adjustable crown strap placement: raise or lower the strap to cradle the head rather than pinch the top of the skull.
One streamer’s trick—used with Vision Pro during long broadcasts—was a shallow rear strap with a light, detachable counterweight. The counterweight was small (think coin-purse size) and positioned low on the occiput to create a balancing moment without feeling like a heavy backpack. Combined with deliberate tilt adjustments so the eyes remained near the optical midline, this reduced the need for constant chin retraction.
Quest and PSVR comfort upgrades that transfer to Vision Pro
Many of the comfort innovations from Meta Quest and PSVR translate directly to Vision Pro because the ergonomic problems are shared: pressure hotspots, slippage, and front-loaded mass. Designers and players have developed practical hardware and fit philosophies that are portable between systems.
Effective cross-device upgrades:
- Dual-strap systems: Spreading force across crown and sides reduces pinch points. A crisscross crown or a halo-style strap gives lateral stability and lowers forward torque. For Vision Pro, aim for even tension rather than a bone-crushing clamp—think supportive cradle, not a vise.
- Temples and cheek padding: Memory-foam temple pads reduce rotational torque when you look up or down. Cheek pads that conform to the zygomatic arch create a stable perch, keeping the headset from rocking and pulling.
- Light counterweights and rear cradles: On Quest and PSVR, small rear pads or soft counterweights make a big difference. The same principle applies to Vision Pro—prioritize thin, contoured pads over heavy dangling weights that can introduce new torque vectors.
Cross-device fit-testing tips you can use with any headset:
- Static balance test: Sit upright, close your eyes, and relax your head. If you feel the headset drifting forward, the center of mass needs a rearward nudge.
- Dynamic motion check: Turn your head slowly side to side and up and down. Note if the headset rocks on your face—rocking means instability and muscle engagement; add side padding or tighten the halo.
- Long-breath test: Take three deep breaths while wearing the device. If repeated deep breathing forces you to re-adjust to maintain fit, the straps are too loose or not distributing load properly.
Remember: materials matter. Gel pads can feel luxuriously soft but may compress too much and shift support; medium-density memory foam provides contour without collapse. For glasses wearers, ensure temple pads do not press frames into your face, as that causes micro-adjustments and added neck tension.
Hardware add-ons: straps, cushions, lifts, and stands that help balance weight
Hardware add-ons are the practical toolkit to rebalance and refine. Pick the right tools and use them incrementally—small changes compound into large comfort gains.
Categories to consider:
- Rear stabilizing straps and halo headbands: These anchor the headset to the occiput and sides of the skull, reducing forward pull. Look for low-profile buckles, breathable padding and good adjustability. A halo that transfers some load to the forehead and rear ridge is effective, but balance it so the facial seal remains comfortable.
- Memory foam cushions and contoured pads: Swap fragile stock foam for higher-density memory foam with moisture-wicking covers. Contoured occipital pads that match the base of the skull move mass rearward while avoiding pressure points.
- Thin counterweights and balance clips: Rather than heavy sacks, use small detachable weights that clip low on the back strap. Use them sparingly: even small weights shift the feel a lot. Test in short trials to find the minimal effective mass.
- Stands and mounts with balance features: A wall or desk stand that supports the headset at the correct rest angle prevents repeated shuffling of straps and pads when you mount the device. Some stands have built-in halo cradles or counterweight hooks that preserve fit between sessions.
Selection criteria when choosing add-ons:
- Compatibility: check attachment points and clearance for sensors and vents; some accessories interfere with cameras or thermal performance.
- Adjustability: more micro-adjust steps let you fine-tune tension and pad placement.
- Weight-shift impact: prefer solutions that shift load across the skull (rear pads, halo straps) rather than adding lots of mass that must be actively supported.
- Durability and hygiene: breathable, washable covers and replaceable foam prolong life and comfort.
Practical example: choose an occipital pad with a removable cover plus a lightweight rear strap. If your headset rocks forward, add the pad first; if it still pulls, try a tiny clip-on weight. If the headset feels uncomfortably tight after adding anything, remove the weight and redistribute padding instead.
Desk and room setup for ergonomic VR experiences
Posture isn’t only fit—your furniture, room layout and peripheral gear influence how the head wants to sit. A poorly set up desk or an off-center monitor forces repetitive head turns and tilts that multiply neck strain over hours.
Chair and desk rules:
- Chair height: set so thighs are roughly parallel to the floor, feet flat, and knees at about 90 degrees. This provides stable lower-body support that discourages slumping.
- Back support and upright posture: use a chair with a modest lumbar curve and an upright backrest. Refrain from reclining deeply while wearing the headset unless your experience is designed for it.
- Monitor and peripheral placement: if you use a secondary monitor during VR sessions (chat, stream controls, code), place it at eye level and directly in front to avoid frequent head turns.
Cable management, environmental cues and accessibility:
- Route cables to avoid drag across the headset or chair. Use clips, a retracting reel or an overhead pulley when necessary to prevent tugging that changes head position mid-session.
- Place frequently used items—controllers, water, phone—within easy reach to avoid sudden neck twists.
- Use subtle cues: a small desk fan aimed at the torso reduces fidgeting; a visible timer encourages micro-breaks. Lighting that’s soft and even reduces eye strain, which in turn lessens the tendency to crane the neck to find clarity.
Mounting and stand considerations:
-
<li>Wall-mounted or <a href="https://4532dd-6f.myshopify.com/blogs/flit-lift-weightless-vr-comfort/psvr-weight-balance-upgrades-reducing-front-heavy-strain-for-prolonged-play">desk stands</a> that hold the headset at a neutral angle preserve strap and pad positions between sessions and reduce the number of adjustments at the start of a session.</li>
- For shared setups, document your ideal strap positions with small marks on straps or use color-coded straps to return to a known baseline quickly.
Small changes add up: a raised monitor, a tidy cable path and a stable chair can reduce the frequency with which you compensate with your neck. Combine those room tweaks with headset fit work for compounding benefits.
Testing, tuning, and safe use for long sessions
Treat comfort tuning like a scientific experiment: start small, measure, change one variable at a time, and repeat. This prevents overcompensation and helps you find the minimal change that produces a meaningful improvement.
Progressive exposure protocol:
- Initial baseline: 5–10 minute session wearing the headset with your starting pads and straps. Log posture and symptoms immediately afterward.
- Incremental increases: if the baseline was comfortable (symptom score 0–2 on a 0–10 scale), increase the next session by 2–5 minutes. If symptoms rose to 3–5, keep the next session the same length and retune fit.
- Regular checks: set a timer for 15–20 minutes during medium-to-long sessions and perform a 30-second posture reset: shoulders down, chin tucked, breathe, and check ear-to-shoulder alignment.
Step-by-step fit-check and weight-tuning routine:
- Before donning: inspect pads and straps for even wear and cleanliness.
- Don the headset and settle the top strap so the device rests comfortably—snug but not tight.
- Adjust side straps for even left-right contact. Make a small facial seal adjustment to seat the visor without pushing it downward.
- Perform the mirror and dynamic motion checks described earlier. Add a rear pad if forward pull is present; remove or reduce it if the head juts backward.
- Log how the neck, traps, and eyes feel at the end of the session on a 0–10 scale and note adjustments made.
When to stop and retune: new or increasing stiffness, headache, or a persistent forward chin tuck are red flags—shorten the session, retune the fit, and repeat. If symptoms persist across multiple tuning sessions, reduce total session time and consult a medical professional if pain is significant.
Common myths addressed:
- “Heavier headsets are always worse.” Not necessarily—if the weight is properly distributed along skeletal lines, a heavier but well-balanced headset can be more comfortable than a light but front-heavy one.
- “Tighter straps equal better stability.” Over-tightening shifts load to pressure points and increases muscle activation. Aim for stability, not constriction.
Practical playbook: a repeatable routine for long VR sessions
Consistency is the secret to long-session comfort. Use a simple, repeatable cadence before, during and after every session so small alignment slips don’t become big problems.
Pre-session (2–3 minutes):
- Inspect pads and straps for cleanliness and position.
- Seat yourself: feet flat, knees ~90°, back supported.
- Don headset, balance left-right, set crown strap so the occiput cradles gently. One-finger fit test under straps.
- Quick mirror check: ears over shoulders, chin neutral, eyes level.
Initial warm-up (1–2 minutes):
- Perform gentle neck mobility: 5 slow chin tucks, 5 slow turns to each side and 5 gentle shoulder rolls to warm stabilizers.
- Start with light content or a short tutorial to confirm optical alignment (IPD, eye relief) without heavy head motion.
In-session cadence:
- Timer at 15–20 minutes: 30-second reset—chin tuck, shoulders down, two deep breaths, check ear-to-shoulder alignment.
- Micro-break every 45–60 minutes: remove headset for 2–5 minutes, stand, do gentle neck and chest stretches.
- If discomfort appears earlier, pause and run the fit-check routine. Don’t push through new or worsening pain.
Post-session recovery (3–5 minutes):
- Cooldown: gentle neck stretches—side bends, rotations and gentle extension held for 10–15 seconds each.
- Log session length, strap/pad settings and symptom ratings for neck, upper back and eyes (0–10 scale). Over time you’ll see trends and preferred settings emerge.
Example settings to try (starting points you can adapt):
-
<li><a href="https://4532dd-6f.myshopify.com/blogs/flit-lift-weightless-vr-comfort/apple-vision-pro-stand-alternatives-compact-options-for-clutter-free-desks">Vision Pro</a>: occipital pad 8–12 mm memory foam; crown strap snug but with one finger clearance; visor angle set so eyes are near midline; lightweight rear clip only if needed.</li>
- Meta Quest: halo-style strap with side supports; cheek and temple pads medium density; use a small rear cradle pad if forward pull develops.
- PSVR: balanced dual-strap layout, prioritize temple and occipital cushioning; trade excessive forehead padding for a shallow occipital cradle to reduce forward torque.
Repeat this playbook every session and adjust only one variable at a time—change in padding, strap tension, or seat height—then evaluate across several sessions. That methodical approach prevents chasing comfort and helps you converge on a stable, long-term setup.
Next step: run a week-long comfort trial. Record settings and symptom scores for each session, change one parameter mid-week, and compare. Small, deliberate changes produce the most reliable improvements.


Share:
Apple Vision Pro stand alternatives: compact options for clutter-free desks
Apple Vision Pro Neck Support: Reducing Headset Strain with Ergonomic Design