

Reducing Quest 2 Pressure: Ergonomic Facial Interfaces and Cushions That Stay Comfortable During Long Sessions
If you love sinking into VR for hours—whether for long gaming marathons, design work, or social VR—discomfort from the Quest 2 can quickly turn immersion into a distraction. The headset’s front-heavy layout and the stock foam interface often concentrate pressure on the nose bridge, cheeks, and temples, producing soreness, red marks, and neck fatigue. ⏱️ 11-min read
This practical, evidence-backed guide walks you through where pressure comes from, which straps and facial interfaces actually help, and exactly how to install and tune them for marathon comfort. Expect clear comparisons, step-by-step adjustments, glasses-friendly tips, maintenance routines, and budget-friendly upgrades so you can stay in VR longer with less pain.
Understanding Pressure Points and Weight Distribution
Comfort begins with anatomy and physics. The Quest 2 houses most of its battery and compute hardware at the front, so the headset naturally tilts forward and loads weight onto the face. The predictable hotspots are the nose bridge, upper cheeks where the facial interface seals, and sometimes the temples; the stock strap’s lack of a rigid rear anchor can also mean pressure at the back of the head where fabric digs in.
That forward pull doesn’t only irritate skin—it translates into neck tension as your muscles compensate to keep the headset level. Over time, sustained forward torque produces headaches, fatigue, and a constantly readjusting fit. Two strategies reduce this: redistribute the headset’s center of mass rearward, and refine strap positioning so load is shared across the crown, cheeks, and back of the head rather than focused narrowly on facial bones.
Practical signs you’re suffering poor distribution: visible red marks under the foam, a headset that slides when you turn quickly, sore temples at session end, or persistent neck ache. Ergonomic cushions, a more supportive strap, and a small counterweight or rear battery pocket can together transform the experience from “bearable” to “barely noticeable” over multi-hour sessions.
Comfort Straps: Standard, Elite, and Third-Party Options
The strap you choose determines how much of the Quest 2’s weight presses into your face. The stock strap is lightweight and unobtrusive for short play, but its fabric construction and minimal rear support mean it tends to concentrate pressure on the cheeks and nose during extended wear. Movement can also cause the headset to shift, increasing hotspots.
Meta’s Elite Strap addresses these issues with a semi-rigid frame and a rear adjustment dial that preserves alignment and lets you micro-tune fit without over-tightening the front. That rigid back spreads load across the occipital area and reduces face pressure; paired with a quality facial cushion it often yields the biggest comfort gain for users who play for hours. The Elite Strap also improves stability during rapid head turns and controllers-in-motion activities.
Third-party straps fill a wide niche between the stock and Elite options. Some third-party designs add thick memory-foam padding, breathable fabric, or a built-in rear battery pocket; others combine a rigid rear plate with plush padding to both stabilize and distribute weight. Advantages commonly cited include extra comfort, the option to add a lightweight comfort-strap-onto-a-quest-2-headset" rel="nofollow noopener noreferrer">battery pack, and lower cost than first-party upgrades.
Compatibility and installation caveats: confirm your chosen strap supports Quest 2 anchors and doesn’t obstruct sensors or controller tracking. Some third-party models require removing the original anchors or include adapters—follow the manufacturer instructions and avoid forcing parts. For many users the Elite Strap or a well-reviewed padded third-party strap offers the simplest, most reliable route to fewer pressure points.
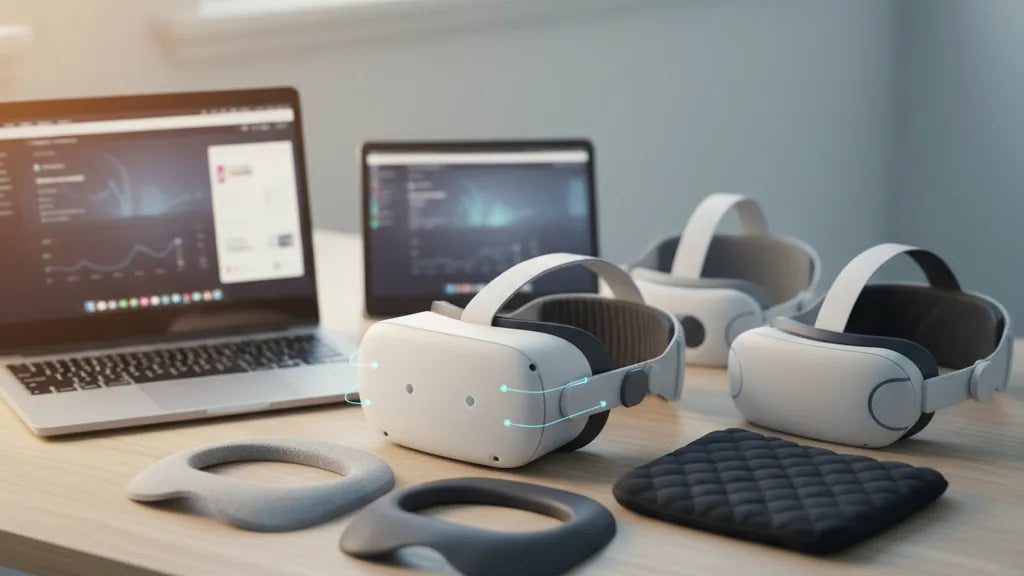
Facial Interfaces and Cushions: Choosing the Right Pad
The facial interface is where headset design meets skin. The stock foam pad is inexpensive and lightweight but porous—it absorbs sweat and oils, traps moisture, and degrades with time, leading to compression and a sagging seal that increases pressure. Upgrading this interface is the single most impactful swap for hygiene and comfort.
Material choices matter:
- Silicone: Non-porous and easy to wipe clean. Silicone interfaces resist sweat and oils and reduce irritation for many users. They won’t soak up moisture between sessions, making them a solid choice for long or shared use—though some people find silicone less “plush” initially.
- PU leather (synthetic leather): Feels softer against the skin than silicone and wipes clean easily. PU leather strikes a good balance between comfort and hygiene; it’s more breathable than silicone but still resists rapid moisture absorption.
- Memory foam / cloth covers: Offer excellent initial softness and breathability. Cloth covers can reduce hotspots and feel gentle on the cheeks, but they do absorb sweat and require machine washing or regular rotation to stay hygienic.
Beyond material, consider thickness and shape. Thicker pads can increase comfort but may push your face closer to the lenses, impacting IPD and causing fogging or lens contact—especially critical for glasses wearers. Nasal cutouts or shallow “nose relief” cushions reduce pressure on the bridge; for many users a medium-thickness PU leather pad with a defined nose cutout provides the best blend of comfort, seal, and cleanliness.
Step-by-Step: Installing and Adjusting the Quest 2 Comfort Strap
Installing and tuning a comfort strap is part mechanical, part fit-and-feel. Take your time during the first setup and test in short sessions to avoid over-tightening. Here’s a practical, safe flow that reduces pressure hotspots and improves balance.
- Power down and set the headset on a clean, stable surface. Removing the stock strap is easiest when the headset won’t shift.
- Gently remove the original side anchors by pulling straight outward from each anchor point—avoid twisting or levering to protect the plastic mounts.
- Align the new strap ends with the headset anchors. Many straps use color marks or keyed clips—slide each end until you feel or hear a soft click. Confirm the strap lies flat and untwisted.
- If your strap includes a top or crown band, position it centrally over the skull. The top strap is your fine-tune for vertical balance: slide it forward or backward to place weight distribution between the forehead and crown.
- With the headset on, tighten the rear dial (if present) until snug but not pinching. The goal is even contact: cheeks and forehead should both feel supported without sharp pressure at the nose or temples.
- Perform a soft shake test and quick head turns. Look for slipping, side-to-side movement, or areas that become painful. If the headset tilts forward, tighten the top strap slightly; if the cheeks feel crushed, loosen the rear dial a touch.
- Adjust IPD and eye relief after achieving a stable mechanical fit so optical clarity doesn't force you to change fit later.
Repeat these adjustments in short ramps—10–15 minutes—until you find the balance where the headset feels secure and no single facial point bears excessive load. Proper installation should reduce the urge to constantly readjust, protecting skin and reducing neck strain.
Weight Reduction and Balance Techniques for Long Sessions
Reducing the perception of weight is rarely about making the headset lighter; it’s about moving the center of mass so your neck and face share the load. Small changes can yield large comfort improvements without sacrificing stability or tracking performance.
Counterweights and rear battery packs are the most direct method: attaching roughly 100–150 grams to the rear of the strap typically shifts the balance so the front feels noticeably lighter. Start light—add a small pack or coin-based counterweight and take a 10–15 minute test session. If the headset sits level and the front relief is evident, you’re in the right range. Too much weight, however, can create an unpleasant pendulum feel or increase pressure on the back of the skull.
Other effective techniques:
- Lift the top strap slightly to bring support to the crown. This redirects torque from the nose bridge to the forehead and crown, reducing facial hotspots.
- Use soft crown padding or an overhead strap to spread load across a broader area. Memory-foam crown pads reduce point pressure that can otherwise form where straps press into the skull.
- Consider a rear-mounted slim battery that powers the headset while doubling as a counterweight. Choose one designed for airflow to avoid heat buildup behind your head.
Finally, balance your accessories: heavy external mods (recording mics, large face plates) can offset gains from straps. Aim for a coherent setup where weight shifts are deliberate and tested in short sessions before committing to marathon play.
Glasses-Wearer Friendly Fit: Maximizing Comfort
Wearing glasses in the Quest 2 adds an extra dimension to fit. The last thing you want is your frames to press into the foam or risk scratching lenses. Focus on clearance, anti-fog strategies, and cushion choices that prevent pinching while preserving optical alignment.
Start by setting IPD and eye relief correctly: if the headset pushes your glasses toward the display, adjust IPD or use a thinner facial interface. Many third-party facial interfaces are explicitly marketed as “glasses-friendly” and feature shallower depth and wider nose cutouts to prevent contact. These interfaces increase space between your prescription lenses and the headset optics without forcing you to sit too far from the display.
Practical tips for glasses wearers:
- Choose a shallow or thin cushion with a pronounced nose cutout. This reduces pressure on the nose bridge and keeps frames from being pushed into the face.
- Use anti-fog wipes or a small dab of dish soap on your glasses before sessions to minimize fogging—this helps maintain comfort and clear vision.
- Opt for soft, cloth-based covers if you’re particularly sensitive to frame pressure; they feel gentler against temple arms but require frequent washing.
- If possible, try prescription lens inserts made for Quest 2. These eliminate glasses entirely and often provide the best long-term comfort, although they represent a higher upfront cost.
With the right cushion and a properly tuned strap, many glasses wearers report sessions that are both longer and markedly more comfortable—no pinching, no fog, and no scratching risk.
Care, Maintenance, and Replacement Timing
Comfort is as much about upkeep as it is about hardware. A clean, intact facial interface keeps seals working well and reduces hotspots caused by compressed, worn foam. Regular maintenance extends the life of cushions and straps and preserves comfort over months of use.
Cleaning guidance by material:
- Silicone and PU leather: wipe with a damp cloth and mild, non-abrasive soap. For disinfection, use alcohol wipes that are safe for the material, but avoid prolonged soaking or harsh chemicals that can degrade finishes.
- Cloth and foam: launder removable covers per manufacturer instructions or hand-wash with mild detergent. Allow complete air-drying before reuse to prevent mold or odor.
- Memory foam: spot clean and allow to dry fully. Foam will eventually compress—rotate or replace it when you notice loss of resilience or changing fit.
Replacement schedule: foam and cloth interfaces typically need replacing every 3–6 months with heavy use. PU leather and silicone can last longer—6–12 months—if cared for properly. Replace straps when you see fraying, cracking in plastic anchors, or looseness in adjustment dials that affects fit and safety.
Storage tips: keep cushions and straps out of direct sunlight and in a cool, dry place to avoid material breakdown. If you share your headset, maintain a small cleaning kit (alcohol wipes, microfiber cloth) and consider swapping interfaces between users to preserve hygiene.
Budget-Friendly Upgrades and Compatibility Notes
You don’t need top-tier accessories to see meaningful comfort gains. Many affordable cushions and padded straps cost less than a single night of takeout and can dramatically reduce pressure points. Typical low-cost upgrades include PU leather replacement pads, silicone covers, and padded third-party straps—these often retail in the $10–$60 range, depending on features.
When choosing budget options, look for reviews that emphasize durability, easy installation, and improved seal without compromising IPD clearance. A cheap pad that’s too thick can push your face into the lenses, so prioritize products that specify compatibility with Quest 2 optics and glasses-friendly designs.
Compatibility notes: Quest 2 accessories are generally purpose-built for the headset’s anchor points and facial geometry. Confirm fit for your specific Quest 2 revision—some older or localized models may have slightly different anchor tolerances. Avoid assuming accessories for other headsets, including premium devices like the Apple Vision Pro, will fit: Vision Pro accessories are not cross-compatible with Quest 2 due to different mounting systems and optical distances.
Finally, weigh cost versus impact. A mid-range Elite Strap or a well-rated third-party strap combined with a PU leather or silicone interface is often the best value-to-comfort ratio. For glasses wearers, a glasses-friendly interface or prescription insert is worth the extra spend for extended sessions.
Takeaway: Start by fixing distribution and hygiene—pair a supportive strap with a clean, appropriate cushion, test minor counterweights, and iterate in short sessions. Small investments and careful tuning often eliminate the biggest pressure problems without breaking the bank. If you want, tell me your current setup (stock strap? glasses? how long your sessions are), and I’ll recommend a tailored list of parts and a step-by-step tuning plan you can try tonight.


Share:
The science of weight distribution and Quest two balance for comfort
Ergonomic benefits of Quest 2 comfort straps for extended play