

How to Balance Your Quest 2: Step‑by‑Step Strap Tuning and Counterweight Setup for Comfortable Long Sessions
If your Quest 2 feels front‑heavy after an hour of play—nose bridge pinching, forehead pressure, or a sore neck—you’re not alone. Small, systematic adjustments to strap fit combined with carefully added rear counterweights can dramatically reduce torque and make long VR sessions comfortable again. ⏱️ 10-min read
This guide walks you through a practical, repeatable process: assess your baseline balance, compare strap styles, tune the straps step‑by‑step, decide if you need counterweights, install them safely, and fine‑tune for real‑world use. Expect specific weight ranges, attachment methods, and troubleshooting tips you can apply in under 20 minutes.
Assess Your Baseline Balance
Start with a quick, 60‑second snapshot. Sit upright in a comfortable chair, put the Quest 2 on in a natural position, and center the visor at eye level. Loosen the top strap so the crown rests without pinching, then tighten the left and right side straps evenly until the headset sits level. Breathe normally and observe.
Look for pressure hotspots: the forehead, temples, cheekbones, or the occipital ridge at the back of your head. A forward tilt, the display dipping toward your eyes, or consistent pressure on the nose indicates front heaviness. If one side digs in more than the other or small head movements shift pressure, your balance is off left‑to‑right as well.
Use a couple of simple checks to quantify the problem:
- Lift test: With one hand under the front of the headset, try to lift it straight up. If the top strap is constantly at full tension, you likely have forward torque.
- Visual fixate: Keep your eyes on a fixed point and nod gently. If the display tilts or changes relative position, there’s imbalance.
- Fatigue timer: Note when neck fatigue starts—after 15, 30, or 60 minutes. Earlier fatigue usually means more front bias.
Record these observations. They guide whether strap tweaks will suffice or whether you’ll need counterweights to shift the center of gravity rearward.
Strap Options: Comfort vs Stability
Strap design plays a huge role in how weight feels. The default Quest 2 elastic straps are lightweight and simple, but they can stretch over time and allow the headset to drift during active play. Rigid halo or crown harnesses redistribute load across the top of the head and reduce chin or jaw pressure—but they add weight and may create top‑pressure points if padding is skimpy.
Elite‑style and third‑party straps bring finer control. Many aftermarket options include an adjustable dial, wider rear pads, or integrated battery packs. Those extra anchor points and adjusters let you tune tension across multiple axes, which often produces a more even load and better balance. The trade‑offs are cost, compatibility, and added mass that sometimes requires a counterweight in the rear to achieve neutral balance.
Choose based on priority:
- If you want minimal extra weight and simple tweaks, stick with the stock strap and pad upgrades.
- If you need long‑session comfort with stable tracking, consider a halo/Elite‑style harness with good padding and micro‑adjustments.
- If you frequently add accessories (battery packs, prescription inserts), check compatibility: some third‑party straps make attaching rear counterweights and power banks easier.
Remember: the best strap is the one that lets you distribute pressure evenly without over‑tightening. Even an expensive strap won’t help if it’s incorrectly positioned.
Adjusting the Straps: Step by Step
Proper strap setup is the foundation. Follow this sequence each time you put the headset on so you’re working from a consistent baseline.
- Prepare: Loosen all straps and sit upright. Make sure your hair won’t bunch under the crown piece.
- Top strap (crown) first: Place the crown piece centered on the top of your head. Tighten the top strap equally from both sides until there’s a light, steady resistance when you try to lift the headset upward with one hand. It should hold without pinching the scalp.
- Sides next: Adjust left and right straps so the facial interface sits level against your face. Aim for flat contact just above the ears—neither loose nor digging in. If one side presses harder, back it off and retighten the other side to keep symmetry.
- Rear cradle positioning: Slide the rear pad so it rests on the occipital bone (the bony ridge at the lower back of the skull). This sits the load off your face and gives a stable pivot point. Center it left‑to‑right.
- Lift and test: With the headset on, look straight ahead and nod up and down and shake side‑to‑side gently. The headset should remain level and not shift dramatically.
Small adjustments matter. If the top strap is too loose, the headset will press on your cheeks; too tight and it pinches the crown. Glasses wearers should ensure temple clearance by slightly loosening the side straps and using a slim facial interface if available. If you still get a forward tilt after these steps, you’re ready to consider a counterweight.
Counterweights: Do You Need Them?
Counterweights shift the headset’s center of gravity rearward, reducing forward torque that causes face pressure and neck strain. They’re not a cure‑all—you should first aim to get the best possible fit from straps and padding. Add weight only when strap adjustments and fresh padding don’t eliminate forward bias.
Indicators you’ll benefit from counterweights:
- The top strap is consistently at maximum tension to keep the display aligned.
- The nose ridge or forehead bears most of the pressure even after strap tuning.
- You experience neck fatigue within 30–60 minutes, or the display visibly tilts when you move.
Start light: subtle corrections often require just 20–50 grams placed at the rear crown. Moderate adjustments are 50–80 grams; strong counterbalances may approach 100–120 grams on heavier setups or when using extra accessories like battery packs. Typical materials include small stainless steel discs, brass weights, or compact power banks attached low on the strap. The goal isn’t to make the headset heavy overall—it’s to bring the pivot point back so the headset feels neutral.
Note: if your headset is already very light and fits well with strap changes, adding weight can introduce new pressure points. Proceed incrementally and test after each addition.
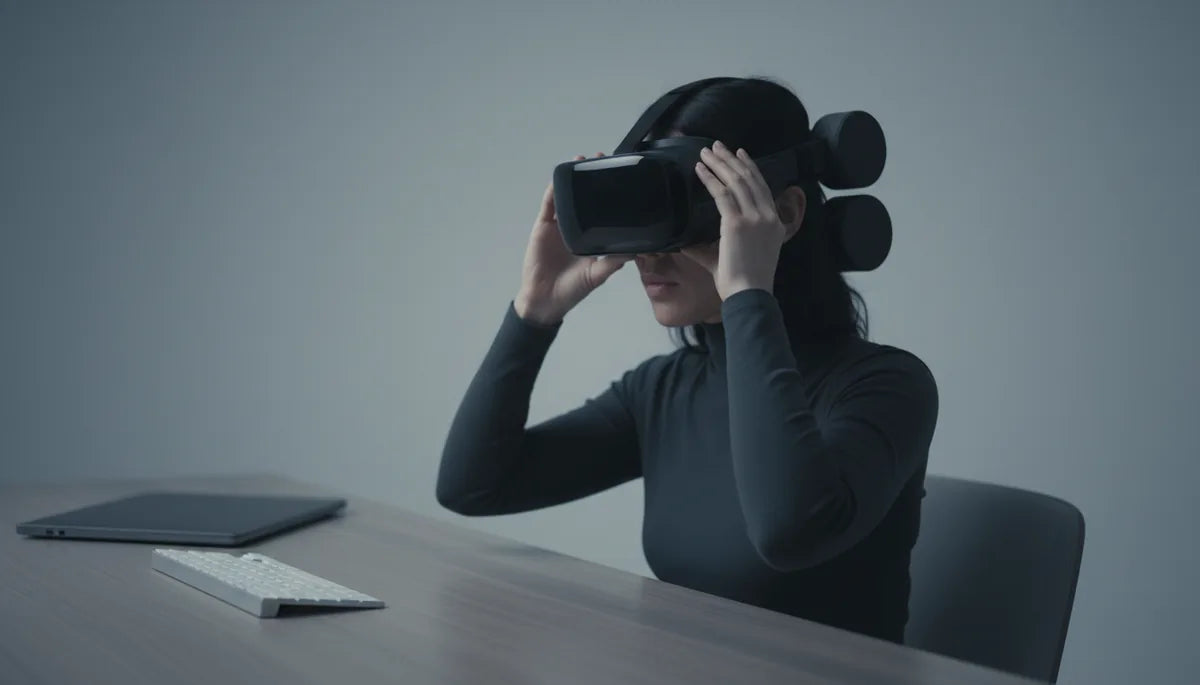
Installing Counterweights Safely
Safety and security are crucial. A loose weight can shift mid‑session, and adhesive can damage fabric or sensors if misapplied. Use these steps to attach weights cleanly and reversibly.
- Choose the right weight type: Velcro‑backed discs are ideal for testing because you can move them quickly. Adhesive weights work for semi‑permanent setups; metallic discs or small battery packs offer dual benefits (power and mass).
- Start small and incremental: Begin with ~20–40 grams. Add 5–10 gram increments until you find the sweet spot. Keep a record of amounts and placement so you can repeat the setup later.
- Placement: Mount weights at the rear crown near the occipital bone, centered left‑to‑right. If you use more than one, distribute them symmetrically to avoid roll. Avoid placing anything near face sensors or on the facial foam.
- Attachment method: For Velcro, loop the fuzzy side onto the strap fabric and press the hooked side to the weight. For adhesive pads, clean the strap surface with alcohol, press for 30 seconds, and allow curing time per manufacturer instructions. For clips or 3D‑printed mounts, verify they don’t obstruct battery ports or cable paths.
- Test movement: After attaching, perform the lift test and gentle head motions. Check for left‑right balance by tilting your head; the headset should rotate about the occipital pivot without rolling to one shoulder.
Watch for practical issues: weights that interfere with a stand, push against the back of your chair, or prevent quick removal are poorly positioned. Secure weights well—Velcro is fast but can peel; adhesive is stronger but less reversible. For power banks, choose slim models and fasten them low and centered to avoid torque changes when cables tug.
Fine‑Tuning for Different Scenarios
Balance needs change with intensity and accessories. A setup that’s comfortable while seated may wobble during room‑scale play. Test in the conditions you use most: seated sessions, fast head turns, standing combat, and while wearing glasses or headphones.
Use this checklist to refine your setup:
- Long sessions: After 45–60 minutes, note any new pressure points and whether neck fatigue appears sooner or later than before.
- Intense motion: Simulate quick pitch and yaw movements to ensure the headset doesn’t bounce or shift. If it does, add slight rearward weight or tighten side straps a notch.
- With/without glasses: Glasses can raise the interface height and change pressure distribution. If pressure lands on temples, try a slimmer facial pad, adjust side strap clearance, or move a portion of the weight lower and slightly outward to reduce temple torque.
- Added accessories: If you mount a battery pack or aftermarket audio, retest balance. Those accessories often shift the center of gravity and may require subtracting or redistributing counterweight.
Make one change at a time and give it a session before judging. For example, after adding 30 g to the rear, play for 30 minutes rather than immediately adding more. Many users report that a modest battery pack (for example, a 10,000 mAh slim power bank) acts as a perfect functional counterweight—fix it low and centered, and you’ll often solve both battery life and balance in one upgrade.
Maintenance and Safety Considerations
Keep your setup reliable by inspecting and maintaining straps and weights routinely. Over time, elastic stretches, Velcro loses grip, adhesive weakens, and padding compresses. A quick monthly check prevents surprises in the middle of play.
- Clean straps and pads: Wipe foam and fabric with a damp cloth and mild soap. For adhesive areas, remove residue and reapply only after surfaces are fully dry.
- Inspect fasteners: Replace worn Velcro or broken clips. If you use adhesive weights, recheck their bond and reapply if they start to peel.
- Avoid over‑tightening: Snug is good—squeezing is not. Excessive tension increases pressure on the temples and scalp and can accelerate fatigue.
- Weight security: If a weight shifts unexpectedly, it can create a sudden imbalance that impacts tracking. Double‑check that weights are centered and locked in place before intense play.
- Storage and transport: Remove add‑ons for transport whenever possible to prevent knocks and wear. Store weights and mounts in a small pouch so you don’t lose increments.
When in doubt about a permanent modification—drilling mounts or gluing heavy items—opt for reversible solutions. Most users get excellent results with Velcro, clips, or purpose‑built rear modules that avoid altering the headset itself.
Comfort Tips for Glasses Wearers and Accessories
Glasses change how pressure spreads across the face. Temples can feel pinched if the facial interface is narrow or if the side straps pull the headset inwards. Here’s how to keep your lenses and comfort both intact.
- Choose a slim facial interface: Aftermarket thin foams provide better temple clearance and reduce side pressure.
- Adjust side straps outward slightly: Creating a bit more lateral space prevents the temples from digging into the pads. Compensate with a touch more rear weight if needed.
- Use prescription inserts where possible: Inserts eliminate direct contact between glasses and the headset, often solving many fit problems.
- Pick compatible battery packs and audio: Low, centered battery packs double as counterweights without pushing against temples. Over‑the‑head headphones should sit lightly—check they don’t pull the headset forward.
- Pad placement: A thin, non‑slip pad under the top strap spreads load across the crown and keeps temple pressure lower.
Example setup: a Quest 2 owner who wore glasses solved temple pressure by switching to a slim foam, moving the side straps out a notch, and adding a 40 g Velcro disc low on the rear cradle. The result was reduced temple contact, a steadier headset during rapid turning, and longer comfortable playtime.
Next step: if you haven’t already, perform the baseline assessment now, then follow the strap tuning steps. If forward tilt persists, try a single 20–40 g Velcro weight at the occipital ridge and test for 30 minutes. Record what you changed and how you felt—small, repeatable tweaks are the secret to a consistently comfortable Quest 2 experience.


Share:
Counterweights for VR Headsets: How to Boost Quest 2 Balance Without Pressure
Elite strap versus third-party options: which keeps you comfortable for marathon VR play