

Compatibility Essentials: Upgrade Your Quest 2 Head Strap to Eliminate Slipping
If your Meta Quest 2 wanders, slides, or becomes a nose-heavy nuisance during longer play sessions, the problem often isn’t the headset itself—it’s the strap. The stock Quest 2 strap is lightweight and simple, but those design choices come with trade-offs: low friction, thin bands, and poor rear support that let the headset tilt and slide with movement. Upgrading to a well-designed third-party head strap can transform comfort, tracking stability, and immersion. ⏱️ 11-min read
This guide walks you from diagnosis to installation and fine-tuning. You’ll learn the anti-slip features that matter, the strap styles that actually work, step-by-step installation, adjustment techniques, and maintenance routines to keep grip strong. By the end you’ll know how to pick a strap that stays put—whether you’re sprinting in Beat Saber, dodging in Superhot, or streaming long sessions—without sacrificing comfort or accessory compatibility.
Why Your Quest 2 Strap Slips (and Why You Need an Upgrade)
The stock Quest 2 strap is built for minimal bulk and easy packing, not for athletic gameplay. Its materials are smooth and low-friction, and the thin elastic top band doesn’t compress into the crown of your head. That combination can let the headset shift forward under dynamic movement. When the front of the headset dips, you instinctively push it up, which only encourages the strap to slide down further—an unpleasant cycle that breaks immersion and can create tracking jitters and pressure hot spots.
Another root cause is weight distribution. The default strap places most of the headset's mass toward the face. Without a firm rear cradle or counterbalance, gravity will win: the headset tilts forward, making the foam press harder on the cheeks and nose. Over time, sweat and skin oils further reduce friction where fabric meets skin, increasing the chance of slip. Third-party straps address these weaknesses by adding textured contact points, stiffer frames, and rear cradles or counterweights that balance the load. In short, an anti-slip upgrade is not just comfort theater—it’s a practical fix for persistent slippage and the tracking or comfort problems that follow.
Essential Anti-Slip Features in Third-Party Head Straps
When shopping for a non-slip Quest 2 strap, look past marketing language and focus on the specific design elements that create a secure fit. Start with contact surfaces: silicone strips, micro-textured padding, and rubberized contact patches at the points where the strap meets skin or hair make a measurable difference. These materials increase friction without becoming abrasive, so they hold during quick head turns and jumps but remain comfortable over long sessions.
A rigid frame and occipital cradle form the mechanical backbone of stability. A stiff, lightweight halo resists flexing when you move, while a cradle that cups the occiput (the lower back of the skull) provides rearward counter-support. That gives the headset something to push against other than your face, reducing forward tilt and keeping lenses aligned. Balanced weight distribution—either via an integrated rear counterweight or a design that transfers load into the crown—further stops the front from sagging.
Finally, adjustable mechanisms matter: ratchets, micro-adjust dials, and secure side clips let you fine-tune tension and alignment. A good lock or quick-release ensures the setting you dial in stays put. Avoid straps that rely solely on thin elastic or Velcro for tightness; those are easier to slip loose mid-session. Combine textured contact points, a rigid rear support, and reliable adjustment hardware, and you have the three pillars of an effective anti-slip head strap.
Top Picks for Slip-Resistant Quest 2 Head Straps
Not every third-party strap is created equal. Designs that consistently perform fall into a few reliable categories: rigid halo (or “Elite-style”) straps, soft straps with high-friction contact points, and battery-integrated models that add rear weight and runtime. Each has trade-offs, but all can eliminate slipping when matched to your play style.
Rigid halo designs use a wide band that bears weight from above and a solid rear cradle that cups the skull. This structure prevents flex and distributes load away from your face—ideal for active players. Look for lightweight materials like reinforced plastics or composites and a comfortable crown pad to avoid hotspotting. Soft, high-grip straps emphasize textured silicone or medical-grade polymers along contact points; they’re often more flexible and break in quickly, making them comfortable for mixed-use players who want grip without extra bulk.
Battery-integrated straps are the quiet friction hero for long sessions. Adding a battery pack to the rear serves two purposes: more runtime and an immediate counterweight that tucks the headset firmly into place. These are excellent for streamers or endurance players who need both power and balance. When evaluating options, check for a secure mounting system for the battery, accessible ports for charging, and thoughtful cable routing so the weight doesn’t create new pressure points. Whichever category you choose, prioritize straps with strong side-arm mounts that click into the Quest 2’s mounting points—weak arm connections are the most common source of wobble and slip.
Step-by-Step Installation for a Secure, Slip-Free Fit
Even the best strap will slip if installed incorrectly. Follow these steps to attach a third-party head strap to your Quest 2 and set a baseline fit before you fine-tune adjustments.
- Prepare your workspace: set the headset on a soft cloth to protect lenses and gather any included hardware and the strap manual.
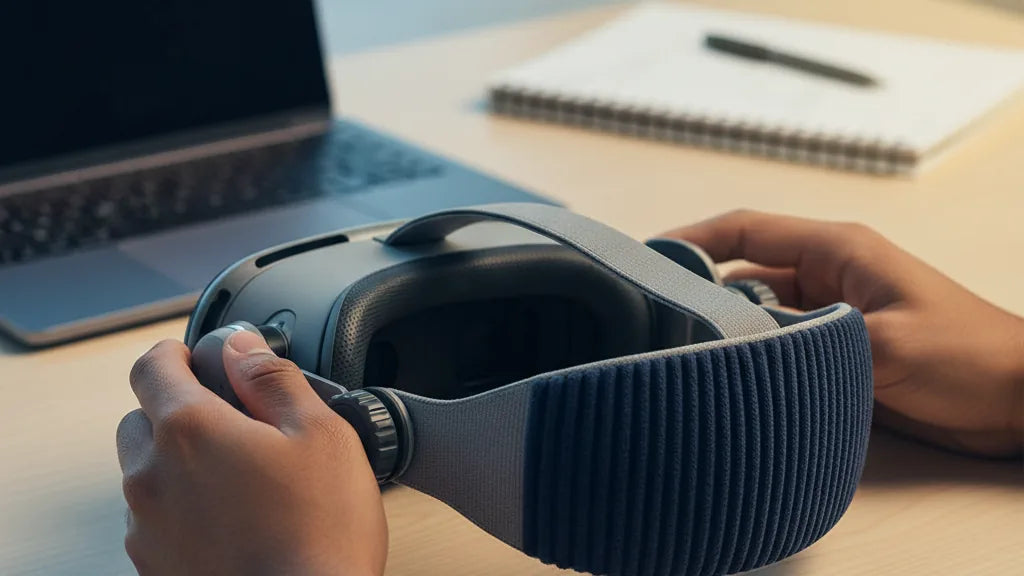
- Safely detach the original strap: gently pry the side arms from the headset mounting posts, then unthread or unclip the top band. Work slowly to avoid damaging the plastic clips or headset housing.
- Attach the new side arms: align each side arm with its mounting point and push until you hear a click or feel a secure lock. Wiggle gently to confirm a firm engagement; loose arms will let the strap rock and cause slip.
- Seat the top strap and occipital cradle loosely: place the crown pad and rear cradle near their final positions but leave adjustments loose so you can fine-tune while wearing the headset.
- Connect any battery or counterweight modules: if your strap includes an integrated battery pack, attach it per the manufacturer’s instructions and route the power cable into the headset’s port without kinking.
- Initial test fit: put the headset on and perform basic movements—look up and down, shake your head side-to-side, and do a couple of simulated in-game squats. If you hear or feel any arm popping or the rear cradle slipping under the strap, remove and re-seat the arm mounts.
These steps establish a mechanically sound base. From here, precise adjustments are what keep the headset locked in during fast-paced play.
Mastering Adjustments: Tightening for Comfort and Stability
Dialing in adjustments is the difference between a snug headset and one that becomes a headache after an hour. Tensioning is about balance: too loose and the headset slides; too tight and you get pressure points or headaches. Use this sequence to find the sweet spot.
Start with the top strap. Its job is vertical positioning and pressure redistribution. Adjust the crown pad so the headset sits at the correct lens height for your eyes—lenses should center on your pupils without forcing your face into the foam. A properly set top strap shifts a portion of the load to the crown, relieving cheek pressure and reducing forward tilt.
Next, adjust the side dials or ratchets progressively. Tighten in small increments, alternating sides to keep pressure even across the temples. Aim for a fit that doesn't move when you shake your head, but that still allows you to slip a finger between the strap and your scalp. For ratchet systems, lock in the setting that gives you secure contact without pinching.
Finally, position the occipital cradle. It should cup the lower back of your skull—not sit too low on your neck or too high on the crown. When the cradle is correctly placed it provides a steady backward counterforce that arrests forward tilt. Do a dynamic test: perform rapid head turns and a few squats. If the headset creeps forward, incrementally increase rear tension or add a lightweight counterweight. If you feel concentrated pressure, loosen slightly and redistribute using the top strap. Little adjustments compound: small, methodical tweaks produce a stable, comfortable fit far better than aggressive tightening.
Counterweights and Accessories: The Ultimate Slip Prevention
Front-heavy headsets are the primary cause of slipping. Counterweights—either built into a strap or added as accessories—shift the center of mass rearward and are one of the most effective ways to stop sliding without squeezing your head. Battery packs are the most common multifunction counterweight: they add mass at the rear while providing extended playtime.
When using a battery pack, think about placement and attachment security. A modular pack that clips low on the rear cradle concentrates weight where it’s most useful. If the pack attaches too high or off-center it can create torque and new hotspots. Aim for a compact, dense pack rather than a long, dangling module; dense weights sit closer to your skull and feel less pendulous. Typical effective counterweights range from 80–200 grams depending on your comfort and session length—start light and increase gradually.
Other useful accessories include silicone grip strips for the headset shell, extra foam shims for better facial seal, and cable clips to secure Link or charger cables so they don’t tug during play. For competitive or high-intensity users, low-profile counterweight pouches let you tune the balance precisely—add one or two coin-style weights until the front no longer tilts. The goal is a neutral balance where the headset stays in place during sudden movements, not a heavy rear drag that strains your neck. With the right counterbalance, slipping often disappears without any squeeze or fuss.
Compatibility with Glasses, Audio, and Other Gear
Upgrading your strap shouldn’t mean giving up glasses, over-ear audio, or your Link cable. But different strap designs interact differently with accessories, so check compatibility before you buy. Glasses wearers need a strap that maintains stability without compressing the frames into the face; a properly distributed strap reduces lens contact and helps avoid smearing or pressure on temple arms. Look for straps with a shallow, comfortable face interface or the option to use a glasses spacer that increases lens distance safely.
For audio, over-ear headphones can be used with most rigid or halo-style straps, but the cup design and headband path matter. Straps that place pressure on the temple can push headphone cups inward; choose a strap with a lower-profile crown pad or one specifically advertised as headphone-compatible. Alternatively, many players use on-ear or in-ear options to avoid interference entirely. Ensure the strap doesn’t block headphone rails or connectors and that there’s room to route audio cables cleanly if you use wired headphones.
When connecting a Link cable or external power, plan the routing so cords don’t pull on the headset. Use built-in cable guides or small clips to anchor the cable along the side arm and down the strap into the rear cradle. This prevents accidental tugs that could loosen the strap mid-game. Also check that any battery pack or rear accessory doesn’t block USB ports or IR sensors on the headset. When in doubt, consult the strap’s compatibility notes and user reviews from glasses- or headphone-wearing players—real-world feedback often highlights small but important fit details.
Maintaining Grip: Cleaning and Care for Your Strap
Grip performance degrades over time if sweat, oils, and dirt accumulate on silicone pads and textured fabrics. Regular cleaning restores friction and prolongs the lifespan of pads and adjustment mechanisms. For silicone grips and rubberized patches, rinse with lukewarm water and a mild soap, gently scrub with a soft-bristle brush, rinse thoroughly, and pat dry with a lint-free cloth. Allow components to air-dry completely before reattaching to avoid mildew or adhesive failure.
For fabric padding, follow manufacturer guidance—most can be spot-cleaned with diluted soap; avoid soaking unless the pad is removable and washable. Never use bleach, strong solvents, or alcohol-based cleaners on silicone or rubber parts—those chemicals break down the material and reduce friction. After sweaty sessions, wipe down contact surfaces with a microfiber cloth and allow the strap to dry in a ventilated area.
Maintenance also includes mechanical checks. Inspect side arms, hinge pins, screws, and dials every few weeks, or more frequently if you log heavy hours. Tighten loose fasteners to the manufacturer’s recommended torque, and replace worn contact pads or thin foam inserts that have flattened. Many manufacturers sell replacement pads and clips; swapping these out restores both comfort and anti-slip performance. A little maintenance goes a long way: clean regularly, check hardware periodically, and replace worn parts to keep your strap feeling new and slip-free.
Next step: Use the quick checklist below to evaluate prospective straps, then test-fit your top two choices with the headset off and on. Small differences in cradle shape, crown pad thickness, and counterweight placement will determine which strap keeps your Quest 2 locked in during your play style.
- Rigid rear cradle or occipital support present?
- Textured silicone or rubberized contact points where the strap meets skin?
- Secure side-arm mounts with audible click and no wiggle?
- Reliable adjustment mechanism (dial, ratchet, or micro-adjust slider)?
- Option for counterweight or integrated battery if you do long sessions?
- Positive user reports for long-term durability and sweat resistance?


Compartir:
Choosing Third-Party Straps to Boost Quest 2 Comfort and Stability
All Day Comfort: Long Session Strap Options for Quest Two