

Which Quest 2 Strap Stays Comfy All Day? A Practical Guide to Long VR Sessions
If you’re logging multi-hour raids, creative sessions, or marathon multiplayer matches on the Quest 2 (comfort-strap" rel="nofollow noopener noreferrer">Quest Two), your headset strap matters as much as the game. Comfort isn’t a single moment feeling—it's how the strap manages pressure, heat, and movement over time. This guide walks through what makes a strap endure long sessions, compares official and third‑party options, and gives hands‑on adjustments and care tips that actually make your next headset block feel lighter. ⏱️ 12-min read
Read on for clear, actionable advice: how weight distribution, padding density, and micro‑adjustments change the game; which official and aftermarket straps perform best in endurance testing; and how glasses wearers can avoid sore temples and fogged lenses. By the end you’ll know how to pick, fit, and maintain a strap that stays comfortable hour after hour.
Understanding what makes Quest 2 straps comfortable for long sessions
Comfort in long VR sessions comes down to three physical realities: where the weight sits, how the padding behaves after hours, and whether the strap keeps its geometry as you move. A strap that’s pleasant at five minutes can become a pain by hour two if it concentrates load on a forehead strip or lets the rear slip away.
Pressure distribution is the top priority. The best straps spread weight across the crown, sides, and rear so no single zone pins you down. Wide crown contact reduces top‑front pressure, and consistent rear contact stabilizes the headset when you lean, crouch, or track quickly. Think of the crown and occipital area as partners: the crown pushes rear‑ward, the occipital pad resists forward rotation—balanced contact prevents the chin‑lift posture that causes neck fatigue.
Padding density, material quality, and surface texture determine how that contact feels over time. Dense foam with firm edges retains shape and avoids the “pancake” flattening that creates hotspots; a softer perimeter prevents edge digging. Breathable, low‑friction covers reduce sweat and skin chafe during extended play. Strap geometry—contoured frames and curved edges—guides pressure away from temples and ears, reducing numbness or soreness.
Lastly, adjustability and lock‑in reliability are crucial. Micro‑adjustment dials and solid clips that don’t drift stop you from repeatedly retuning mid‑session. When testing for endurance, dial in fit on the top strap first to set headset height, then fine‑tune rear tension to shift load without creating new pressure points.
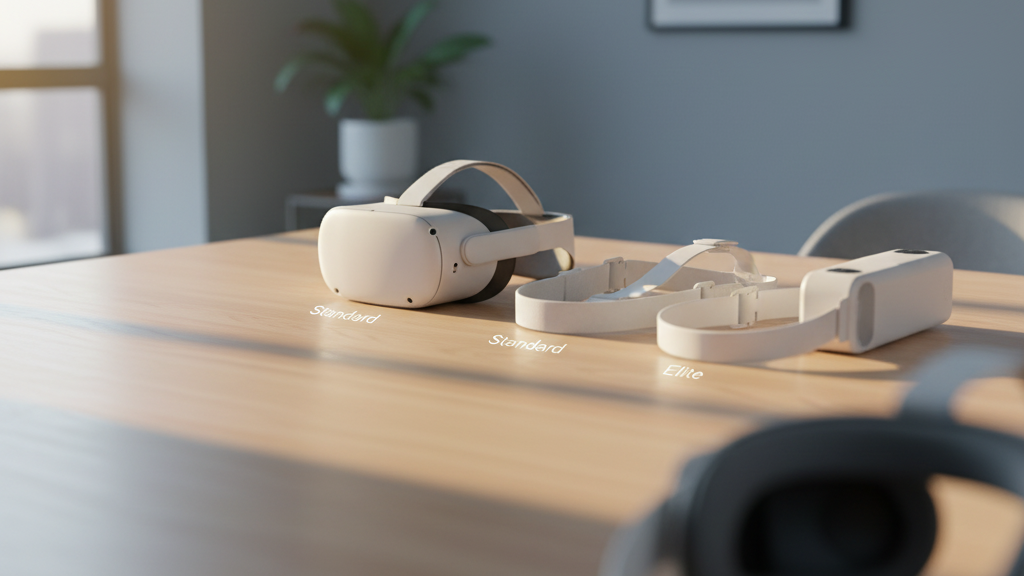
Official Quest 2 strap options: Standard, Elite, and Elite with Battery
Oculus/Meta’s official strap options for the Quest 2 cover distinct comfort philosophies: keep it light, add structure, or add power and balance. Each choice affects long‑session comfort in predictable ways.
The Standard strap is the baseline: minimal padding and a simple rear support. Its advantage is low weight and minimal bulk, which helps keep facial pressure lower in some players. In endurance use it can become problematic because sparse padding concentrates pressure along cheeks and temples. If you prefer a minimalist feel and mainly play short sessions, the standard strap can be fine; for multi‑hour blocks it often needs comfort-strap-alternatives-official-premium-padding-and-third-party-options" rel="nofollow noopener noreferrer">padding upgrades or a breathable cover to stay comfortable.
The Elite Strap adds a wheel‑based dial and broader padding coverage. That dial gives precise tension control so you can distribute weight toward the crown and rear more reliably. In practice, the Elite reduces headset wobble during active play and provides steadier cheek and temple contact for movement‑heavy sessions. You’ll still need to check padding breathability because the extra foam can trap heat over time.
The Elite Strap with Battery keeps the Elite’s geometry but adds a rear battery that shifts mass toward the back of the head. This reduces front‑face pressure and the chin‑down moment, which many users find makes long sessions feel less fatiguing. The trade‑off is added overall weight: some testers reported neck strain after several hours unless they micro‑adjusted strap tightness or added additional occipital support. Battery life gains are real for tethered play or heavy apps, but plan for small breaks or a lighter counterweight if you push beyond four hours.
Installation is tool‑free: align the lugs, snap, and confirm the click. For endurance comfort, prefer the Elite for adjustability and the Elite with Battery if front pressure is your primary complaint—just watch for neck fatigue and manage cable routing carefully.
Third-party comfort straps: evaluating options and fit considerations
Third‑party straps often promise better materials and smarter geometry than stock options, and several brands consistently stand out in endurance use. Kiwi Design and AMVR, for example, target long sessions with memory‑foam pads and occipital support, while BoboVR and others mix padding densities and custom hardware to tune fit across head shapes.
Memory foam excels at eliminating pressure hotspots because it molds to the crown and cheeks, spreading load across a larger surface. Kiwi Design straps commonly use a memory‑foam crown and a rear stabilizer that reduces strap creep; that combination helps glasses wearers and sweaty players keep a stable fit during long raids. AMVR’s focus on face pad comfort and lower‑back occipital support prevents tilt and glare by anchoring the headset against the head’s natural curve.
When comparing third‑party options, apply a simple checklist: material quality (dense foam vs. thin padding), breathability (moisture‑wicking covers), adjustability granularity (dial locks or micro‑steps), and connector compatibility with the Quest 2 lugs. Verify whether replacements or covers are washable; sweat management matters more after the second hour. Beware of warranty implications—swapping straps rarely voids the headset warranty, but using non‑standard battery packs or cutting mounts can.
Fit compatibility is especially important for glasses wearers. Look for straps that either increase nose bridge clearance or have face‑pad contours that sit away from the temples. Some third‑party straps include removable face‑pads or shims to tune clearance—these small features can be the difference between pinching and barely noticing your frames after two hours.
Install, adjustability, and quick-fit tips for a comfortable Quest 2
A good strap only works if you install and tune it properly. Here’s a concise, repeatable routine to get a balanced, comfortable fit fast so you can focus on gameplay instead of readjusting every 10–15 minutes.
- Prep: Power down the Quest 2 and place it on a soft surface to avoid scratching lenses. Remove any accessories in the way and have the new strap ready.
- Swap: Detach the stock strap by unlatching the lugs. Align the new strap’s mounting points with the headset lugs, press until you hear a click, and confirm both sides are secure and even.
- Initial Fit Order:
- Put the headset on and tighten the top strap first—this sets the vertical height so the lenses align with your eyes.
- Adjust the rear dial or strap so the headset feels snug but not pinching across the forehead.
- Micro‑Adjusting: Make small 1–2 mm adjustments. If you feel a hotspot, tweak one zone slightly and retest for a couple of minutes. Repeat until pressure distributes evenly across forehead, cheeks, and rear crown.
- Glasses Check: With your frames on, verify a gap between lenses and the headset; raise the top strap slightly to shift pressure from nose to crown if needed.
- Secure Cables: Route cables along the back and clip them away from cheek and temple areas. Avoid slack that can tug and destabilize the fit.
Quick‑fit tip: use a small mirror or smartphone camera to confirm symmetry across cheek pads and crown contact. If you play with frequent quick motions, tighten the dial a touch beyond your comfort threshold and then back off 5%—this helps prevent mid‑session drift without creating a sore spot.
Weight, balance, and strategies to ease headset load
Perceived weight is more about torque than mass—the further weight sits from your head’s pivot, the more strain your neck feels. Front‑heavy setups pull your neck into extension; rear support or counterweights reduce that chin‑lift torque and make long sessions surprisingly easier.
One practical strategy is to shift mass rearwards. The Elite Strap with Battery does this by design, moving battery weight to the occipital pad and reducing facial pressure. If you prefer a lighter strap, a small rear counterweight—like a slim battery or weighted pouch attached to the back—can recreate that balance without adding bulk to the front. The goal is to achieve a neutral head posture where the headset rests without forcing your chin up or down.
Cable management is another underappreciated factor. A dangling USB‑C or poorly routed power lead can tug during quick turns, creating uneven pressure and shifting the headset. Clip cables along the rear strap and keep slack minimized. If possible, use a wireless power module compatible with your strap or a shorter cable to reduce pull on the jawline.
Balance is about distributed contact, not tightness. A common mistake is overtightening a strap to remove wobble—this increases pinpoint pressure and accelerates fatigue. Instead, spread contact across the forehead, temples, and rear head, and rotate padding placement if one area begins to flatten. During endurance sessions, schedule short micro‑breaks every 45–60 minutes to recheck tension and let padding rebound.
Glasses‑wearer guidance: fit, padding, and alignment tips
If you wear glasses, long VR sessions require special attention to clearance, temple pressure, and lens fog. Poor setup can lead to sore temple points, pushed frames, and blurred vision—none of which you want mid‑boss fight.
Nose bridge clearance is the first priority. Ensure the headset rests on your cheeks rather than squeezing your glasses into your face. If frames press inward, tilt the headset slightly downward or raise the top strap to transfer load to the crown. Many face pads and third‑party cushions include thicker bridge sections that create additional clearance—these are especially helpful for high‑bridged glasses.
For the nose area, choose padding thoughtfully. Foam pads add cushion and can create extra bridge space, but they compress over long sessions and may need replacement. Silicone nose pads are firmer, easier to clean, and better for lower bridges. If you notice frame arms being pinched, position the strap so it sits above or behind the temple curve rather than directly on the arms.
Temple alignment can be tuned with small shims or offset padding. Some straps let you move side pads slightly away from the temple to avoid pressure; others accept thin foam inserts that nudge the headset outward an extra few millimeters. If you frequently experience fogging, prioritize breathable, moisture‑wicking covers and consider anti‑fog wipes for your glasses.
Finally, double‑check fit after 30–60 minutes. Glasses shift subtly with head movements and sweat; a quick retune of top height and rear tension often restores comfort without loosening the overall fit.
Maintenance and care to preserve comfort over time
Comfort degrades when padding compresses, covers harden, or straps crease. Regular care keeps a strap feeling new and prevents hotspots from returning mid‑session.
- Regular cleaning: Wipe pads and covers with mild soap and warm water—avoid bleach, alcohol, or harsh solvents that can degrade foam and fabric. Use a soft cloth, rinse lightly, and air dry completely before reuse.
- Air drying: Dry in the shade away from direct heat. Lay the strap flat with pads exposed to encourage even drying and prevent mildew. Never store damp; trapped moisture accelerates odor and material breakdown.
- Padding checks: Inspect foam for compression, flattening, or hardening. If cushions don’t rebound or gaps form between the strap and your head, replace them. Many third‑party straps provide replacement pads or washable covers—stock up on spares if you do long sessions regularly.
- Durability checks: Examine stitching, buckles, and connector lugs for wear. Replace cracked clips or frayed straps before they fail mid‑session.
- Storage: Store the headset and strap in a cool, dry place away from crushing loads. Avoid stacking heavy items on the strap; loosely coil or hang straps to preserve shape.
Small habits—like wiping sweat after each session and swapping to clean covers weekly—add up. When foam flattens, you’ll feel it within an hour of play. Replace early rather than waiting for pain to appear.
Compatibility and cross‑ecosystem notes: Vision Pro and accessories
It’s tempting to assume a comfortable Quest 2 strap will work elsewhere, but cross‑compatibility is limited. Apple’s Vision Pro uses a different mounting and crown system, so Quest 2 straps are not officially supported and aren’t reliably plug‑and‑play. Forcing a Quest 2 strap onto a Vision Pro can create uneven pressure, wobble, and long‑session discomfort.
Some third‑party adapters claim cross‑compatibility, but results vary by hardware generation. If you plan to use third‑party straps with other headsets, verify the exact model match and check community feedback for any fit quirks. Pay special attention to how padding sits relative to optics—padding that presses against lenses can cause glare, fogging, or eye strain during long sessions.
Accessories such as wireless modules, battery packs, and audio attachments also affect comfort. Adding a rear battery or wireless pack can improve balance—but only if the strap’s geometry supports rear loading. Similarly, add‑on audio modules should route cables along the back of the strap to avoid tugging on the jaw. When integrating modules, re‑run your fit routine: top strap height, rear tension, and cheek contact all require fine‑tuning after attachment.
In short: match accessories and straps to the headset they were designed for. When mixing ecosystems, prioritize balance and secure mounting; test for heat and pressure in shorter sessions before committing to marathon play.
Practical takeaway: choose, tune, and maintain for marathon comfort
For long Quest 2 sessions, prioritize straps that distribute weight across crown and rear, offer micro‑adjustments that lock reliably, and use breathable, replaceable padding. If you want a simple rule of thumb: choose the Elite for better adjustability, the Elite with Battery if front pressure is your main issue and you accept the extra mass, and third‑party memory‑foam or occipital‑support straps if you need tailored fit for glasses or sweat management. Always install carefully, micro‑adjust in tiny increments, manage cables, and maintain pads with routine cleaning and replacement.
Next step: pick the strap that matches your play style (lightweight for short bursts, rear‑weighted for long sessions), follow the install checklist, and schedule micro‑breaks. Comfort compounds—small improvements in balance, padding, and breathability let you focus on the game instead of the headset.


Compartir:
Quest 2 comfort strap alternatives: official, premium padding, and third-party options
Quest 2 Comfort Strap Installation Guide: A Step-by-Step Fit Tutorial