

Match Your Quest 2 Comfort Strap to Your Head: A Practical Guide for Long-Session Fit and Stability
Choosing the right comfort strap for your Meta Quest 2 is about more than padding or price—it's about matching strap design to your head shape, play style, and accessories so you can stay comfortable and focused during long VR sessions. This guide walks through how head shape changes pressure patterns, compares strap types, gives step‑by‑step fit tuning, covers glasses and accessory compatibility, and finishes with a quick test plan and specific recommendations. ⏱️ 11-min read
Read this if you want to stop fiddling with straps mid‑session and start enjoying balanced, stable VR. The tactics below are practical and field‑tested: small adjustments and the right strap can remove neck strain, reduce facial hotspots, and keep your headset steady through intense movement or extended sitting sessions.
Identify your head shape and balance needs
Start by recognizing how your head shape affects where a Quest 2 comfort strap presses and how it balances weight. Most people fall into three broad categories: round, oval, and narrow—and each tends to create different pressure patterns.
Round heads distribute contact broadly across the forehead and temples. With this shape you’ll commonly see even red marks across the brow unless the strap provides wide forehead padding and a stable crown support. Oval heads often wear the headset a touch higher; they need lateral support and a rear pad that sits above the occipital bone to keep the headset centered. Narrow heads concentrate pressure at the temples and the crown—slim straps with soft edges and a low‑profile pad layout avoid digging in.
Do a quick, no‑tools check at home: put on your Quest 2 with whatever strap you have, tighten to your usual level, then press a finger gently on the top of the front housing while nodding your head. If the front drops easily you need more top strap lift or rear counterweight. Next, shake your head briskly side‑to‑side; any persistent sliding or twisting points to insufficient lateral adjustment or slippery pad material.
Finally, note neck posture. A forward‑tipping headset indicates front‑heavy balance—consider a rear‑weighted strap or counterbalance pack. If you get headaches or red marks after short sessions, that’s your cue to redistribute pressure with different padding or a strap with crown support.
Compare strap types: stock vs Elite vs third‑party
Not all Quest 2 comfort straps are created equal. Choosing between the stock fabric strap, Meta’s Elite Strap, and the many third‑party options comes down to how they manage weight distribution, stability, and long‑term durability.
The stock Quest 2 strap is lightweight and simple—great for quick sessions and portability. Its downside: minimal padding and limited structural support, which can leave pressure concentrated on the forehead or temples and allow more slippage during motion. Price: bundled with the headset, but replacement stock straps are cheap.
The Meta Elite Strap introduces a rigid frame with a robust rear cradle and often an adjustment dial. It shifts weight toward the back of the head and offers clear improvements in stability and balance. The Elite works well for multi‑hour sessions and heavier accessory setups; it’s typically mid‑range in price and officially compatible with the Quest 2’s mounting points.
Third‑party options are diverse: halo and suspension bands elevate the faceplate to relieve facial pressure; rigid cradle designs prioritize rear support and temple anchoring; low‑profile padded straps aim at glasses wearers. Brands like Kiwi Design, BoboVR, and other aftermarket makers tailor solutions for particular needs. Materials vary from breathable fabrics and memory foam to hard plastics and metal frames—expect prices from budget cloth straps ($15–$35), to padded/upgraded variants ($40–$90), and premium harness or halo systems ($100–$150+).
When comparing, weigh real benefits: does a strap stabilize during active movement? Does it shift weight rearward or onto the crown? Does it have replaceable pads and a warranty? That value assessment prevents overspending on features you won’t use.
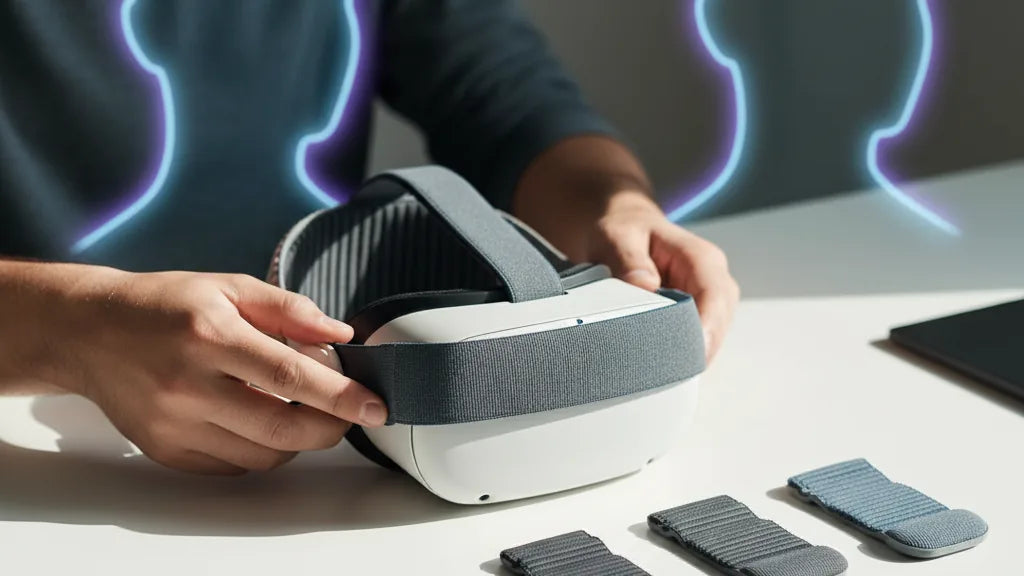
Adjust fit: top, side, rear and padding
Getting a comfortable, stable fit is about sequence and small, deliberate changes. Tackle adjustments in a consistent order so each change builds on the previous one. This stepwise approach ensures the headset sits where you want it without trial‑and‑error fiddling.
- Top (crown) strap: start loose, then tighten just enough to stop the headset from drooping. The crown strap controls vertical position—raise the front slightly off your cheeks to reduce nose and forehead pressure.
- Side straps: tighten evenly on both sides until facial pressure is balanced. You want firm contact without gaps or pinching. If one side digs in, loosen both and re‑tighten incrementally.
- Rear cradle: position the rear pad low so it cups the occipital bone at the base of your skull. A correctly placed cradle moves weight from your face to the back of the head and reduces neck strain.
- Micro‑padding: add, remove, or reposition foam stacks to erase pressure points. Use thinner layers for narrow heads and broader pads for round heads. Memory foam works well but choose breathable covers for long sessions.
Practical tuning notes: if your cheekbones press hard against the mask, slightly raise crown height or insert a thin foam spacer between the face gasket and the shell. If the temples get hot or squeezed, switch to thinner temple pads or a strap with softer edges. For straps with dials or ratchets, make tiny clicks and test by walking/jogging in place; large jumps in tightness usually create new hotspots.
Glasses wearers and accessory compatibility
Wearing glasses adds a new layer of fit constraints: temple clearance, lens contact avoidance, and preventing scratches. Address these by combining strap selection with small hardware tweaks.
First, use the official Quest 2 glasses spacer or a compatible spacer that lifts the faceplate slightly away from your lenses—this prevents contact and reduces the pinching effect. Some third‑party straps and facial interfaces provide modular foam stacks or adjustable facial gaps that achieve the same result without the official spacer.
Temple spacing matters: choose straps with flatter internal profiles or softer temple pads so frames don’t dig into your temples. If your frames are thick, look for straps that allow an extra millimeter or two of clearance through adjustable height or removable foam segments.
Check audio and cable routing: many users add clip‑on headphones, attach battery packs, or run charging/data cables. Prefer straps with integrated cable channels or modular sections so your accessories don’t tug on the headset or press your glasses into your face. A rear‑mounted battery pack can improve balance but must sit flush with the strap’s cradle; otherwise it’ll introduce new pressure points.
Finally, beware of lens mods and inserts: many aftermarket lenses change how the headset rests on your nose and cheeks. Ensure any adapter or insert plays well with your chosen strap and that padding avoids scraping or compressing those mods. When in doubt, test the full setup—glasses, lenses, headphones, and any packs—before a long session.
Long‑session comfort: weight distribution and stability
Comfort for marathon VR play is largely an engineering problem: move mass away from soft facial areas and toward sturdier parts of the skull. The more mass you can support on the crown or rear of the head, the less your face and neck will complain after an hour or three.
Rear‑weighting strategies work by counterbalancing the forward mass of the Quest 2. A rear counterbalance pack or a strap designed to move weight rearward reduces forward torque and neck extension. Halo and crown‑supported designs lift the headset slightly, distributing load around the top of the skull and away from the nose bridge, which is particularly helpful for glasses wearers and people with high cheekbones.
Stability is equally critical: a strap that shifts as you move forces constant microadjustments and increases perceived weight. Look for non‑slip features—silicone backing, textured webbing, locking sliders, robust buckles, or magnetic clasps. After adjustments, test stability by performing typical in‑game motions (quick turns, squats, nods) and note any shifting. If the headset slides during a run, re‑tune side straps and rear cradle position; consider swapping to a more rigid frame if instability persists.
Breathability should not be an afterthought. Thick foam feels luxurious but can trap heat and moisture. Aim for open‑cell or perforated memory foam with moisture‑wicking covers in areas that contact skin. Overheating can increase discomfort even when pressure is optimized, so trade a bit of plushness for airflow on long sessions.
Install, maintain, and clean for longevity
Installation doesn’t have to be intimidating. A correct, repeatable process not only improves comfort but extends the strap’s life. Below is a simple beginner‑friendly install and maintenance routine for most Quest 2 straps.
- Remove old strap (if present): depress clips at the headset hinges and slide fabric/frames out gently. Keep small screws or adapters in a labeled container.
- Align new strap: insert the strap anchors into the headset’s hinge slots and snap or screw them into place per the manufacturer’s instructions. Confirm both sides are even before tightening.
- Initial tuning: follow the adjustment sequence—top, sides, rear—until the headset sits comfortably. Do a quick motion test and re‑tighten by small increments.
- Pad placement: attach any removable foam pads to expected pressure zones (forehead, temples, rear). Start with thinner pads and add layers if needed.
Maintenance routine:
- Weekly: wipe foam covers and fabric with a microfiber cloth and a mild, damp solution (water + a drop of dish soap). Air dry fully before use.
- Monthly: inspect straps for fraying, check buckles and dials for smooth movement, and clean silicone or textured backing with isopropyl wipes to restore grip.
- Replace pads annually or sooner if foam becomes compressed or loses shape. Many third‑party pads are inexpensive and swap easily.
For hygiene, consider a removable cover or replaceable facial interface if multiple people use the headset. Avoid machine washing framed straps; instead hand wash removable fabric elements and let them air dry to prevent glue breakdown and foam deformation.
Budget, materials, and warranty checklist
Deciding what to spend can be simpler if you use a checklist that balances materials, expected use, and after‑sales support. Rather than buying the most expensive strap by default, match spend to how often and how aggressively you use the Quest 2.
Budget tiers and what to expect:
- Economy ($15–$35): basic fabric or slightly padded straps. Good for casual, occasional users. Limited durability and fewer adjustment features.
- Mid‑range ($40–$90): padded straps, Elite‑style third‑party options, better materials (memory foam, breathable covers), and more robust adjusters. Best value for regular users.
- Premium ($100–$150+): halo harnesses, full rigid cradles, and straps with integrated battery packs or advanced materials. Ideal for daily heavy use, competitive play, or professional applications.
Material checklist:
- Contact areas: breathable fabric, open‑cell or perforated memory foam, moisture‑wicking covers.
- Frame: durable plastic or metal for longevity and stiffness; check for flex that could lead to slippage.
- Fastenings: robust dials, locking sliders, or magnetic clasps that don’t loosen during movement.
Warranty and returns: prefer sellers offering at least 30 days for trial and 6–12 months warranty on structural parts. That protection matters because the first few weeks reveal fit issues that aren’t obvious from photos. If you wear the headset daily, invest in replaceable pads and a strap with good replacement part availability.
Head‑shape‑guided recommendations and 5‑minute comfort test plan
Here are concise, head‑shape mappings with strap recommendations and a quick test you can run in 5 minutes to confirm a good fit. Use these pairings to narrow choices before you buy, and the test to validate them when they arrive.
Recommendations by head shape:
- Round head — Casual use: stock or lightly padded third‑party strap with broad forehead padding. Mid‑range padded strap if you play longer sessions.
- Oval head — Long sessions: Elite Strap or halo harness that distributes load laterally and rearward for extended comfort.
- Narrow head — Active play: rigid cradle with tight lateral straps to minimize wobble; low‑profile padding to prevent temple hotspots.
- Glasses user — Any head shape: strap with adjustable facial gap or add the official glasses spacer; prioritize shallow or modular facial pads.
Five‑minute comfort test protocol:
- Fit the headset per the adjustment sequence (top, sides, rear). Put on your full accessory setup (glasses, headphones, battery pack).
- Hold a neutral posture and note any immediate hotspots (forehead, temples, nose). Adjust pads accordingly.
- Perform motion checks: turn your head quickly left/right, look up/down, squat and stand—observe any sliding or shifting.
- Simulate an in‑game minute: play or watch a 60‑second clip; note pressure and breathability. If you feel concentrated pressure or begin to lean forward, retune or consider a rear counterbalance.
- Swap criteria: if red marks or pain appear within 10 minutes, switch to a different strap or add padding. If instability continues after retuning, upgrade to a rigid or halo design.
Swap thresholds to act on: persistent neck fatigue (within 30 minutes) → try rear counterbalance; mid‑session sliding → switch to non‑slip backing or rigid frame; glasses rubbing or lens contact → add spacer or change facial interface.
Next step: pick one strap to trial based on your head shape and play style, run the 5‑minute test, and iterate. Small changes—an extra millimeter of crown height or a thinner forehead pad—often transform a "so‑so" fit into a comfortable, immersive session.


Compartir:
Understanding Quest 2 weight versus other VR headsets and the comfort impact
Optimizing Padding and Face Interface to Reduce Pressure Points During Play