

How to Choose Between the Quest 2 Comfort Strap and Elite Strap: A Practical Guide to Fit, Balance, and Long-Session Comfort
If you own an Oculus (Meta) Quest 2, the head strap you pick will shape nearly every VR session—from quick social hangouts to sweaty rhythm workouts. Choosing the right strap comes down less to brand names and more to three practical factors: how the headset's weight is distributed, how easy it is to fine-tune the fit, and whether it keeps you comfortable for the length of time you play. ⏱️ 10-min read
This guide walks through the structural differences between the stock Comfort Strap and the Elite Strap, matches each to common playstyles, addresses glasses and facial comfort, gives beginner-friendly installation and adjustment steps, and covers maintenance, accessory compatibility, and a concise decision checklist so you can upgrade confidently.
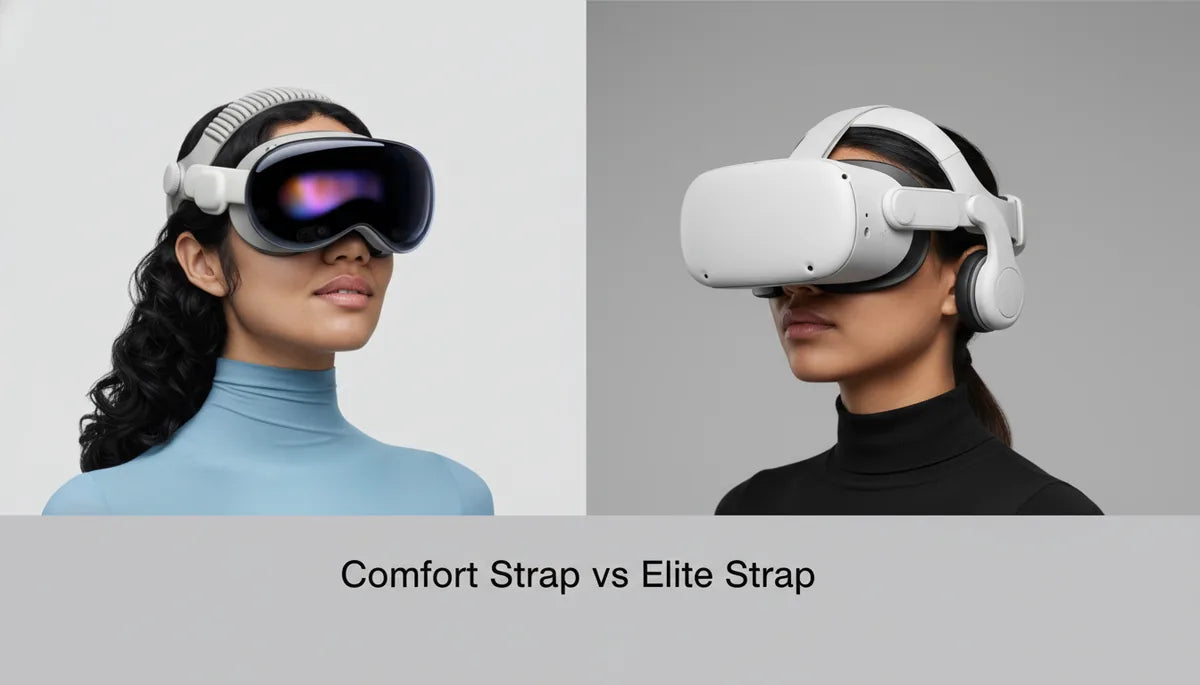
Understanding the core options: Comfort Strap vs Elite Strap
The simplest way to think about the two straps is that the Comfort Strap is soft and low-profile, while the Elite Strap is a sturdier, more engineered cradle. The Comfort Strap uses a woven fabric band over light foam padding. It’s flexible, breathable, and very lightweight—ideal when portability and ease of use matter. Adjustment is handled with side clasps and a rear strap, making it quick to slip the headset on and off without fuss.
By contrast, the Elite Strap replaces the soft back with a rigid plastic frame and a firmer rear band. It usually includes a dial on the back to fine-tune tension and—on battery-equipped variants—a rear-mounted battery module that shifts weight toward the skull’s rear. That rigid cradle stabilizes the headset, reduces front-end wobble, and holds the position more securely during brisk head movements. The trade-off is extra bulk and total weight.
Design philosophy matters: the Comfort Strap prioritizes accessibility and minimalism, while the Elite Strap targets performance and stability. Which you prefer depends on whether you value lightness and portability or engineered support and the ability to add power and accessories.
Match strap choice to your playstyle
Start by being honest about how you actually use your Quest 2. Sessions that last 15–30 minutes and involve minimal body movement—social VR, quick multiplayer matches, or media browsing—are perfect with the Comfort Strap. Its soft profile keeps the headset unobtrusive and fast to don, and for short runs the slight front-heavy bias is rarely noticeable.
If your routine includes active titles like Beat Saber, Pistol Whip, or fitness apps such as Supernatural, stability becomes critical. The Elite Strap’s rigid back band and dial let you lock the headset firmly in place so it doesn’t rock during sudden turns or lunges. For long, cinematic sessions—watching VR movies or extended exploration—many users also prefer the Elite Strap because it spreads pressure over a larger surface and can be fitted with a rear battery to reduce forward tilt.
Think about power needs, too. If you frequently run long sessions or share the headset between users, the Elite Strap with a battery module can be a convenience multiplier: fewer interruptions for charging and a better-balanced load when the battery is mounted at the rear. Just remember that adding battery increases total mass, which can change how the headset feels while you move.
Fit for glasses wearers and facial comfort
Glasses add a layer of complexity to fit. Beyond clearance, good fit means minimizing pressure on the temples and bridge of the nose and preventing the frames from shifting during play. The Comfort Strap’s light, flexible support can sometimes allow the headset to tilt forward if it isn’t tightened—this can press glasses into the cheeks. Users often report temple squeeze after longer sessions because the lighter rear support doesn’t fully counteract the front weight.
The Elite Strap improves this by moving more support to the back of the head, which tends to reduce direct pressure on the temples and cheeks. Its firmer padding and rigid frame help hold the headset’s position, so glasses remain aligned during rapid movement. That said, thicker padding near the face can change the seal and cause fog if air can’t circulate—so choose cushioning that balances comfort with breathability.
Simple practical tips: raise the top strap about 1–2 inches above your ears so the crown support shares the load; loosen the side straps slightly to avoid pinching the temples; and consider a thin glasses spacer or an aftermarket facial interface that provides extra clearance. For fogging, try improving ventilation—reduce excessive face cushion pressure and use anti-fog wipes or lens-safe sprays when necessary.
Installation and adjustment for beginners
Installing and dialing in either strap is straightforward once you know the steps. Start with the headset powered off and rested in a soft surface to avoid scratching the lenses.
- Comfort Strap attach/detach: Find the two attachment slots on the sides of the headset. Slide each end of the fabric strap into its slot until it clicks. To remove, press the release tabs on both sides and pull straight away.
- Elite Strap attach/detach: Remove the stock strap first if attached. Align the Elite Strap’s end clips with the side slots and push until you hear the click. Position the top strap on your crown. Remove by pressing the release levers and pulling outward.
Once attached, adjust for a secure but comfortable fit:
- Center the lenses over your eyes and seat the foam on your face gently so the display is crisp.
- Set the top strap so it sits roughly 1–2 inches above your ears—too low will squeeze the forehead, too high destabilizes fit.
- On the Comfort Strap, balance side tension so pressure is even; avoid overtightening one side to compensate for fit issues.
- On the Elite Strap, use the rear dial to make small adjustments. Tighten in small increments, testing head movement and checking for hotspots.
- Move your head as you would in-game—look up, down, and side-to-side—then tweak to eliminate slipping or pressure points.
Beginners should plan on two to three quick adjustments over the first 10–20 minutes of a new session; straps settle and your comfort preferences become clearer after a few trials.
Weight, balance, and long-session comfort
Weight distribution is the single largest determinant of neck fatigue and overall comfort. With the Comfort Strap, the headset often feels front-heavy because the light rear support doesn’t fully counteract the display assembly at the front. Over an hour of play, that forward bias forces your neck to perform small, constant corrections, which adds up to noticeable strain.
The Elite Strap shifts the fulcrum rearward. The rigid cradle and firmer padding hold the headset closer to the back of the skull and reduce forward tilt. If you opt for the Elite Strap with a rear battery, the extra grams behind the head act like a counterweight to the front-heavy display and can dramatically reduce neck strain during extended sessions. Keep in mind, however, that overall headset mass increases—some users report less fatigue despite higher weight because the load is distributed more evenly.
Practical adjustments to improve balance:
- Start with the strap loose, position the headset, then gradually tighten until the headset stays stable without squeezing the face.
- With the Elite Strap battery, experiment with how tight the dial is combined with slight top-strap changes to find a neutral position that minimizes micro-adjustments.
- If you experience a heavy feeling at the back, loosen the dial slightly or move the top strap forward until pressure is evenly spread.
The goal is a neutral balance where you don’t feel the headset pulling your head forward or the rear band digging in—this minimizes neck-muscle activation and improves comfort in marathon sessions.
Durability, maintenance, and replacement parts
The materials and construction of each strap affect longevity and care. The Comfort Strap’s woven fabric and light foam are breathable and cool but are prone to fraying and gradual stretch where they anchor to the headset. Expect fabric edges to show wear sooner, especially after repeated sweaty sessions. Cleaning is simple: remove the strap and wash with mild soap and water, then air-dry completely before reattaching.
The Elite Strap’s rigid plastic frame and dense foam are more resistant to sagging and hold shape better over time. Wear often appears on mechanical points—the rear dial, hinges, and where the strap clips into the headset. Cushions will compress after extended use and may need replacement to maintain optimal comfort. Clean the plastic shell with a damp microfiber cloth and avoid soaking foam pads; don’t expose cushions to high heat to prevent deformation.
Price ranges influence replacement planning. The Comfort Strap is usually included with the Quest 2 or inexpensive to replace, often falling in the lower price band when bought separately. The Elite Strap is a mid-range upgrade, with standard models often advertised around $59.99 and battery-equipped versions up to $129.99. Third-party alternatives can undercut these prices but vary widely in quality. Check manufacturer warranties and retailer return policies before buying, and source replacement cushions and parts from reputable stores or the official accessory channels to ensure compatibility and fit.
Compatibility with accessories and third-party options
One of the strengths of the Quest 2 ecosystem is the wide variety of third-party accessories—replacement facial interfaces, upgraded cushions, strap covers, and battery packs. Many third-party cushions fit both straps and can improve comfort for glasses wearers or reduce heat buildup. Strap covers and fabric sleeves are popular hacks for softening contact points on the Comfort Strap. For the Elite Strap, aftermarket cushions and sweat guards can extend comfort and lifespan.
When considering accessories, watch compatibility claims closely. The Quest 2 has its own attachment system; while many third-party straps and adapters exist, quality and durability vary. Be cautious of low-cost adapters that promise cross-compatibility with entirely different systems—Apple Vision Pro and Quest 2 use different designs and are not interchangeable without specialized adapters that may compromise fit or safety. If you add a third-party battery pack, verify connectors, mounting stability, and whether the added weight is safe and comfortable for your head shape.
Finally, consider warranties and return policies. Reputable accessory makers provide clear specs, compatibility notes, and customer support. If in doubt, buy from known VR accessory retailers or the manufacturer directly to reduce the risk of fit issues or early failures.
Decision guide and quick-start plan
If you want one last, practical way to decide, use this short decision tree:
- If your sessions are usually under 30 minutes and you value portability, choose the Comfort Strap.
- If you play active VR games or have regular sessions longer than an hour, prefer stability, or want on-head power, choose the Elite Strap (consider the battery version if you need longer runtime).
- If you wear glasses or experience pressure at the temples, try the Elite Strap first for better weight redistribution; if cost is a constraint try a third-party cushion or spacer with the Comfort Strap.
- If you’re budget-conscious but want improved comfort, reputable third-party straps and cushions can be a middle ground—just verify return policies and compatibility.
Quick upgrade path and starter checklist:
- Measure typical session length and list your top three apps (e.g., Beat Saber, Supernatural, VR cinema).
- If buying online, check the return policy and possible trial window—small fit differences matter.
- Install and follow the adjustment steps above. Play for at least 30 minutes to gauge hotspots and balance.
- If you feel forward tilt or neck fatigue, add the Elite Strap or a rear weight (battery) to counterbalance. If the face feels pinched, try a thinner cushion or a glasses spacer.
- Keep a microfiber cloth, mild soap, and spare cushions on hand; clean after sweaty sessions to extend life.
Next step: pick the strap that best matches your dominant play pattern, order from a retailer with a good return policy, and plan a short fitting session to dial it in. That small investment in fit and balance will repay itself with more comfortable, immersive VR time.


Compartir:
How to Choose a Glasses-Friendly Oculus Quest 2 Strap: Fit, Balance, and Padding
How to Choose the Right Quest 2 Comfort Strap for Different Head Shapes and Sizes