

Upgrade Quest 2 Comfort: A Practical Step‑by‑Step Guide to Third‑Party Straps and Cushions
If you’re stretching Quest 2 sessions from casual half‑hour plays to multi‑hour VR workouts, comfort becomes the difference between a seamless session and a miserable slog. This guide walks you through assessing your needs, choosing between the official quest-2-comfort-for-extended-play" rel="nofollow noopener noreferrer">Elite Strap and lighter third‑party options, picking the right cushion materials, and tuning fit so the headset feels like an extension of your head—not a foreign object. ⏱️ 11-min read
Read on for concrete, testable advice: how to install a replacement strap without tools, how to dial in height and tension, what to pick if you wear glasses, and how to clean and replace parts so your setup performs reliably across months (and many sweaty sessions) of use.
Assess Your Comfort Goals for Quest 2
Start by asking how you actually use your Quest 2. Are your sessions short and intense—30–60 minutes of fast movement—or do you settle in for long VR meetings, exercise classes, or marathon campaigns that last several hours? Do you feel pressure across the crown, behind the ears, or on the nose bridge? Do you wear glasses or do you sweat heavily? These answers determine whether you want weight redistribution, additional padding, better airflow, or a glasses‑friendly profile.
Be specific: measure your typical session length, note the room temperature (ventilated vs warmer), and write down where you feel discomfort after about 15 minutes. Use simple targets to judge success: after a 15‑minute wear test, aim for a 0–2 out of 10 discomfort rating at temples and nose, with no new red marks. During brisk head turns, the headset should not shift more than about 0.5 cm at the eye line—if it does, you need better stability or a different strap geometry.
Finally, decide on priorities. If you prize mobility for active games, a lighter strap that preserves center of gravity may be best. If you game for hours and value steady lens alignment, a sturdier strap that spreads weight across the back of the head and sides will win. Knowing this before you shop saves time and helps you compare product specs and real‑world reviews with confidence.
Elite Strap vs Third‑Party Straps: What Actually Improves Comfort
The official Elite Strap and the many third‑party alternatives tackle comfort in different ways. The Elite Strap is built to move weight off the crown and forehead and distribute it across a supportive rear pad and side rails. That design reduces top‑of‑head squeeze, stabilizes the lenses, and tends to stop the headset from tilting forward during dynamic play—particularly valuable for long sessions. Users often report fewer readjustments and less temple tension with the Elite Strap.
Third‑party straps offer variety: lighter materials, modular components, and more aggressive adjustability. Some specialty straps shave ounces from the overall feel and change the headset’s center of gravity so it feels less forward‑heavy. Others add innovative anchor points, dial systems, or removable padding to let you tailor the balance between stability and mobility. These differences are subtle but meaningful during multi‑hour play—little changes in how the weight rests on your crown, cheeks, or back of the head compound over time.
When comparing, look beyond marketing: check build quality (stitching, plastics, metal clips), how the strap mounts to the Quest 2 lugs, and whether the strap requires adapters. Warranty and customer support matter—some third‑party manufacturers offer good returns and clear compatibility notes; others leave you guessing about long‑term durability. If you’re unsure, opt for a strap with positive stability reviews and an easy, tool‑free install so you can test without risking the headset’s connectors.
Cushions and Face Interface Padding: Choosing the Right Foam and Covering
The padding that touches your face controls seal, heat, and pressure points more than any strap. Foam choice and the cover material determine whether you fog, sweat, or get pressure marks. Memory foam is excellent at contouring to facial features—densities of roughly 2.5–5 PCF are common. Denser memory foam improves the seal and reduces light leakage, but it can trap heat. EVA foam or a mid‑density core layered with lighter foam improves airflow and keeps the headset feeling less stuffy.
Cover materials matter as much as the foam. Breathable fabrics—cotton blends, bamboo viscoelastic covers, or moisture‑wicking mesh—reduce sweat buildup. Removable, washable covers are worth the premium: you’ll keep smells and bacteria at bay with far less effort. Anti‑microbial finishes (silver‑ion or copper‑based) can help curb odor without changing the feel. Look for cushions with glasses‑friendly cutouts if you wear frames; a small nose notch or wider bridge area prevents lenses from pressing into your frames.
Practical test: install a new cushion, wear the headset for 30 minutes, and monitor for red marks and heat. If you get a strong seal but excessive warmth, try an EVA‑hybrid cushion or a thinner cover. If you get gaps or light leakage, move up one density step in foam or choose a thicker facial gasket. The goal is a snug but not crushing seal that balances pressure across cheeks and the bridge of your nose and minimizes fogging and hotspots during long sessions.
Step‑by‑Step Install: Replacing the Strap on Quest 2
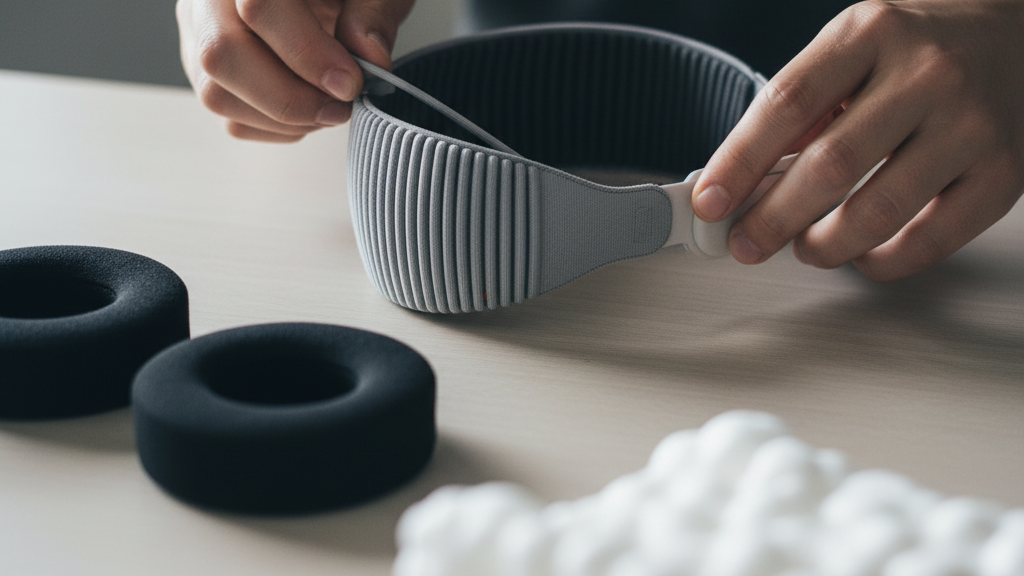
Replacing the Quest 2 strap is quick and tool‑free if you follow a steady sequence. Have the headset on a soft surface and clean hands before you start. Here’s a concise install process you can picture as you work:
- Remove the existing strap: Press the release points on both sides of the rear headband and slide the strap modules outward. Keep the modules level and don’t yank—work straight back so the mount disengages cleanly.
- Inspect the mount and rails: Check for dirt or lint in the prongs or the headset slots; wipe them with a dry microfiber if needed. Ensure no cable is trapped under the mount area.
- Attach the new strap: Align one side’s hook with the headset prong and press in until you hear a click. Repeat on the other side. If the strap has a backplate or extra anchor, make sure it sits flush against the shell before locking.
- Seat and test: Put the headset on and tighten slowly. Shake your head gently and perform brisk turns—check for tilt, rubbing, or loose parts. If anything shifts, reseat the strap and recheck.
Potential pitfalls: some third‑party straps use different clip widths or require a small adapter; confirm compatibility before purchase. Avoid designs that require force to click into place—if it feels jammed, stop and re‑align. For best results, pair the new strap with your preferred cushion so the headset sits flush and weight distribution matches how you like to wear it.
Fine‑Tuning Fit: Height, Strap Length, and Tightness for Comfort
After installing a strap and cushion, spend time on fit adjustments. Small changes in height and tension shift load between the crown, cheeks, and the back of the head. Take a methodical approach: adjust one variable at a time and test for 10–15 minutes to judge the effect.
Top strap height: position the top pad so it sits level with your crown. If the headset tilts forward, raise the pad slightly; if it sits too high toward your forehead, lower it. A crown‑aligned pad moves some load off the cheeks and reduces forward pull on the nose bridge.
Side strap tension and position: tighten the side straps until they’re snug behind the ears without pinching. The goal is a secure anchor that doesn’t compress your temples. If you feel numbness or sharp pressure, back off until the tingling stops. For straps with dial systems, increase tension in small increments and test with quick head movements—if the lenses shift, pull a single notch tighter and retest.
Cheek and nasal bridge pressure: check for even contact across both cheeks and the nose. If one cheek bears more weight, tilt the cushion slightly or swap in a different foam height. Avoid over‑tightening; a good rule of thumb is that the headset stays stable during brisk turns but leaves the skin circulation intact—no redness or numbness after a 15‑minute test. Rotate cushion positions (front/back or left/right) regularly to even wear and find the sweet spot for long‑session comfort.
Glasses‑Friendly Design: Comfort Tips for Eyewear Wearers
Wearing glasses in VR can be comfortable with the right cushion and a little technique. The key issues are lens contact, fogging, and frame pressure. Choose a cushion with a wider nose gap or a small foam cutout for frames—this prevents the nose bridge of your glasses from pressing into the headset lens and reduces fogging by improving airflow around the top of the frame.
Adjust eye relief and tilt: small changes in headset height and forward tilt create extra clearance. Raise the headset an extra notch and tilt it slightly down so the lenses sit parallel to your eyes without contacting frames. If your headset still touches your frames, consider a thin spacer gasket or a glasses‑friendly face plate; these add millimeters of clearance without dramatically changing strap tension.
Don and remove gently: slide the headset up and over the temples when putting it on, instead of pushing directly on the frames. When removing, lift both edges evenly to avoid yanking frames into lenses. For fog prevention, clean lenses and frames regularly, and use anti‑fog wipes or a small microfiber cloth to remove moisture between sessions.
If you find persistent fog, try a cushion profile that channels airflow away from the nose or opt for an insert with a vented design. These solutions maintain a good seal while keeping the air moving enough to reduce condensation. The result should be clear optics and a comfortable fit for longer sessions without the nuisance of lens contact or fog build‑up.
Care and Longevity: Cleaning, Maintenance, and Replacement Tips
How you maintain straps and cushions determines whether they last months or a single sweaty season. Develop a simple routine: wipe foam surfaces with a mild soap solution or a gentle disinfectant at least weekly, and after heavy or shared use wipe again. Use a soft cloth—never soak foam or expose it to bleach, solvents, or direct heat, which degrade both foam and covers.
For removable covers, follow the manufacturer’s laundering instructions. Wash breathable cloth covers on a gentle cycle and air‑dry away from direct sunlight. Rotate cushions occasionally to even out compression—swap left/right and front/back every few weeks if you use the headset daily. This small habit extends the visible life of foam and avoids uneven flattening.
Inspect components regularly: press the foam to detect soft spots or cracks, look for loose seams, and test straps for fraying or loosened stitching. Keep a log with purchase dates and planned replacement windows—many third‑party cushions and straps show noticeable wear after 12–24 months with daily use. Replace sooner if you see sagging, tearing, or if hygiene becomes a concern.
Minor repairs—tightening screws, reseating clips, or replacing a washable cover—are cheaper than replacing the whole strap. If a part degrades or squeaks, address it early: loose hardware can create pinch points or interfere with fit, and worn foam can compromise the seal and comfort. Proper care keeps your Quest 2 performing like new and protects the investment you made in comfort upgrades.
Compatibility, Safety, and Accessories: What Works with Quest 2
Before buying a strap, cushion, backplate, or battery pack, confirm Quest 2 compatibility. Manufacturers should list model compatibility and specify connector types. Some third‑party straps require adapters or have non‑standard mount widths. Check the product questions and reviews for reports of fit issues or needed spacers; a positive stability review is a strong signal that the accessory will work as intended.
Safety checks are simple but non‑negotiable. After installation, run a quick inspection for pinch points where buckles or thin straps might press skin during motion. Make sure any cable routing stays behind the head and away from the eyes; avoid accessories that tug on the headset during sudden movement. Rattling parts or loose mounts can stress the Quest’s shell lugs—if you detect play in the connection, remove the accessory and confirm alignment before reattaching.
Think about how other accessories interact: battery packs change balance and may require a different strap geometry; wireless dongles and backplates may introduce bulk behind the head. Verify that a gasket or lens shield sits flush with your chosen cushion—some thick gaskets reduce eye relief and may not pair well with glasses. Also review manufacturer warranty notes—using certain third‑party parts might affect warranty in edge cases, so keep receipts and photos of installations if you need to claim support.
Finally, consider modest investments that boost comfort without complicated installs: lightweight counterweights, sweat‑resistant covers, and simple backplates that spread load. The right combination of strap, cushion, and care gives you longer play sessions, safer movement, and more reliable headset performance without sacrificing mobility or optics.
Next step: pick one change—strap or cushion—install it, and use the 15‑minute test: rate pressure, check for red marks, and perform brisk head turns. Small, iterative upgrades are the most reliable path to long‑session comfort for Quest 2.


Compartir:
Halo strap vs standard head strap: which enhances Quest 2 comfort for extended play
Maintenance and Longevity: Cleaning and Replacing Cushions for Meta Quest