

Budget Quest 2 Strap Upgrades: Top Replacement Straps for Thrifty Builds
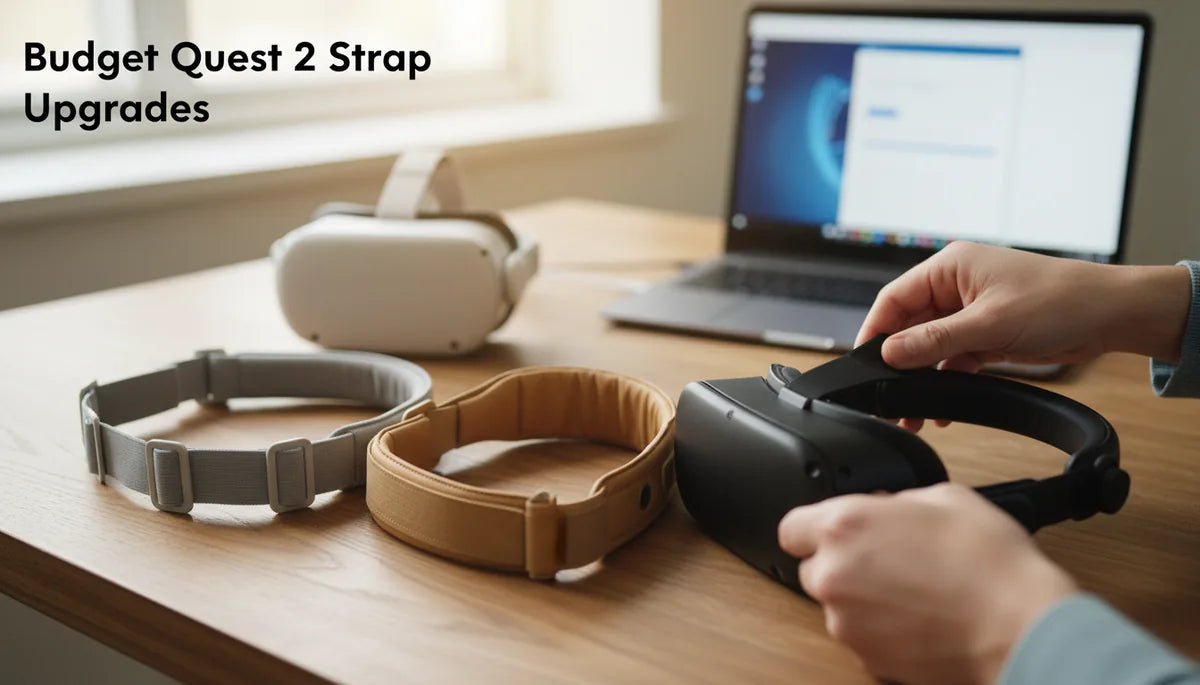
The Quest 2 is an incredible gateway to virtual reality, but its stock strap frequently becomes the weak link in long sessions. If you play for an hour or more, move around a lot, or just want fewer interruptions, a better strap can make a world of difference—without needing to buy the premium Elite Strap or a full accessory kit. ⏱️ 9-min read
This guide walks you through why an upgrade matters, what to look for when shopping on a budget, the best inexpensive halo and elite-style alternatives, simple DIY fixes, and practical troubleshooting so you can enjoy longer, steadier VR sessions without breaking the bank.
Why upgrading a Quest 2 strap makes sense on a budget
Not all comfort upgrades are expensive. The right replacement strap improves weight distribution and stability, which directly affects how long you can play comfortably. The stock Quest 2 strap is designed for quick setup and light use; it keeps the headset on your head but doesn’t prioritize balance. A budget strap that spreads load across a wider area—often with a padded rear band or improved strap geometry—relieves pressure from the face and reduces the forward tilt that causes neck strain.
What to expect from budget options: many solid third‑party straps fall in the $15–$40 range and install with no tools using simple clips or quick‑release anchors. They won’t always match the premium materials or ultra-smooth tightening mechanisms of the official Elite Strap, but they often offer real-world improvements—a steadier center of gravity, reduced wobble during quick turns, and fewer mid-session adjustments. Brands like KIWI Design, AMVR, and BoboVR focus on comfort-first designs at consumer-friendly prices; prioritize padding, a reliable adjustment method, and a backband that actually sits on the crown rather than the temples.
Beyond the basic: why the stock strap falls short
Once you use the Quest 2 for more than 30–60 minutes or jump into action-heavy titles, common limits of the stock strap become obvious. The headset is front‑heavy by design: most of the mass is around the visor and face, and the stock strap’s thin rear section struggles to counterbalance that load. The result is forward tilt, chin pressure, and neck torque—all things that pull you out of the experience.
The rear elastic used in the factory strap can relax over time, creating subtle slippage or side‑to‑side drift that demands frequent readjustments. That looseness breaks immersion and creates a nuisance between games. Pressure points are another frequent complaint: narrow straps and minimal padding concentrate force on the forehead, temples, or bridge of the nose, leaving red marks, pinching, or even headaches.
Upgrading aims to solve these specific problems: restore balance to the headset, reduce front-load pressure on the face, and keep the headset stable during rapid head turns. Even a modestly priced strap that replaces the elastic with a firmer rear band, adds a padded crown, or uses a rear dial for tension will make longer sessions noticeably more comfortable.
Smart shopping: essential features for affordable straps
When you're shopping for an inexpensive Quest 2 strap, look beyond branding and price. Focus on features that actually affect comfort and longevity. Durability is crucial—double‑stitched seams, reinforced attachment points, and metal or solid plastic hardware will outlast flimsy buckles. Materials like ballistic nylon, neoprene, or thicker woven fabrics stand up to repeated use far better than thin webbing.
The adjustment mechanism is equally important. A rear dial or precision slider lets you micro‑adjust tension without removing the headset; quick‑release clips should lock firmly and not creak. Confirm the strap's compatibility with the Quest 2 mounting points and that it attaches snugly—loose anchors are a common cause of mid-session drift. Also evaluate padding: memory foam or dense EVA padding gives more comfort than thin polyester pads, and breathable covers (microfiber, mesh) manage heat better during long sessions.
- Durability: reinforced seams, robust hardware, quality materials.
- Adjustment: rear dial or reliable sliders for micro adjustments.
- Weight distribution: a wide backband or halo design to counter front load.
- Padding and breathability: thicker foam with a wicking cover reduces hotspots.
- Attachment: secure clips or mounts that match the Quest 2’s points.
These features help you avoid common budget pitfalls like sagging, breakage, and uncomfortable hotspots—without needing to spend a lot.
Halo comfort on a dime: best budget halo straps
Halo-style straps are one of the most cost-effective ways to reduce facial pressure and stabilize the headset. They move contact points away from the face and distribute weight across the sides and crown. For budget builds, halo straps offer a big comfort gain for a modest cost.
Top wallet-friendly halo options include:
- KIWI Design Halo Strap for Quest 2 — Often priced around $20–$25, this strap uses memory-foam padding and an adjustable crown band. Installation is straightforward and it typically improves overall balance for longer play.
- AMVR Halo Strap for Quest 2 — Usually $15–$25, this model commonly includes a rear adjustment dial and side wings to spread pressure. It’s well-reviewed for quick-fit adjustments and value.
- BoboVR Halo Strap — In the $18–$28 range, BoboVR combines a soft top strap and memory-foam sections and typically fits securely with simple screw-in or clip fasteners.
These halo designs won’t fully replicate the rigidity of elite-style supports, but they shave pressure off the nose and forehead and often cut down on wobble. For the best deal, watch major retailers and marketplaces for sales; many of these straps periodically dip below $20 and come with free returns if the fit isn't right.
Elite feel, thrifty price: top budget elite-style straps
Elite-style straps—those with rigid side arms and a rear tightening knob—deliver the most noticeable upgrade in balance and stability. While the official Oculus Elite Strap carries a higher price, several third-party models mimic its ergonomics affordably. These budget alternatives often pair a rear dial with stiff side supports and thicker padding to approximate a premium feel.
Look for models that advertise metal or reinforced plastic side supports and a smooth rear dial. Options to consider include the Comfort Halo Pro, StableFit Deluxe, and Ergo-Balance Strap—third‑party choices that frequently undercut the official elite unit while keeping core benefits: reduced cheek pressure, steadier view during motion, and better long-session comfort.
When choosing a budget elite-style strap, inspect these details:
- Side-arm rigidity: stiff support prevents tilt and preserves interpupillary alignment.
- Rear tightening knob: should dial in tension precisely; avoid coarse or slippery knobs.
- Padding quality: dense foam at the back of the head helps counter torque without squeezing.
- Overall weight: some rigid designs add a modest amount of mass; balance that against the counterbalancing benefits.
Expect to pay between $30 and $50 for the best budget elite-style options; prices fluctuate, so a little patience often lands a near‑elite experience at a thriftier cost.
Creative comfort: DIY upgrades for your existing strap
If you’d rather tune a strap you already own—or prefer a minimalist spend—small, targeted DIY upgrades can deliver real comfort gains. These tweaks are inexpensive and reversible, and they scale from simple padding swaps to minor counterweighting for balance.
Practical DIY ideas:
- Counterweights: attach a small power bank (150–250 g) in a pouch at the rear of the strap to shift the center of gravity backward. Secure it with Velcro or a stitched pocket and route any cable neatly to prevent tugging. Start light and move the weight slightly until balance feels right.
- Padding wraps: use neoprene strips, foam pipe insulation, or thin memory-foam cut to match strap width. Wrap and secure with Velcro, fabric tape, or silicone sleeves to eliminate hotspots on the temples and crown.
- Grip sleeves: a silicone or rubber sleeve over the rear band increases friction against hair, cutting slippage without bulk.
- Adjuster stabilizers: add a small reinforcement patch under the adjustment point to reduce stretching in older elastic straps.
Safety and comfort tips: avoid adding anything that blocks the headset sensors or presses into the occipital bone unpleasantly. Test changes gradually—introduce one mod, wear for a short session, and adjust as needed. DIY fixes can extend the life of a budget strap and are often cheaper than swapping to another replacement.
Troubleshooting common budget strap issues
Budget straps solve many problems but can introduce issues of their own. Here’s a practical troubleshooting guide for the most frequent complaints—and quick fixes you can implement without special tools.
Slippage or loosening: ensure each attachment point is fully seated; rethread webbing where applicable and tighten in the correct sequence—top strap first, then sides. If the material has stretched, a silicone grip sleeve or a non‑slip pad behind the rear band can improve hold. For persistent looseness, consider replacing the strap with one that has a rear dial or micro‑adjuster.
Pressure points and hotspots: reposition the strap so it rests higher on the crown instead of across the temples; add soft padding at contact points using neoprene or microfiber strips. If you wear glasses, raise the strap slightly to avoid frame compression and periodically shift pads during long sessions to disperse load.
Minor discomfort or misalignment: check that the headset sits level—not tilted forward—and that the strap’s side arms sit flush. Small shims of thin foam inside the pad can tilt the headset up or down to correct sightline without buying a new strap. Finally, clean and air out breathable covers to prevent sweat buildup and skin irritation; washable covers or removable pads are a practical feature in many budget options.
Real examples, quick mini-cases, and a practical next step
Practical results make the difference when choosing a strap. Two mini-cases illustrate how small changes produce measurable comfort improvements.
Example A — Swap to a padded, adjustable replacement: I installed a padded, adjustable strap with a rear band and quick‑release connectors. Over a 60‑minute playtest, neck fatigue dropped noticeably and the headset stayed secure through rapid head turns. The padding eliminated hotspots and the micro‑adjuster meant no mid‑game fiddling—small investment, clear comfort gain.
Example B — Slim, breathable option for lighter builds: I tried a silicone-backed, breathable strap for a lighter setup. It kept the headset balanced on a lift stand and reduced heat buildup. Movement felt steadier and sweat management improved during longer sessions—great for people who prioritize a slim profile and cooler wear.
Practical next step: pick one clear priority—balance, padding, or micro‑adjustment—and choose a strap that excels at that feature. If you aren’t sure, start with a halo strap (KIWI Design or AMVR) for broad comfort improvements that cost little. If you need near‑elite performance, hunt for a reinforced, rear‑dial model and watch for sales to land the best price.
Quick buying checklist (use before checkout):
- Is it Quest 2 compatible and easy to attach?
- Does it have a rear adjustment method (dial/slider) or a sturdy backband?
- Is padding dense and breathable? Any washable covers?
- Are the seams and attachment points reinforced?
- Does the weight vs. balance tradeoff fit your play style?
Start with that checklist and test a single change—many players find one budget strap gets them 80% of the comfort improvement at a fraction of the price of premium accessories.


Share:
Materials and padding that boost glasses comfort on the Quest 2
Quest 2 and glasses: optimizing strap pressure and lens clearance for comfort