

A glasses-first guide to picking and and tuning Quest comfort straps for long VR sessions
Wearing glasses in a Quest headset changes everything: pressure points, fogging, and how stable the view feels when you turn or move. This guide focuses on practical choices and adjustments that prioritize eyewear comfort—so you can play for hours without temple pain, nose pressure, or constant lens contact. ⏱️ 10-min read
You’ll get plain-language explanations of strap types, the features that matter most for glasses, hands-on fitting steps, maintenance routines, and realistic buying advice—so you can decide and tune a headset strap that keeps your frames protected and your sessions immersive.
Understanding why glasses wearers need a different Quest strap
Quest headsets are designed around a close face seal and an even-weight profile for users without frames. Add glasses and the contact map changes: narrow temples and a bridge press against rigid frame edges, and the headset’s seal may squeeze lenses into the face. The result is red marks, headaches, and a distracting wobble when you accelerate or turn your head quickly.
Glasses introduce three core challenges. First, concentrated pressure at the nose bridge and temple arms—standard straps can pull the headset forward, squeezing your glasses tighter into those points. Second, frame-to-face contact and micro-movements: if the headset tips forward even slightly, the frame rims can rub the face seal or the Quest lenses. Third, fogging and ventilation: close seals trap warm breath and sweat around glasses and lenses, creating condensation during longer sessions.
A glasses-friendly strap doesn’t magically fix every issue, but it changes how and where the load is carried. By moving force to the crown or back of the head, widening contact areas, and adding purpose-built padding or clearance, a well-chosen strap reduces hotspots, stabilizes frames, and improves airflow—letting you focus on VR instead of frame pain.
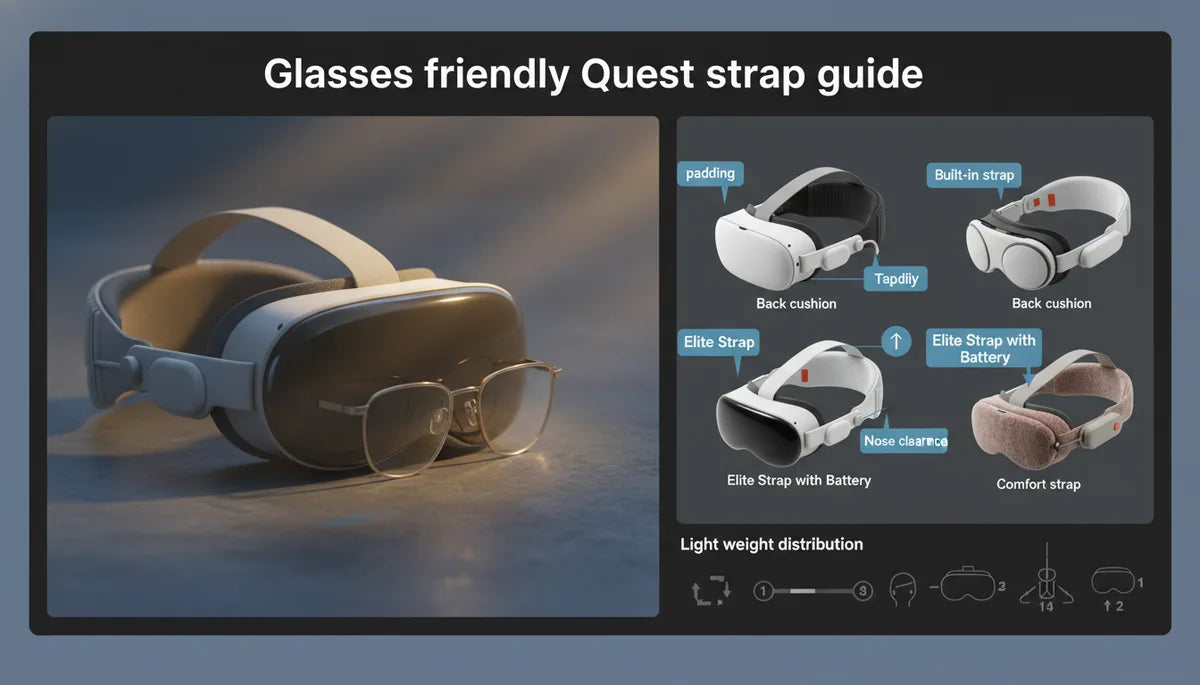
Strap types and what they offer for glasses wearers
Not all straps are created equal for glasses. The stock Quest strap is lightweight and simple, but it puts more load on the mid-face—fine for short sessions, uncomfortable for glasses over long play. From there the landscape splits into halo, rigid, soft, and hybrid systems. Each has tradeoffs in weight, adjustability, and frame compatibility.
Halo-style straps (rear-and-top support) redirect much of the headset’s weight to the crown and rear band. That’s ideal for glasses because it reduces nose and temple pressure—frames sit more naturally without being forced into the face. Halo straps work especially well with thicker frames and long sessions where comfort over time matters.
Rigid straps use firmer materials and a solid back anchor to lock the headset in place. For active players who turn, jump, or duck, rigid designs cut down on tilt and frame rubbing. They can feel bulkier, though, and some models are less forgiving for precise comfort tuning unless they also include a top strap.
Soft straps rely on foam and fabric to contour to your head and glasses. They’re comfortable at rest and lightweight but can allow slight drift if not anchored. Hybrid straps combine a rigid frame with padded contact points and increased nose/temple clearance—striking a useful balance for many glasses wearers.
Official options like the Elite Strap or Elite Strap with Battery offer solid stability and a familiar fit; third-party comfort straps (FlitLift, GraviPro-style designs) often emphasize dial adjustments, added padding, or better ventilation. In short: choose halo for sustained comfort, rigid for active play, and hybrid if you want a middle ground.
Key comfort features to prioritize
When shopping, look beyond aesthetics—prioritize features that directly protect your glasses and your skin. Start with padding: quality matters. Thick, dense foam or memory-foam pads with a soft fabric cover distribute pressure away from the temple edges and nose bridge. Pads should be wide enough to sit around your frames, not on them, and have a gentle bevel to avoid digging into temple arms.
Adjustability is next. You want multiple adjustment points: a numeric or dial tension on the rear band, an adjustable top strap for crown tension, and side-length tuning for cheek clearance. One-handed dials are particularly useful when you need a quick tweak mid-session. These adjustments let you change the headset’s posture on your head so glasses stay aligned without pinching.
Clearance around the nose and temples is critical—check the internal depth and look for models that advertise extra room or include spacers. Ventilation reduces fogging: breathable mesh, perforated foam, or open-back sections improve airflow and keep lenses clearer. Finally, look at strap materials: non-slip fabrics and rounded edges reduce pinching and frame wear. Avoid overly slick materials that let the headset shift and avoid coarse edges that can abrade frames.
Weight, balance, and long-session comfort
Weight is more than pounds—how that weight is distributed determines whether your glasses suffer. If load sits mostly on the nose and cheeks, your frames will be squeezed and move during active play. A strap that shifts weight toward the crown and back keeps the headset’s mass near your head’s center of gravity, reducing forward torque and neck strain during long sessions.
Practically, this means choosing straps with a wide rear band or a secure top strap that can carry more of the headset’s load without pinching. Some aftermarket designs advertise “weightless” comfort by using lift brackets or cleverly placed padding to transfer weight—these are worth considering if you play long sessions or use heavier accessories like a battery pack.
Be mindful of added accessories: the Elite Strap with Battery improves battery life but shifts mass rearward, which can be good for balance but may require firmer top strap tension to eliminate wobble. Third-party battery packs and rigid halo plates have similar tradeoffs. If you choose a heavier strap, tune the crown and rear tension so the headset sits neutral on the head. Lighter materials like foam and aluminum help reduce neck fatigue, but make sure they still anchor the headset enough to prevent micro-movements that cause frame contact and eye fatigue.
How to adjust fit for glasses wearers
Fitting a headset when you wear glasses should be a deliberate four-step process: height, rear tension, top tension, then cheek/temple alignment. Start with the headset off and loosen everything; put on your glasses first. Don the headset and slide it up or down until the display aligns comfortably with your eyes—this is the height placement. You should have minimal goggle gap but also enough space so the frame rims don’t touch the foam seal.
Next, set rear strap length so the rear band sits mid-to-lower back of your skull. Tighten the rear band until the headset feels supported but not clamped; the point is to carry most vertical load here. Use the top strap dial or slider to fine-tune crown tension—this controls forward pitch and prevents the headset from tilting and pushing frames into the face. Only tighten until stable: over-tightening increases pressure points.
Finally, check cheek and temple alignment. There should be a small, even gap between your temple arms and the face foam; if the arms press into the foam, add a thin spacer or move the strap forward or back to change the contact angle. If you notice fogging, slightly loosen the top strap to allow more airflow or switch to a ventilated pad. Test with short movements—turn quickly, crouch, and look down—to ensure frames stay in place without rubbing. Make small incremental changes and note them; this iterative approach yields the best long-session setup.
Step-by-step install for Quest 2 comfort strap (beginner)
- Prepare: Power off your Quest 2. Remove the stock strap if you’re replacing it—unclip the side anchors and slide the strap out gently.
- Inspect your glasses: Fold them or ensure temple arms aren’t loose. If frames are hinged, lock them so they don’t change shape during fitting.
- Attach the strap: Follow the manufacturer’s anchors—usually rear band slides into side rails and top straps loop over the crown. For rigid or halo kits, secure the back plate first and then the top pad.
- Initial setup off-head: Loosen all adjustments. If the strap has a dial, set it to the lowest tension. Place the headset on gently over your glasses without forcing it.
- Height and rear band: Slide the headset so the display centers with your eyes. Adjust the rear band until the headset feels supported but free of heavy forward pull.
- Top strap tension: Tighten the top/halo dial until the headset stops pitching forward with gentle head movement. Don’t overtighten; small increments matter.
- Temple clearance: Check temple arm contact. If arms press the foam, add a supplied spacer or use a thin soft pad behind the arms. Make micro-adjustments to side length to re-center the display.
- Final checks: Move your head quickly left/right and look down/up. If frames shift or the headset tips, readjust rear/top tension. Ensure no part of the frame scrapes the headset lenses when removing or adjusting.
- Quick maintenance tip: After the first 30–60 minutes of play, re-check tension—padding compresses and tiny adjustments often improve long-session comfort.
Common hiccups include pins not seating (re-seat the side anchors), dial squeaks (add a tiny pad beneath the dial housing), or persistent fogging (install a ventilated pad or try an anti-fog wipe that’s safe for VR lenses).
Maintenance, care, and longevity
Good care extends the life of both the strap and your glasses. Foam and fabric compress and absorb oils; plan to replace face pads every 6–18 months depending on use, or sooner if you see flattening or smell persistent odors. Use mild, alcohol-free cleaners on fabric surfaces and avoid soaking memory-foam—lightly wipe and air-dry completely before use.
Frame wear is often caused by repeated rubbing against rough edges. Add soft frame sleeves (silicone or fabric) to temple arms and bridges to reduce abrasion and spread contact pressure. Lens protectors for the Quest lenses are inexpensive insurance—if your glasses accidentally touch the lens, a protector takes the damage, not the glass itself.
Anti-fog care helps keep visibility intact. Use products specifically labeled safe for VR or camera lenses, apply sparingly, and follow instructions. Alternative: swap to moisture-wicking pads or ventilation inserts to cut fogging without chemicals. If you use a battery pack or heavier rear plate, check the straps’ mounting points regularly for loosening screws or worn plastic. Tighten hardware gently; avoid overtightening which can crack mounts.
Finally, store the headset with straps loosened and away from direct sunlight and heat—prolonged heat can warp plastics and degrade foam. Regularly inspect seams and attachment points and replace parts promptly: a small worn pad is cheaper replacement than a cracked anchor later on.
Buying guide, compatibility, and tips for glasses wearers
Budget vs premium: If you play short sessions or rarely move, a budget soft strap or upgraded third-party foam pad can improve comfort quickly. For frequent, long sessions, invest in a halo or hybrid strap with a reliable rear band and a quality dial—these deliver the best balance for glasses. The official Elite Strap and Elite Strap with Battery are solid, mid-to-premium choices; they’re well-made and compatible with Quest 2, but consider weight and battery tradeoffs.
Third-party options like halo rings, rigid plates, and dial-based straps (FlitLift, GraviPro-style) often give more adjustability or ventilation at similar or lower prices. Check clearance specs and read reviews from other glasses wearers—frame depth and temple angle are where compatibility issues appear.
Compatibility and accessories: Confirm your strap’s mounts match Quest 2 side rails or use an adapter. If you plan to add a rear battery, ensure the strap is rated to carry the extra weight and that accessory mounts don’t press on temple arms. Wireless audio or headstrap attachments can change balance—always re-tune crown/rear tension after adding accessories.
Cross-ecosystem note: Apple Vision Pro and other non-Quest headsets use different strap systems and clearance measurements. Don’t assume a strap that works for Quest 2 will translate directly to another headset; always check model-specific compatibility. Finally, if in doubt, buy from retailers with a good return policy—trying a strap on with your glasses is the only true test.
Next step: measure your glasses’ temple length and bridge depth, and use those numbers when comparing strap clearance. Small measurements save you from big discomfort later—make that a habit before you click buy.


Share:
Choosing the Best Oculus Quest 2 Head Strap: Comfort, Stability, and Longevity
Ergonomic Temples and Pressure Points: How to reduce VR headset fatigue