

Quest 2 Strap Comparison: Original, Elite, and Third‑Party Options for Better Balance and Long‑Session Comfort
Choosing the right strap for your meta-quest-2-ipd-and-lens-comfort-for-sharper-happier-sessions" rel="nofollow noopener noreferrer">Meta Quest 2 is one of the fastest upgrades you can make to improve comfort, reduce neck strain, and keep your view steady during longer VR sessions. The stock elastic band is fine for brief play, but when you start pushing past 20–30 minutes, weight distribution and rear support become the deciding factors. ⏱️ 11-min read
This guide walks you through the three main paths—Original strap, the official Elite Strap (with and without the battery pack), and third‑party alternatives—comparing how each handles weight, balance, installation, and long‑session wear. Read on for concrete examples, step‑by‑step setup tips, and a quick decision tree to pick the strap that will keep your headset feeling lighter for longer.
Overview: Quest 2 Strap Options at a Glance
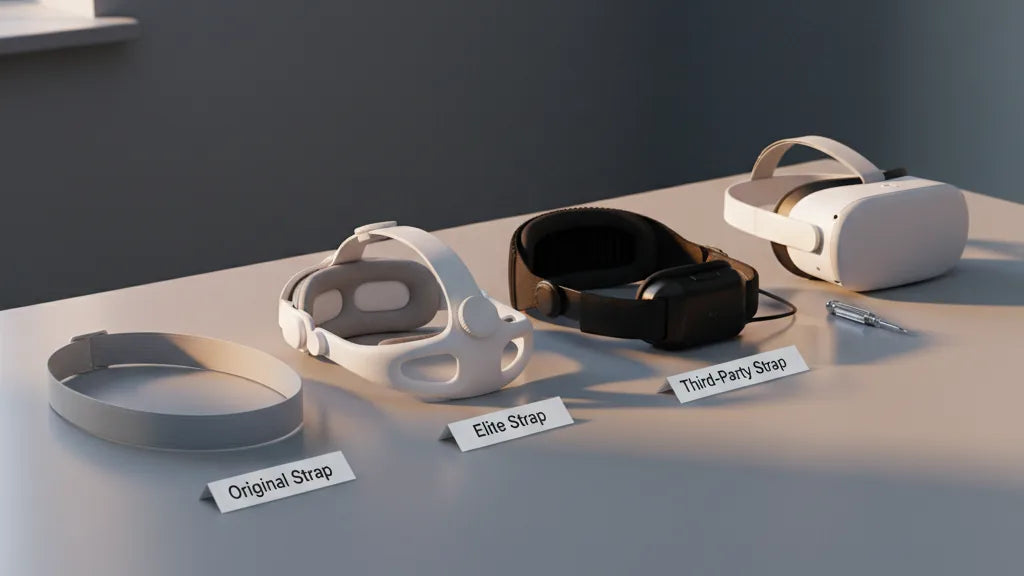
There are three broad categories of Quest 2 straps you’ll see in the market: the Original strap that ships with every headset, Meta’s Elite Strap, and a wide array of third‑party options. The Original strap prioritizes simplicity and low weight; it uses elastic bands, a Y-shaped rear connection, and Velcro for adjustments. It’s quick to use and inexpensive—ideal for casual sessions or users who rarely wear the headset for long stretches.
The Elite Strap steps up support with a rigid halo design, thicker side padding, and a rear dial for microadjustments. It moves more of the headset’s mass toward the back of your head and reduces the forward pull on your face. Many owners add the Elite Strap with Battery to further improve balance and extend playtime. Third‑party straps are a diverse group: some imitate the Elite design, others focus on plush padding, integrated counterweights, or lightweight travel solutions. The trade-offs are generally between comfort and bulk, price and durability, and how much installation effort you’re willing to accept.
Original Quest 2 Strap: Fit, Comfort, and Practical Limits
The stock Quest 2 strap is intentionally bare‑bones: flexible, lightweight, and adjustable via Velcro. For new players or short experiences—think 10–30 minute demos, social apps, or casual games—its minimalism is an advantage. It adds almost no bulk, is easy to don and remove, and doesn’t change how you store or transport the headset.
Where it struggles is long sessions and vigorous movement. The headset’s weight sits forward around the lenses, and the elastic strap offers little rigid structure to shift that load toward the rear of the skull. After 20–30 minutes of active VR, many users notice increased pressure on the nose and cheekbones, slight slippage during quick turns, and growing neck fatigue. The stock strap also offers fewer fine‑tuning options: the Velcro adjusts length but can’t tune crown pressure or the front‑to‑back angle in the way a dial or halo design can.
Practical touches: the original strap is compatible with simple padding upgrades and many third‑party facial interfaces, so you can squeeze additional comfort from the headset without replacing the strap entirely. But if you plan on multi‑hour play, productivity in VR, or rhythm and fitness games, the stock strap is the weakest link to replace.
Elite Strap: Comfort, Support, and Balance Improvements
The Elite Strap is Meta’s official solution when stock comfort runs out of steam. Its most visible changes are a rigid rear brace and a dial‑based tightener that lets you microadjust without pinching. The added padding and structured cradle keep the headset steadier through rapid head movements and reduce pressure on the face by moving weight rearward.
For many users this results in a marked improvement: images remain aligned during fast turns, neck strain decreases, and the headset feels more locked to the skull. The Elite Strap’s reinforced plastics and better stitching offer improved longevity over the stock elastic option. If you choose the Elite Strap with Battery, the extra mass behind your head doubles as a counterweight and can make the headset feel surprisingly light up front—ideal for long sessions or if you stream and want uninterrupted play.
There are trade‑offs to consider. The Elite Strap adds bulk and a little weight; it costs significantly more than the original and even more with the battery. Some users report crown pressure if the dial is over‑tightened, so micro‑adjustments matter. Overall, if you prioritize steadiness, regular long sessions, or play intense movement titles, the Elite becomes a sensible investment.
Third‑Party Straps: What to Look For (Quality, Fit, and Value)
The third‑party market is rich with alternatives that range from cheap fabric replacements to premium halo cradles with integrated counterweights. The right choice depends on which problem you want solved: better padding, improved weight distribution, glasses compatibility, or a lower price than the Elite Strap with Battery.
Key attributes to evaluate:
- Materials and build quality: Look for durable plastics in the arms, robust adjustment mechanisms, and high‑density padding (memory foam or breathable PU leather often performs best).
- Rear support design: A stable rear cradle or halo distributes load across a broader area and prevents the headset from sliding during vigorous play.
- Adjustability: Multiple adjustment points and a smooth tightening knob are valuable. Cheaper straps often skimp on microadjustment and can cause uneven pressure.
- Extras and integration: Some third‑party straps include removable counterweights, extra battery mounts, or improved facial interfaces to increase comfort and playtime.
Brands such as Kiwi Design and AMVR have become well regarded because they balance price and function—offering halo‑style designs and counterweights at a lower cost than official accessories. But quality varies: read reviews for reports of cracking plastic, loose fittings around the audio ports, and slow or imprecise dials. A good third‑party strap can approach Elite‑level comfort at a fraction of the price; a poor one can make comfort worse than the stock band.
How to Choose Based on Weight, Balance, and Long Sessions
Choosing a strap starts with honest answers to two questions: how long will you wear the headset, and how much active movement will you do? If you wear the Quest 2 for short sessions and mostly sit or stand still, a padded third‑party fabric strap or the original may be fine. For multi‑hour sessions, productivity work, or rhythm and fitness titles, prioritize designs that move weight to the rear and offer fine microadjustment.
Consider these selection rules of thumb:
- If you primarily want to cut face pressure: pick any halo or cradle design (Elite or well‑made third‑party) to shift load to the back of the head.
- If you need longer battery life and improved balance: the Elite Strap with Battery or third‑party straps with counterweights/battery mounts provide both more playtime and better front‑to‑back equilibrium.
- If you travel or carry the headset often: favor lighter straps with easy removal and smaller form factors—some third‑party options offer foldable designs for portability.
- If you wear glasses: choose straps that increase temple clearance and pair with a taller face gasket (details below).
Remember that balance is both a hardware and a setup problem. Even the best strap will feel poor if the top strap isn’t adjusted to lift the front or if the dial is over‑tightened, causing crown pinching. A good strap provides options; your task is to use them to move the headset’s center of gravity so the front feels lighter.
Step‑by‑Step Installation and Adjustment Tips
Swapping straps is straightforward but doing it well makes the most difference. Here are clear steps for common strap types plus adjustment tips to get balanced comfort quickly.
- Remove the old strap: For the stock elastic strap, slide the plastic clips off the headset sides and unthread the top strap. For rigid straps (Elite or many third‑party), gently detach the side arms at the headset ports—apply steady pressure and avoid twisting to protect the mounts.
- Install the new strap: Align side arms with the Quest 2’s audio port slots and push until you hear or feel a click. Thread the top strap through its loop if present. Confirm both sides are secure before picking up the headset.
- Initial fit: Place the headset on loosely, set the top strap so the front of the headset sits just above your cheekbones, and tighten the rear dial or adjust the Y‑strap until the headset feels secure but not pinched.
- Fine‑tuning balance: To reduce face pressure, slightly loosen the side/cheek tension and tighten the top strap to lift the front. Then increase rear dial tension to shift weight back. Aim for even pressure across the forehead and rear head cradle.
- Movement check: Turn your head quickly, lean forward, and jump in place. If the headset slips forward, increase rear support or add a counterweight. If you feel crown pain, back off the dial a quarter turn and recheck.
Quick troubleshooting: blurry visuals usually mean the headset is sitting at the wrong vertical angle—lift or lower the top strap and re‑position the facial interface rather than over‑tightening the rear dial. For straps with battery packs, install the pack last and recheck balance, because even modest added mass shifts the center of gravity noticeably.
Comfort for Glasses Wearers and Everyday Use
Glasses change the comfort equation. Frames push against cheeks and the bridge, so the strap must provide a stable seal without squeezing the face. The stock Quest 2 strap sits closer to the face and can press glasses’ arms into the cheeks during movement, while halo designs distribute pressure away from the face and reduce slippage.
Practical tips for glasses wearers:
- Raise the headset slightly: Position the headset a touch higher on your face and angle the lenses to avoid direct contact with frames.
- Choose thicker padding: Taller facial gaskets or thicker foam/silicone inserts increase clearance for frames and reduce temple contact.
- Favor halo/cradle straps: A rigid rear cradle and a top strap lift the headset, often making VR with glasses comfortable for longer durations.
- Look for anti‑sweat and breathable materials: For all‑day wear, PU leather and dense foam trap heat; breathable covers or moisture‑wicking pads improve comfort.
Everyday use also benefits from straps that are quick to don and tightly adjustable without fuss. If you switch users frequently, look for straps with easy release points and clearly marked adjustment ranges to speed up handoffs. For shared headsets, removable and washable padding helps maintain hygiene between sessions.
Maintenance, Cleaning, and Longevity
A strap’s lifespan depends as much on care as on build quality. Sweat, oils, and repeated stretching break down fabrics and foam, while sunlight and heat degrade plastics and adhesives. Regular cleaning and careful handling extend usable life and maintain comfort.
Cleaning guidelines by strap type:
- Original fabric strap: Hand wash gently with mild soap and cool water. Rinse thoroughly and air dry completely before reuse.
- Elite Strap (plastic/silicone/padded): Wipe down with a soft, damp cloth. For salt build‑up or visible grime use mild soap; avoid abrasive cleaners or alcohol that can damage finishes.
- Third‑party straps: Check the manufacturer’s directions. When in doubt, wipe with a damp cloth and mild soap. Removable foam or fabric covers can often be hand washed separately.
Maintenance tips:
- Avoid over‑tightening the dial or Velcro to prevent stretching and early failure of adjustment mechanisms.
- Store the headset in a cool, dry place away from direct sunlight to prevent plastic embrittlement and foam discoloration.
- Replace worn gaskets and pads when you see fraying, compression set, or loss of shape—these degrade comfort more than any other issue.
Signs you should replace or repair: frayed straps, Velcro that no longer grips, cracks in the plastic arms, or foam that has permanently flattened. Small investments in replacement pads or a higher‑quality strap are often cheaper than replacing the whole headset down the line.
Practical Comparisons, Recommendations, and Quick Fit Guide
Here’s a concise map to help you choose based on real use cases and a quick decision tree to match strap characteristics to your needs.
Best matches by scenario:
- Short, casual play (10–30 minutes): Original strap or a lightweight third‑party fabric strap—cheap, easy to use, and minimal bulk.
- Frequent moderate sessions (30–60 minutes): A padded third‑party halo or the plain Elite Strap—better stability and reduced face pressure.
- Long sessions, productivity, or intense movement titles: Elite Strap with Battery or a premium third‑party strap with counterweight—best balance and sustained comfort.
- Travel and portability: Lightweight third‑party straps with foldable designs; keep the stock strap if you prefer the smallest footprint.
- Glasses wearers: Halo/cradle designs with taller gaskets or thicker facial interfaces to prevent frame contact.
Quick decision tree:
- Do you play for more than 30 minutes regularly? If no → consider stock or lightweight third‑party. If yes → continue.
- Do you play active/fitness titles? If yes → pick a halo/cradle design with good rear support or Elite Strap with Battery. If no → a padded third‑party strap or Elite Strap (without battery) may suffice.
- Do you need longer battery life? If yes → consider Elite with Battery or third‑party straps that accept battery packs/counterweights.
- Are you price sensitive? If yes → look for reputable third‑party brands (reviews matter). If no → Elite Strap offers a dependable official path.
Mini case reminder: keeping the stock strap (Example A) will work for short sessions but often causes neck discomfort past 20–30 minutes. Upgrading to the Elite (Example B) generally reduces forward pull and improves stability, and adding a battery increases balance even more. Third‑party straps can mimic these benefits for less money, but quality varies—read reviews and check return policies.
Next step: try a 10–15 minute trial period after any upgrade and adjust the top strap, rear dial, and facial interface in small increments. Use movement checks and a short workout or gameplay sequence to validate comfort before committing to multi‑hour use or purchasing additional accessories.


Share:
Optimizing Meta Quest 2 IPD and Lens Comfort for Sharper, Happier Sessions
How head cushions relieve pressure points on Quest headsets