

Ergonomic Guide to Quest 2 Comfort: Optimizing Weight Distribution with Strap Design and Fit
If your Quest 2 starts to feel front-heavy after an hour of play—pressing on your nose, pinching your forehead, or tugging at your neck—you’re not alone. The device itself weighs roughly 503 g and carries most of that mass toward the lens housing, which creates a forward moment that the straps must counterbalance. This guide explains exactly where that weight goes, how straps move it across your skull, and practical adjustments you can make (including counterweights and strap choices) to extend comfortable playtime without sacrificing image stability. ⏱️ 11-min read
Read on for a clear, step-by-step approach: how to tune crown height and strap lengths, how to choose between the Elite Strap and third-party options, how to use small rear weights or battery packs productively, and how to test and maintain your setup so balance holds over long sessions. Expect concrete checks, recommended weight ranges, and simple troubleshooting so you can stop constantly readjusting and start enjoying longer, pain-free VR sessions.
Weight distribution 101: where the Quest 2 carries its load
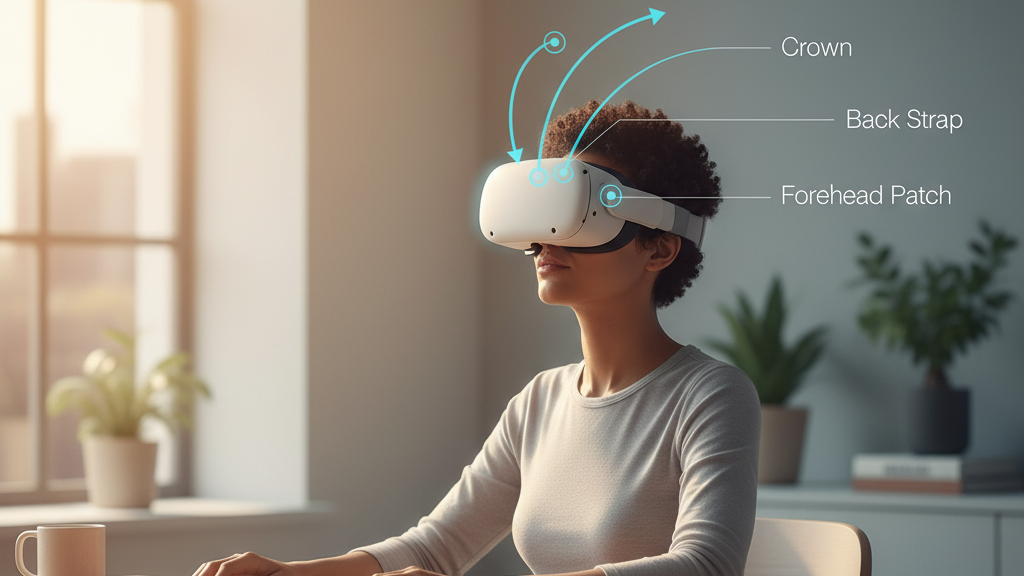
The Quest 2’s mass is concentrated near the front—around the lenses, electronics, and face gasket. When you first lower the headset onto your head that forward mass wants to tip the unit down toward your nose and forehead. The straps are not just there to keep the headset on; they create a load path that transfers that front weight into the skull and scalp at three principal contact regions: the forehead contact patch (brow/gasket), the crown or top strap, and the rear/occipital region.
Think of the headset’s forces like plumbing: the lens housing is the source and the straps are the pipes that route force into broader, more supportive regions of your head. A well-tuned pipe delivers load evenly across the crown and occiput so the face gasket carries minimal peak pressure. Poorly routed tension creates “hotspots” where a narrow area—the bridge of the nose, the upper forehead, or the temple—takes most of the load, causing pain, red marks, and loss of immersion.
Load path quality depends on several fit factors: crown height, strap tension, strap geometry (how top, side, and rear straps meet), and how the padding contacts your skull. The goal is a continuous arc from forehead to occiput that distributes weight across a larger area of bone and soft tissue, reducing localized pressure and stabilizing the image. Prioritize even contact rather than just gripping the headset tightly; a tight fit with concentrated pressure is usually worse than a slightly looser, well-distributed one.
Top strap vs back strap: who bears most load and why
The crown (top) strap and the rear (back) strap behave differently and share load in distinct directions. The crown strap primarily manages vertical distribution—pulling load upward onto the top of your skull. The rear strap handles horizontal balance—anchoring the headset behind the head to resist forward tipping. Understanding how they trade forces lets you tune them to reduce neck torque and facial pressure.
Tightening the top strap shifts more of the load into the crown. That can be helpful if the front gasket is pressing too hard, but overdo it and you’ll concentrate pressure on a smaller area of scalp or push the chin and neck into an awkward angle. Conversely, a loose or slack rear strap lets the headset tip forward during movement, increasing face pressure and degrading image stability. The rear strap’s anchor near the occipital ridge is valuable because that bone tolerates distributed loads well and helps keep the unit aligned during turns or lean-backs.
Rules of thumb: if your forehead feels pinched, try easing the top strap and slightly tightening the back strap to transfer load rearward. If the headset slides forward when you lean, increase rear strap tension in small steps. Your aim is balance—enough crown tension to stop bounce, but not so much that the top of the skull takes most of the load; enough rear tension to resist forward tilt, but not so tight it pinches the occiput or increases neck strain.
Crown height, strap length, and load path: tuning fit for even pressure
Small changes in crown height and strap length rearrange the load path more than you’d expect. Raising the crown contact point moves tension toward the upper forehead and top of the skull; lowering it moves tension rearward. Shortening the top strap concentrates the “bite” into the crown and improves anchoring for dynamic movement. Lengthening the top strap smooths the pressure curve across the forehead but may reduce front stability during aggressive motion.
Start with crown height: set the top strap so it lies flat and parallel across the top of your head without digging. The strap should contact a broad area—not a single narrow line. If you feel a horizontal line of pressure across your scalp, try a slightly wider padding or a strap that distributes force more gradually. For many people, a crown position halfway between the forehead and the very top of the skull yields the best trade-off between seal and comfort.
Adjust strap lengths next: shorten the rear strap until the headset resists forward pitching, then back off slightly to avoid pinching. The ideal path is a gentle arc from forehead to occiput where no single point feels much tighter than the others. If you wear glasses, prioritize a lower gasket seat to avoid temple pinch—raise the crown slightly to compensate so the contact area on the forehead remains broad. Use small, incremental adjustments—millimeters matter—testing after each change with a few head nods and turns.
Counterweights and battery packs: mitigating front-weight bias
When you add accessories—battery packs, thick aftermarket facial interfaces, or audio modules—the front-heavy bias increases. Rather than fighting that by clamping the crown harder (which creates hotspots), the smarter approach is to move weight rearward so the headset’s center of gravity shifts toward the middle of your head. Placing counterweights or battery packs near the back strap or in a rear pouch is the most effective method.
Placement matters more than absolute weight. A small mass placed far back creates a stronger balancing moment than the same mass near the crown. Users commonly find 50–150 g of rear counterweight is enough to neutralize the front bias without overloading the neck. Start at the low end (50 g) and add in 25–50 g increments: too much rear weight can itself cause neck fatigue, so aim for proportional distribution rather than “balancing the scales” by dumping heavy packs onto your neck.
Battery-integrated straps move the battery rearward and can smooth the headset angle while extending playtime. The trade-off is higher total mass and occasionally a different torque profile when you move quickly. Mount any pouch or battery as low and as rearward as your strap design allows—near the occipital region—so that the lever arm is maximized. After installing a battery or counterweight, repeat a full fit check: crown height, back strap tension, and a movement test. Small crown or rear-tension tweaks after adding weight will keep the headset balanced without creating new hotspots.
Choosing comfort straps: Elite Strap, third-party options, and performance trade-offs
The stock Elite Strap delivers predictable, repeatable adjustment with a relatively light padding profile and a focus on simplicity. It shifts weight toward the top of the head and tends to reduce face pressure for many users. Adding the official battery version moves mass rearward, which helps extended sessions but increases total weight and alters dynamics when you make sudden head movements.
Third-party straps often change the equation. Many aftermarket designs introduce thicker padding, alternative anchor points, and integrated rear pouches or rigid bands that redistribute load differently. Thicker padding can reduce peak pressure on the brow and temples by increasing contact area; rigid or semi-rigid frames can route load across the parietal bones more effectively than purely fabric straps. The downside: more complex straps can be heavier, bulkier, and require more fine-tuning. They can also change how the headset sits relative to your face, which may affect the gasket seal and image clarity.
Performance trade-offs to consider:
- Weight vs. padding: extra cushioning reduces hotspots but increases mass—test if the benefit outweighs added torque.
- Adjustability: straps with finer, repeatable adjustments let you tune distribution precisely; elastic, one-size-fits-most solutions are simpler but less precise.
- Mounting for rear weights/batteries: if you plan to use counterweights, choose straps with a secure rear pouch or mounting point rather than improvising a solution that slides.
Step-by-step fit and adjustment for optimal distribution
Follow a deliberate, repeatable sequence to tune your Quest 2 so weight is shared evenly across forehead, crown, and occiput. Use this checklist each time you change straps, add accessories, or notice discomfort.
- Baseline and seal: Place the headset on your face and set the foam/gasket so the display is visible without tilting your chin. The seal should feel neutral—not forced.
- Set crown height: Adjust the top strap so it contacts a broad area and lies flat. Tighten gradually until it feels snug but not painful—aim for even pressure across the top of the skull.
- Adjust back strap tension: Tighten or loosen the rear strap to find a point that resists forward tilt without pinching the occiput. The headset should remain centered during a gentle nod.
- Fine-tune front pressure: If the gasket presses too hard on the forehead or nose, ease the top strap and shift tension to the rear strap in small increments.
- Movement test: While focusing on a stable point, perform slow nods and shakes and then quick turns. The image should remain steady and pressure should not migrate to a single point.
- Accessory integration: If you add a battery or counterweight, mount it low and rearward and repeat steps 2–5. Start with a light weight and increase only as needed.
- Re-check glasses fit: If you wear glasses, ensure temple arms are not pressed against. Raise crown height slightly if necessary to avoid temple hotspots.
Small, iterative changes are the key. Millimeter-level strap adjustments and a few grams of counterweight can make a big difference. Keep a routine: after significant sessions or modifications, re-run the checklist so the setup remains tuned to your comfort preferences.
Long-session testing and maintenance: evaluating balance over time
Even a perfectly tuned setup changes over time: padding compresses, webbing stretches, sweat and oils alter friction, and repeated use shifts how straps engage the head. Long-session testing helps you spot those changes before discomfort becomes a showstopper.
Simple tests to confirm balance:
- Five-minute idle test: Wear the headset for five minutes sitting still, then check for pressure marks or hotspots along the forehead and temples.
- Active-motion test: Do a sequence of head turns, squats, and quick pivots to simulate gameplay. If the headset drifts forward or the image bounces, re-evaluate rear strap tension and crown position.
- Neck endurance check: If you add rear weight, try a 30–60 minute session with typical movement and note any neck fatigue. Reduce rear weight if neck strain appears.
Maintenance tips to preserve consistent weight distribution:
- Keep contact surfaces clean: wipe the foam and strap areas with a microfiber cloth and a little mild soap, then dry thoroughly. Cleanliness preserves friction and prevents slippage that alters load paths.
- Inspect components regularly: look for fraying webbing, compressed or split padding, and loose buckles or pivots. Replace any part showing wear—small failures change how load is routed and can create hotspots.
- Revisit adjustments periodically: after about 10–15 hours of use, or after adding counterweights/batteries, re-check crown height and rear tension to ensure balance hasn’t shifted.
If you notice progressive drift—where you’ve tightened more and more to compensate—take a break and re-assess the strap system. Often the long-term solution is replacing compressed padding or swapping to a strap design that better matches your skull shape rather than continually increasing tension.
Practical examples: quick fixes from real setups
Practical adjustments often mirror a few common cases:
- Case A — Forward tilt with stock Elite Strap: A subtle crown height raise and a slight rear strap tighten rebalanced the headset, reducing forehead squeeze and stabilizing the image during turns.
- Case B — Battery pack added: Users adding a rear battery found 75–100 g enough to neutralize the front bias. They mounted the battery low on the rear strap and reduced crown tension slightly to avoid scalp pinching.
- Case C — Thick third-party padding: Extra padding eliminated temple hotspots, but users needed to add a small rear weight and retune rear tension to maintain stability during vigorous movement.
- Case D — Glasses users: Lowering the gasket seat for glasses and raising the crown slightly distributed pressure away from the temples. A wider crown strap prevented a single pressure line across the scalp.
Each case shows the same lesson: distribute force over a broader area, shift the center of gravity rearward when possible, and iterate adjustments in small steps. These real-world tweaks turn theoretical ergonomics into comfortable, repeatable setups for long play.
Next step: pick a routine—baseline fit, movement test, and a maintenance check—and use it after any significant change. Small, deliberate adjustments and occasional component refreshes will keep your Quest 2 balanced, comfortable, and ready for longer sessions.


Share:
Ergonomic Strap Upgrades That Reduce Quest 2 Headset Pressure for Long Sessions
How to Choose a Quest Head Strap for Long Gaming Sessions