

Front vs Back Weight Balance: How to Tune Your Quest 2 for Long‑Session Comfort
Comfort in VR starts where physics meets fit. For Quest 2 owners, tiny shifts in front‑to‑back mass change whether the headset feels like a gentle hug or a tiring choke point after an hour. This guide explains how balance works, how to choose and install comfort straps, and which small adjustments and accessories move the Quest 2 from “bearable” to “I can play for hours.” ⏱️ 10-min read
Read on for practical, step‑by‑step advice — from top strap height and side tension to counterweights, battery packs, and glasses‑friendly padding — so you can make precise, repeatable improvements that suit your games and your head.
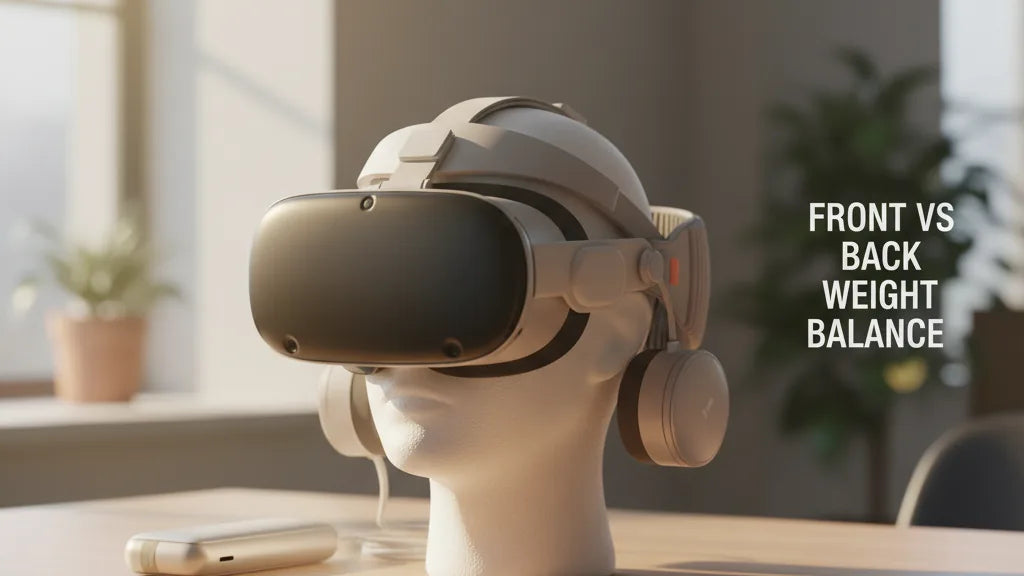
Understanding Front vs Back Weight Balance on Quest 2
The Quest 2 is relatively light compared with wired PC headsets, but its visor and electronics place more mass forward than many users expect. That forward center of mass (COM) creates torque: the weight wants to pivot the headset toward your face. When the COM sits forward, you feel pressure on your forehead, nose, and cheeks; the mask can dig in or even lift at the back during sudden movements. That pinch‑and‑lift sensation is the classic “front‑heavy” complaint.
Shift the COM rearward and the pressure profile changes. Less load on the face generally reduces red marks and fogging because the seal is less aggressive, but the neck and back of the head take more of the load. Users report less facial discomfort but sometimes notice a mild backward tilt or neck fatigue after long sessions — a tradeoff between facial pressure and cervical load.
Every millimeter matters: tightening a top strap or clipping on a rear battery pack moves that COM noticeably. So comfort isn't just “more padding” — it's about where the headset pivots. A well‑balanced setup minimizes both front torque (face pressure) and rear torque (neck strain), keeping the visor level, optics stable, and your attention in the game instead of on discomfort.
Choosing a Comfort Strap Based on Weight Distribution
Choosing the right strap starts with a simple question: do you want to reduce pressure on your face or reduce neck load? Straps fall into a few practical categories that address different balance needs.
Rear‑weighted designs — like Meta’s Elite Strap (and the Elite Strap with Battery) — place mass at the back to counteract the headset’s forward bias. These are ideal if your primary issue is forehead and cheek pressure. The integrated battery versions are especially effective: the battery doubles as a purposeful counterweight and extends playtime, killing two problems with one accessory.
Halo or crown‑support straps distribute load over the top of the head. They don’t necessarily add rear weight but change pressure from the face to the crown and scalp, which some users find much more tolerable for long seated sessions. For active, standing, or fast‑paced games, look for straps with a secure rear cradle or knob adjuster to keep the headset from shifting.
Lightweight soft straps and thick foam face gaskets can feel more comfortable initially, but if they don’t move mass rearward you may still get front pressure. Glasses compatibility is another factor: rigid side mounts and adjustable tilt are friendlier to spectacles and spacer inserts, while battery packs and large rear pads can interfere if not chosen carefully.
Finally, decide whether you prefer a strap that’s easy to swap (clip‑on), or a more integrated solution that offers a tighter, more repeatable fit. Your typical playstyle — seated streaming, competitive motion, or casual exploration — should guide the choice more than brand alone.
Install Guide: Step-by-Step for Quest 2 Comfort Straps
Installing a new strap is straightforward but benefits from a calm, methodical approach. A poor install can misalign lenses or pinch cables, which undermines all the comfort tweaks you make afterward. Follow these steps to get the strap on securely and balanced before a long session.
- Power down the headset and set it face‑up on a clean, soft surface. Remove the facial interface if recommended by the strap instructions to prevent accidental damage.
- Detach the stock strap by unclipping the plastic arms: pull gently outward and rotate as needed. Slide the top strap free and keep those original parts in case you want to revert.
- Align the new strap’s side mounts with the Quest 2’s attachment points. Most third‑party straps click or slide into place; ensure both sides are fully engaged. If screws or clips are supplied, use them per manufacturer instructions.
- Thread and fasten the top strap, then attach any rear pad, cradle, or adjustment knob. Battery packs usually clip onto the rear pad or plug into a dedicated rail — follow polarity and cable routing guidelines to avoid pinched wires.
- Tighten in stages: set the top strap first, then the rear adjustment, and finally the side arms. Check for even tension on both sides and that the headset sits level on a horizontal plane when you hold it in front of your face.
After installation, do a quick balance test: wear the headset, look up and down, and perform a few swift head turns. If the headset shifts or the optics pull away from your pupils, re‑adjust the rear tension or top height. Small tweaks now save a lot of discomfort later.
Fine‑Tuning Fit: Height, Length, and Tightening Tips
Once your strap is installed, the art of comfort becomes small, iterative adjustments. Start loose and tighten in controlled stages — this process helps you find a fit that keeps optics aligned without creating pressure points.
Begin with the top strap height. Raising the top strap shifts the headset slightly rearward, reducing forehead pressure by allowing the rear pad to bear more of the weight. Lowering it does the opposite: the front pulls down. Adjust in 5–10 mm increments and test in‑VR to see how your eye‑line and IPD feel.
Next, set the side arm length so the visor sits close enough for clear optics but not pinching the bridge of your nose. A snug fit should leave the headset stable during head turns but allow you to breathe and speak normally. If you wear glasses, leave slightly more side clearance and test the seal to ensure frames aren’t pressed into your face.
Tighten sequences matter: top first, rear second, sides last. This sequence moves the COM into place with minimal shifting. After each change, perform quick motions (look up/down, shake head lightly) to check the seal and lens alignment. If one side feels looser, nudge the crown or adjust the rear pad to balance pressure.
When you find a sweet spot, mark it: note the knob clicks or strap notch, and take a quick photo of the setting. Recreating the same fit later is simple and avoids hours of trial and error. For shared headsets, set a dial or loop color so each user can switch back to their preferred setting quickly.
Weight Reduction and Balance Accessories
You can improve comfort by removing unnecessary front pounds or strategically adding small rear weights. Both approaches are valid — the right choice depends on whether your priority is less facial pressure or less neck strain.
To reduce front weight, swap out the bulky foam gasket for lighter silicone alternatives. They cost little and often improve airflow while trimming grams off the front. Trim excess foam sparingly if pressure is localized; test in short sessions to ensure you don’t compromise lens clearance or seal. Low‑profile replacement straps and lightweight panels of polycarbonate or reinforced nylon can also shave front mass without sacrificing support.
If you prefer adding rear mass, use compact counterweights or clip‑on battery packs. A 150–250 g pack behind the head often makes a dramatic difference, pulling the COM back and reducing forehead pressure. Battery packs offer the added benefit of longer playtime, but remember they trade facial pressure for neck load — try lighter batteries or split weights across the rear pad to find a tolerable balance.
Cable management matters too. Loose cables can tug and subtly shift balance during movement; elastic tethers or small Velcro wraps keep cables aligned along the strap and reduce shifts. When adding accessories, verify they don’t intrude on tracking rings or obstruct the headset’s sensors. Aim for durable, thin accessories that change mass efficiently without increasing bulk.
Glasses Wearers and Comfort
If you wear glasses, fit adjustments become doubly important: you need lens clearance, minimal frame pressure, and a cushion that prevents the frames from rubbing the headset’s lenses. The first line of defense is a spacer or thicker facepad that raises the Quest 2 slightly away from your glasses. Many users keep the original spacer or buy thicker third‑party pads for this exact purpose.
Choose straps with tilt and vertical adjustments so you can angle the display without forcing your glasses into an uncomfortable position. Vented, breathable foam or silicone pads reduce fogging and sweat while also creating a consistent gap. Anti‑fog wipes and spray help but are only part of the solution; physical clearance prevents the crushing that causes scratches and discomfort.
For a long‑term solution, investigate prescription lens inserts. Companies like WidmoVR and VR Lens Lab produce custom lenses that snap into the Quest 2, letting you remove personal glasses entirely. Inserts eliminate the frame‑pressure problem and often improve optical clarity, but they add upfront cost and must match your prescription accurately.
Finally, when balancing for glasses wearers, err on the side of slightly looser facial pressure to accommodate the frames. That means you may need a modest rear weight or a halo support to maintain optics and keep the headset steady without squeezing your temples.
Comparing Straps: Elite Strap, Third‑Party Options, and Compatibility
The market for Quest 2 straps is broad. Meta’s Elite Strap is the most direct upgrade from the stock elastic. It provides a rigid side‑arm, a rear pad for better rearward distribution, and a knob‑style adjustment on some editions. For many, it’s a straightforward, reliable solution that balances cost and performance. The Elite Strap with Battery goes further, using the battery as a purposeful counterweight and extending runtime.
Third‑party straps take different tacks. Halo‑style KIWI Design models spread load across the crown and often feel lighter on the face. The BoboVR M2 Pro and similar designs add magnetized or hot‑swappable battery options that let you tune rear weight precisely. These options can be lighter, more breathable, or more customizable than official gear, but quality varies — prioritize robust clips, metal reinforcements at stress points, and a clear return policy.
Compatibility caveats matter: not all straps fit every Quest revision or accessory. Check whether a strap uses the stock clip points, requires an adapter, or interferes with facial inserts and third‑party lenses. And to be clear: Quest 2 straps are designed for the Quest platform. They are not directly compatible with other headsets such as Apple Vision Pro; the mounting geometry and tracking systems are different, so don’t expect cross‑platform compatibility without vendor confirmation.
In practice, many users find the Elite Strap or a well‑made third‑party halo delivers the best balance between comfort and price. If you want both a snug fit and longer battery life, the Elite Strap with Battery or a third‑party pack that clips to the rear pad is an excellent middle ground.
Real‑World Fixes, Troubleshooting, and Next Steps
Small, repeatable tweaks produce the biggest comfort gains. If the headset tilts forward, increase rear tension or add a small counterweight. If it feels heavy on your neck, reduce rear mass or raise the top strap to share the load across the crown. If slipping occurs, check strap wear and clean contact areas — dirty foam reduces grip more than you might expect.
Maintenance prevents surprises: wipe foam with a mild cleaner, tighten screws quarterly, and replace pads when they flatten or crack. Keep a mental or written log of preferred strap settings — number of knob clicks, strap notch positions, or a photo — so you can restore the exact feel after travel or shared use.
Next step: pick one change at a time. Try a silicone gasket, then evaluate a 150 g rear battery, then swap to a halo strap if needed. Testing singly isolates what actually helps. For shared headsets or streamers, consider keeping two configured setups: one optimized for glasses wearers and a second for contact‑lens users or competitive play.
Small moves toward the rear, precise top‑strap adjustment, and mindful accessory choices will help your Quest 2 feel balanced and stay comfortable through long sessions — so you can focus on the game, not the headset.


Share:
From Pressure Points to Pain-Free: Ergonomic Strategies for Oculus Quest 2 Straps
Balancing Quest 2 with a counterweight: boost stability during long sessions