

How Battery Pack Placement Shifts Quest 2’s Center of Gravity—and How to Stop Neck Strain
For many Quest 2 owners, the headset’s total weight is less important than where that weight sits. Move a small battery pack a few inches and the headset suddenly feels heavier, more prone to slide, or worse — a cause of neck fatigue after an hour of play. This guide explains the physics behind those sensations and gives practical, hands‑on strategies to rebalance your Quest 2 for longer, more comfortable sessions. ⏱️ 11-min read
Read on for a clear definition of center of gravity (CG) in headset terms, a breakdown of common battery placement options, step‑by‑step installation and strap adjustments, plus real user setups and simple tests you can do at home to confirm improvements. By the end you'll know how to position batteries and counterweights so your neck does less work and you get more playtime.
Understanding center of gravity in Quest 2 and why it matters
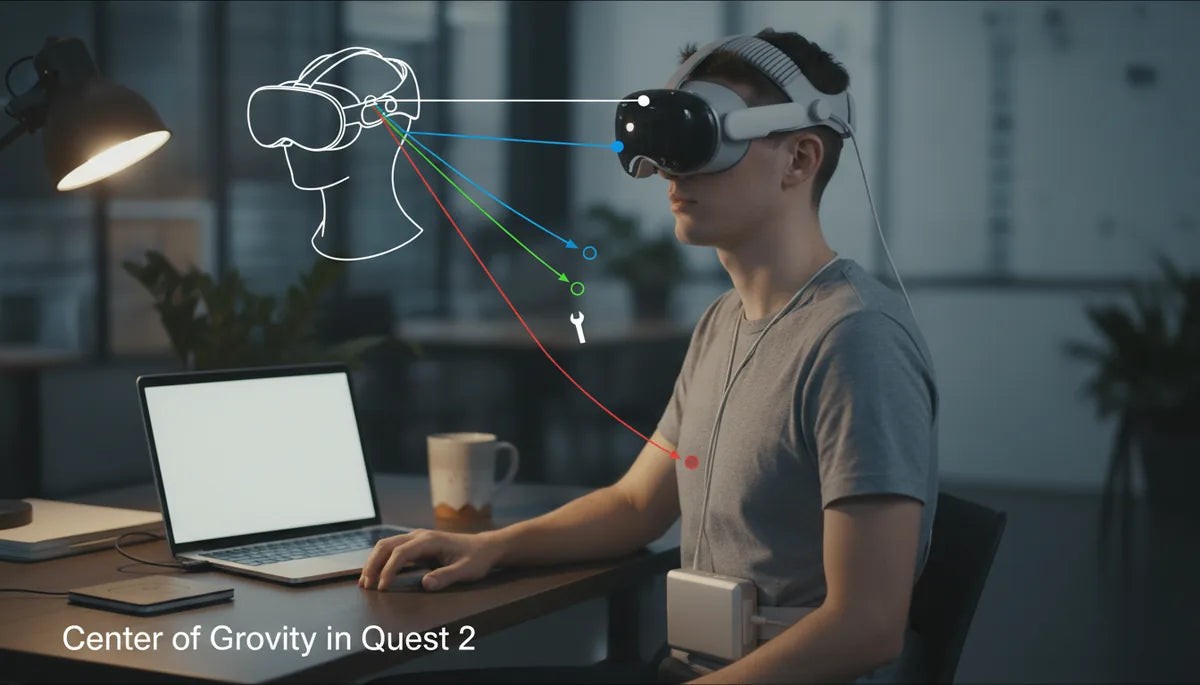
Center of gravity (CG) is the point where an object’s mass would balance if you supported it at that spot. With a comfort-strap-for-different-head-shapes-and-sizes" rel="nofollow noopener noreferrer">VR headset, CG isn’t just academic: it determines how the device pulls on your face, where pressure lands, and how much torque the neck must resist to keep the display aligned with your eyes. The Quest 2, with its display, optics, and battery concentrated at the front, has a naturally forward‑biased CG. Although the full headset weighs roughly 503 g with the internal battery, that mass sits ahead of the head’s pivot point, so small shifts in where additional weight lives can produce outsized changes in feel.
Perceived weight is a product of both mass and leverage. A light total weight with a forward CG feels heavier because the neck muscles are fighting a longer lever arm. That constant micro‑tension causes fatigue, pressure on the nose and forehead, and the “I need a break” sensation that shortens play sessions. Moving mass rearward toward the occipital area shortens the lever and reduces sustained muscle effort — the core idea behind counterbalancing with external battery packs or strap weights.
Battery pack placement options for Quest 2
When you add an external battery to a Quest 2, common placement options include rear/neck area mounts, crown/top mounts built into straps, and external belt or pocket mounts connected by a cable. Each choice changes the balance in predictable ways and carries tradeoffs in ventilation, movement, and perceived front‑or‑back heaviness.
- Rear/occipital mount: A low, flat pack positioned just below the occipital bone (the bony ridge at the base of your skull). Typical compact power banks suitable for this are in the 10,000–20,000 mAh range (about 37–74 Wh) and often weigh 100–300 g depending on capacity. This placement shifts CG back and reduces forward torque most effectively, while staying low minimizes wobble and cable tugging.
- Crown/top mount (strap‑integrated batteries): These sit higher on the head, often near the strap’s crown. They counter front‑heaviness but raise the overall CG, which can make the headset feel bulkier and can increase chin load for some wearers.
- Belt or hip mount: The battery rests on a belt or pocket and connects with a long cable. This option removes weight from the head entirely, eliminating upper‑neck torque. The downside is cable management, potential snags, and less direct counterbalance for lateral stability.
Choice depends on priorities: low rear packs maximize comfort and reduce neck torque; crown mounts offer convenience and a snug integrated feel; belt packs remove headload but introduce cable and movement considerations.
How CG shifts affect neck strain during long sessions
Biomechanically, the head acts like a lever pivoting at the upper spinal joints. The stronger the forward moment (torque), the more the extensor muscles at the back of the neck must contract to keep your gaze level. Torque equals force times distance: adding a 150 g battery 3–4 cm behind the pivot creates much more balance than placing that same battery 7–8 cm forward near the face.
Forward CG increases flexion at the upper cervical spine. That means your neck is continually resisting a forward pull, creating static muscle loading. Static loads are deceptively tiring—muscles hold a contraction for long periods without visible movement, which limits blood flow, causes metabolic buildup, and leads to soreness, headaches, and stiffness. Conversely, a neutral or slightly rearward CG reduces required muscle activation, distributes pressure away from the nose and forehead, and allows you to maintain good head posture even during intense sessions.
Over time, poor CG contributes not only to immediate fatigue but also to compensatory posture: tensing shoulders, jutting the chin forward, or lifting the sternum to stabilize the headset. These secondary changes amplify discomfort. The goal, therefore, is to move the effective CG close to the head‑neck pivot and keep mass low and centered to minimize sustained torque.
Choosing straps and counterweights for CG balance
Strap choice profoundly influences how additional mass behaves. The stock Quest 2 strap is light and flexible, offering minimal redistribution of force away from the face. Upgrading to a sturdier comfort strap, like the Elite Strap or third‑party rigid solutions, moves the attachment points and gives you predictable anchor points for rear packs and counterweights.
Compare strap types:
- Stock strap: Lightweight and breathable but provides limited rear support. Rear packs can pull on the interface and cause more face pressure unless a dedicated adapter is used.
- Elite Strap / rigid comfort straps: These have a firm rear spade or cradle that accepts dedicated battery mounts and counterweights. Their rigid shape transfers load onto the occiput and headband, spreading pressure across the skull rather than concentrating it on the nose and forehead.
- Halo or ring styles: These offer excellent load distribution around the crown and posterior skull, but placement of batteries higher on the head can raise CG and change rotational dynamics.
Counterweight strategies include placing a small weight (100–200 g) low on the rear of the strap to pull the CG back, or using a slim power bank as both battery and counterweight. Position the mass as close to the skull as possible and centered on the midline to avoid introducing lateral imbalances. If you add weight high on the crown, combine it with a lower rear mass or a snug chin/forehead support to prevent forward pitch.
Step-by-step install: mounting battery packs and adjusting straps
Successful installation is more planning than brute force—decide placement, test, and iteratively adjust. Follow these practical steps to mount a rear battery and achieve neutral balance.
- Plan placement and check compatibility. With the headset off, decide whether you’ll use a strap mount, pouch, clip, or adhesive. Ensure your chosen battery’s thickness and weight match your strap’s capacity and that a short USB‑C cable reaches the headset port without tension.
- Wear the headset and identify the occipital spot. Put the Quest 2 on and, with the strap snug, have a friend or use a mirror to mark where the back of the strap meets the lower skull. Your goal is to place the battery low and centered, just above the neck’s crease.
- Attach the mount. Use the strap’s factory loop, a dedicated pouch, or a clip to secure the pack. For Velcro mounts, wrap firmly and double back; for clip mounts, verify both sides engage. A flat, low profile attachment reduces rocking during head turns.
- Route and secure the cable. Run the short USB‑C lead along the strap, loop any slack around the back, and secure with small Velcro ties so the cable won’t tug when you move. Avoid long dangling cables that create dynamic pulls during fast turns.
- Adjust strap length and top strap. Tighten the lower occipital strap so the pack sits close to the skull, then fine‑tune the top strap so the interface presses evenly across the forehead instead of pinching the nose. Aim for even pressure distribution rather than a single tight point.
- Test and iterate. Put the headset on, perform the “hand test” tilt and then play for 10–15 minutes. Look for red marks, sliding, or a sense of chin lift. If you feel forward pull, move the pack lower or add a small rear counterweight. If the headset tips backward, shift the mass slightly forward.
Remember: secure mounting and cable management are as important as total weight. A well‑secured 150 g pack will feel less intrusive than a loosely attached 100 g unit that wobbles during movement.
Fine‑tuning fit for glasses wearers and different face shapes
Face shape and eyewear change how the headset contacts the face and how CG adjustments feel. Glasses wearers often compensate for lens clearance by pushing the headset slightly forward, which increases forward torque and worsens neck strain. Likewise, people with high cheekbones or deep‑set eyes may get different pressure points. The solution is a careful triad of padding, strap angle, and weight placement.
Practical tweaks:
- Use a thinner or low‑profile facial interface. Replacing the stock foam with a slimmer gasket brings the display closer to your eyes, shortening the lever arm and reducing front bias. This is especially helpful for glass wearers who otherwise push the headset forward.
- Raise or lower the top strap. Adjust the vertical position so the rear strap presses on the occiput instead of the crown; this keeps the headset from tilting forward. For some, lowering the top strap slightly reduces temple and cheek pressure.
- Adjust forehead padding instead of tightening. If your glasses require a little more forehead clearance, add a thin foam pad at the rear strap rather than tightening the front, which would increase face pressure.
- Position counterweights to correct asymmetry. If one temple bears more pressure, slide the rear pack a few millimeters to the lighter side or add a small weight to rebalance laterally.
After any change, wear the headset for a short session and check for impressions on your skin. The absence of red marks and the ability to keep a neutral chin position are good indicators that you've minimized compensatory posture and reduced future neck strain.
Real‑world setups and what users report
Small placement changes have large practical effects. Here are three typical configurations VR users adopt and the outcomes they report after tuning balance and cable management.
- Rear-mounted compact power bank: A 10,000–15,000 mAh power bank strapped low on the occiput with a Velcro strap. Users say nose and forehead pressure drops noticeably, and they can play for longer stretches before neck fatigue sets in. Typical tradeoffs: a bit more time spent dialing in the strap and ensuring the short USB‑C lead doesn't pull.
- Integrated battery in a rigid comfort strap: Uses an Elite‑style strap with a slot for an integrated battery. The headset balances more evenly across the skull, and playtime comfort improves. Some report slight additional heat in the strap area after long sessions, which can be alleviated by choosing a lighter battery or intermittent breaks.
- Belt or pocket power bank: The battery sits on a hip belt or pocket and connects with a longer cable. This eliminates upper‑neck loading almost entirely, but the cable can snag or pull if not properly managed. For seated experiences and flight sims where movement is limited, this can be the most comfortable setup.
Across these examples, common themes emerge: lower rear placement gives the most direct reduction in forward torque; secure mounting and short, well‑routed cables are essential; and small mass increments (100–200 g) are usually sufficient to produce a noticeable difference without making the headset feel cumbersome.
Measuring and assessing your Quest 2's balance
Objective and subjective checks help you know whether a change worked. Start with quick at‑home tests and keep a simple comfort log to evaluate what truly improves long sessions.
Hand test:
- Hold the Quest 2 in your palm at the strap attachment, letting it rest naturally. Tilt it forward and backward slowly. A pronounced forward pull says the CG is ahead of the pivot; a neutral feel indicates good balance.
- Wear it for 5–10 minutes and rate comfort 1–10 on front pressure, neck effort, and temple squeeze. Record the scores and changes after adjustments.
- Inspect skin after a session for red marks or indentations. These reveal pressure concentration and uneven load distribution.
For a more quantitative approach, measure distances from the headset’s display plane to the occipital point with and without the battery installed and note perceived torque differences. While you won’t get a lab‑grade CG number, these measures plus your comfort scores let you iterate in meaningful ways.
Maintenance, compatibility, and long‑session tips
Keeping mounts, straps, and cables in good condition preserves balance and prevents surprises mid‑play. Regular inspection is simple but highly effective.
- Inspect straps and connectors monthly for fraying, loose stitching, or stretched Velcro. Replace worn parts before they fail and alter load paths.
- Clean interfaces per manufacturer guidance—mild soap and water for foams, isopropyl wipe for plastic mounts—so sweat doesn’t degrade material and change friction points that influence slipping and pressure.
- Confirm accessory compatibility before purchase. Some batteries are too thick or have odd centerlines that change balance unpredictably. Pick low‑profile packs or products designed for VR to avoid interference with your strap geometry.
- Adopt a session routine: short warm‑up (neck rotations), 15‑minute breaks every hour, and repositioning the pack every few sessions. These habits reduce cumulative strain even when your balance is near ideal.
If you use third‑party counterweights, choose small, dense forms that attach close to the strap and can be swapped quickly. Many users keep a 100 g weight in their kit to fine‑tune balance for different experiences. Lastly, consider ergonomics beyond weight: better chair support, adjusted play height, and a clean cable path all contribute to longer, more comfortable VR sessions.
Next step: try the hand test, mount a low rear 10–15k mAh power bank with a short cable, and play for 30 minutes—if your comfort rating improves by at least two points, you’re on the right track. Adjust from there until the headset feels like it’s simply resting, not pulling.


Share:
How to Choose the Right Quest 2 Comfort Strap for Different Head Shapes and Sizes
Fine tuning Quest 2 strap length for a secure, pressure-free fit