

Lightweight VR Headsets vs Comfort: Why Balance and Strap Design Matter More Than Raw Grams
When you’re deciding between a lighter headset and a heavier one, the instinctive answer is obvious: fewer grams should equal more comfort. In practice, especially for sessions that last an hour or longer, comfort is rarely decided by mass alone. How that mass is distributed around your skull, the design and padding of the strap, and small fit tweaks determine whether a headset feels featherlight or a constant burden on your neck and face. ⏱️ 10-min read
This article walks VR enthusiasts and professionals through the real-world rules for long-session comfort. You’ll learn why center of gravity beats total weight, how Quest 2 and Vision Pro differ in design and ecosystem, step-by-step guidance for installing and tuning Quest 2 comfort straps, how to choose the right strap, safe ways to shave grams without making fit worse, practical balance tips, glasses-friendly adjustments, and simple maintenance to keep a strap performing over time.
Weight and comfort in long VR sessions
“Long session” isn’t a fixed number on the clock; it’s whatever you keep the headset on until fatigue starts to degrade immersion and performance. Many users notice that comfort drops between 45 and 90 minutes — not because the headset suddenly weighed more, but because muscles and skin begin to register uneven loading. Front-heavy designs push the head forward, producing neck torque and chin lift. That torque forces postural compensation and can create tension across your neck, shoulders, and jaw.
Two headsets with similar mass can feel completely different. Perceived weight depends on where the mass sits relative to your face and skull. A well-balanced headset spreads load across three contact points: the forehead (or upper face gasket), the crown, and the occipital bone at the back of your skull. If most of the weight sits forward, the nose and cheeks shoulder the burden, producing hotspots, redness, and headaches even when the numbers on the scale are modest.
For Quest 2 owners specifically, strap selection and adjustment are a first-order remedy. The stock elastic strap is light but tends to let the display sag forward during active play. Upgrading to a halo or Elite Strap shifts load toward the crown and back of the head, dramatically reducing facial pressure. Before you assume you need a lighter headset, test strap and fit changes: better balance often buys more time in VR than a marginal gram reduction.
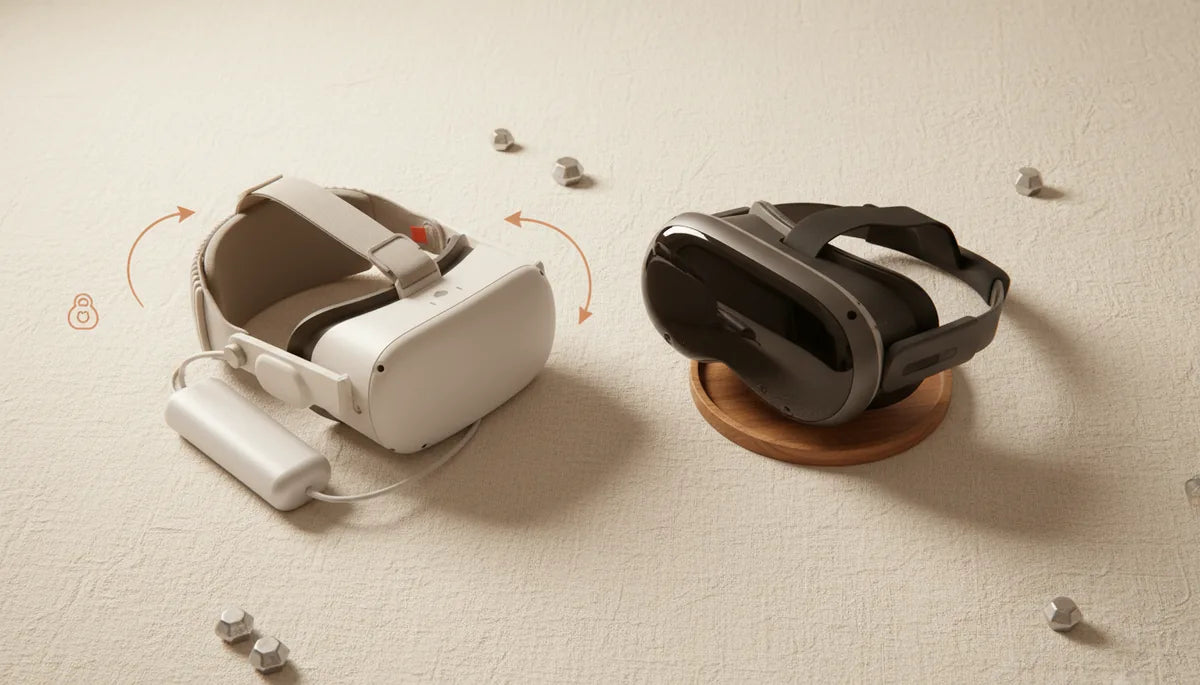
Headset weights and strap ecosystems: Quest 2 vs Vision Pro
Raw weight provides a useful baseline: the Meta Quest 2 comes in at roughly 503 grams (about 1.1 pounds), while Apple’s Vision Pro is commonly estimated between 600 and 650 grams (1.3–1.4 pounds). Those numbers alone, however, don’t fully predict how you’ll feel after two hours. The Quest 2’s advantage comes from an open accessory ecosystem—third-party halo straps, battery packs, rigid Elite Straps, and modular cushions are all widely available, letting users tune balance and padding to their head shape and activity.
Apple’s Vision Pro takes a closed, integrated approach: the dual-loop band, overhead strap and rear cradle are engineered together with carefully shaped light seals and padding to offset a heavier front. That systems-level design often delivers premium comfort without aftermarket adjustments, though options for third-party modification are limited compared with Quest 2 accessories.
Compatibility is straightforward: Quest 2 straps are designed for Quest 2 hardware and click onto the side posts. Vision Pro’s strap system is proprietary and not cross-compatible. So your comfort strategy differs by platform: Quest 2 users pick and swap — testing halo designs, rear counterweights, and battery-backed straps — whereas Vision Pro users rely mainly on Apple's factory geometry or specialized accessories made for that platform.
Step-by-step Quest 2 comfort strap installation and fit
Installing and dialing in a Quest 2 comfort strap is one of the quickest ways to lengthen playable sessions. The process is simple but worth doing deliberately.
- Unbox and inventory: lay out the main halo or rigid frame, the top crown strap, any adapter clips, and extra padding.
- Remove the stock elastic strap: detach the Velcro top strap and slide the side arms off the headset posts. Keep stock parts if you want a fallback.
- Attach the new strap: align the strap arms with the side posts and press until they click. Secure the top strap with its Velcro or clip so it runs over the crown.
- Initial fit: place the headset on, then tighten the rear dial or ratchet until it feels snug—not constricting. The headset should rest on the forehead and the back of the skull, with minimal pressure on the nose.
- Top strap tuning: adjust the crown strap to raise or lower the front of the visor. Raising slightly shifts load to the crown and rear; lowering centers more weight on the face.
- Eliminate hotspots: wear for five minutes and scan for pressure at the forehead, temples, and cheekbones. Make small adjustments—loosen or reposition the halo—until pressure evens out.
Key technique: when tightening the back dial, tighten in small increments while checking lens alignment and IPD. If the headset rides too low or too high, your eyes will strain to find the sweet spot, which undermines even the best strap upgrades.
How to choose a comfortable head strap for Quest 2
Pick a strap by matching design to your priorities: long-duration comfort, active room-scale play, or portability. Don’t fixate on grams alone—material, padding geometry, and adjustability matter just as much.
- Padding quality: look for open-cell foam or plush fabric that preserves thickness under pressure. Cheap foam compresses quickly and creates new hotspots.
- Adjustability: a top crown strap plus a rear ratchet offers the most control. Multi-point adjustment lets you fine-tune pitch (nose up/down) and roll (head tilt), which affects lens alignment.
- Weight and balance: some straps add a rear battery or counterweight. These increase total mass but can move the center of gravity rearward for a net comfort gain.
- Glasses compatibility: check for a shallow face gasket or adapter spacers. Some straps include extra cheek padding to accommodate prescription glasses without pinching your temples.
- Ease of installation: if you swap headsets or switch users often, choose a strap that installs and removes quickly without tools.
Common choices: the stock elastic strap is light and portable but offers minimal balance control. The Elite Strap (rigid) gives superior stability and a clean rear ratchet—many users find it a major step up for sessions past an hour. Adding a counterweight or battery pack to the Elite Strap can further reduce face pressure; aim for modest weights (100–200 g) mounted low over the occiput to avoid creating a new hotspot.
Weight reduction strategies for Quest 2 without sacrificing fit
If you want to shave weight but keep comfort, prioritize removing unnecessary front-mounted mass and simplifying attachment points rather than stripping padding. Small changes often produce outsized benefits because they preserve balance.
- Remove heavy front accessories: detachable speakers, large lens covers, or oversized facial interfaces add frontal load. Replace them with lighter alternatives or skip them for long sessions.
- Choose lighter strap materials: some third-party halos use thin carbon-fiber frames or reinforced plastics that cut grams compared with bulkier rigid straps, while still keeping stiff support.
- Relocate batteries and accessories to the rear: if you need extended play, use a small rear-mounted battery or counterweight instead of a front battery pack. Even a 100 g rear battery improves balance far more than a 100 g front add-on hurts it.
- Trim non-essential padding carefully: shaving foam is a last resort. Overdoing it sacrifices pressure distribution, so only reduce padding where it causes local hotspots.
Safety note: avoid structural modifications that change how the side arms click into the headset posts. Improper mods can affect tracking, interfere with sensors, or cause slippage. When in doubt, choose vendor-approved parts or common aftermarket brands with good user reviews.
Achieving balance: weight distribution tips for long sessions
Balance is the invisible multiplier for comfort. A slightly heavier but well-balanced headset often outlasts a lighter, front-heavy unit. The goal is to have the center of gravity sit roughly over the midline of your head, where the crown meets the occiput.
Practical positioning tips:
- Top crown strap: position the crown strap so it pulls the headset back into the occipital cradle rather than letting the front sag. The strap shouldn’t be tight; it’s a tension guide that shifts forces rearward.
- Back strap and dial: tighten the rear dial until the lash on your forehead feels even—not pinching, yet preventing forward pitch. Small adjustments matter more than brute tightness.
- Visor pitch: aim for a neutral pitch where you can see through the center of the lenses without needing to tilt your chin. If you’re constantly looking up or down, redistribute the strap tension to correct pitch rather than contorting your neck.
Quick balance checklist before a long session:
- IPD and eye relief set correctly—clear focus without leaning.
- Forehead pressure even across the top edge; no single red hotspot.
- Back strap resting on the occiput, not the crown edge.
- Top strap slack tuned to keep visor pitch neutral.
- Optional rear counterweight only if it restores rearward center of gravity by ~100–200 g.
Case example: a hobbyist switched from the stock elastic strap to a halo design and added a 120 g rear counterweight. The headset felt heavier when lifted off the table but, once worn, neck strain dropped after 90 minutes because the center of gravity moved closer to the back of the skull.
Comfort for glasses wearers and ergonomic considerations
Glasses add another variable to long-session comfort: extra thickness in the facial interface, potential temple squeeze, and reduced nose clearance. The right strap and a few small changes can make VR with glasses practical for hours.
Fit adjustments for glasses wearers:
- Increase face gasket spacing if your strap or purchase includes a spacer to push the headset slightly away from your face. That additional gap reduces lens-to-glasses contact and minimizes temple pressure.
- Check temple clearance: if temple pressure builds, shift padding outward or choose a facial interface with deeper eye pockets. Some aftermarket foam kits increase side clearance without sacrificing light seal.
- Consider prescription lens inserts: they eliminate glasses entirely inside the headset, remove temple squeeze, and preserve the gasket seal. Inserts are a strong investment for frequent long sessions.
- Pick lightweight frames: if you must wear glasses, low-profile frames with thin temples reduce pinch. Avoid bulky or wraparound glasses that force the gasket outward.
Also remember that ventilation and heat amplify discomfort for glasses wearers—sweat can fog lenses and grip on temples. If you sweat easily, prioritize breathable foam and intermittent micro-breaks to wipe both skin and lenses. Small changes—adjusting top strap tension, using thinner frames, or installing inserts—often extend comfortable playtime far more than swapping the whole headset.
Maintenance, care, and evaluating strap performance over time
A well-chosen strap will perform for years, but padding compresses, Velcro weakens, and dial mechanisms gather grit. Regular maintenance preserves comfort and protects your investment.
- Cleaning: wipe foam and fabric with a lightly damp cloth and mild soap after heavy use. Avoid saturating open-cell foam. For the facial interface, use an antibacterial wipe safe for electronics and follow manufacturer cleaning guidance.
- Inspection: every 3–6 months, check foam for compression or tears, verify Velcro still holds, and rotate through any removable pads so a single area doesn’t wear through prematurely.
- Replace soft parts: foam inserts, face gaskets, and pads are wear items. Replacing them is often cheaper and more effective than buying a new strap when the original padding is flattened.
- Mechanics: keep ratchets and dials free of debris. A quick compressed-air blast can dislodge dust that causes slippage. Lubricate only if recommended by the vendor.
Evaluate strap performance after long sessions: if you notice recurring hotspots or new slippage, re-run the balance checklist and consider whether padding replacement or an alternative strap design is warranted. Track your sessions—note discomfort onset times and conditions (temperature, activity type, glasses use). These data points make it easier to choose targeted upgrades instead of costly trials.
Next step: if you regularly exceed 60 minutes in VR, try a single upgrade (halo or Elite Strap) and run a controlled 60–90 minute test, logging comfort, hotspots, and neck fatigue. Small, measured changes reveal what your head needs: lighter, or simply better balanced.


Share:
Fine tuning Quest 2 strap length for a secure, pressure-free fit
Comfort or Stability? How Strap Choice Affects Weight Distribution on Meta Quest