

Quest 2 Comfort Strap Installation Guide: Choose, Fit, and Fine-Tune for Long VR Sessions
If you love long VR sessions but fatigue, hot spots, or slipping straps cut your playtime short, the right comfort strap and a careful installation can change everything. This guide walks you through choosing the best Quest 2 comfort strap for extended wear, the tools and parts you’ll need, a clear step‑by‑step installation, and practical tuning tips for glasses wearers and different head shapes. ⏱️ 9-min read
Read this straight through for a complete setup, or jump to the section you need: compatibility, quick fixes, or maintenance. By the end you’ll know how to install a strap that balances the Quest 2’s weight, reduces neck torque, and keeps you comfortable for hours.
Choosing the right Quest 2 comfort strap for long sessions
Not all comfort-strap-alternatives-official-premium-padding-and-third-party-options" rel="nofollow noopener noreferrer">comfort straps are created equal. For marathon VR sessions, focus on three things: padding quality, weight distribution, and a locking attachment that won’t loosen mid‑game. Padding matters more than plushness — dense, high‑rebound foam holds shape and resists the “flattening” that creates pressure points after an hour. Look for straps that use firm cores with a softer outer layer or moisture‑wicking covers; mesh or breathable fabric keeps sweat down and skin cooler.
Weight distribution is the second big consideration. The Quest 2 weighs about 503 g by itself; if a strap concentrates mass at the front, you’ll feel forward tilt and neck strain. A good long‑session design pushes support toward the crown and rear of the head, spreading load across a larger surface and counterbalancing the display. Many third‑party options like FlitLift GraviPro and premium Elite Strap variants emphasize rear padding or a counterweight for this reason.
Finally, match the strap to your personal needs. Glasses wearers should prioritize side clearance and softer temple pads; quick‑release clasps help if you swap headsets or share with friends; and if you pace around a lot, choose a strap with a secure locking mechanism and minimal slip. Decide which tradeoffs matter most — weight, convenience, or cooling — and pick accordingly.
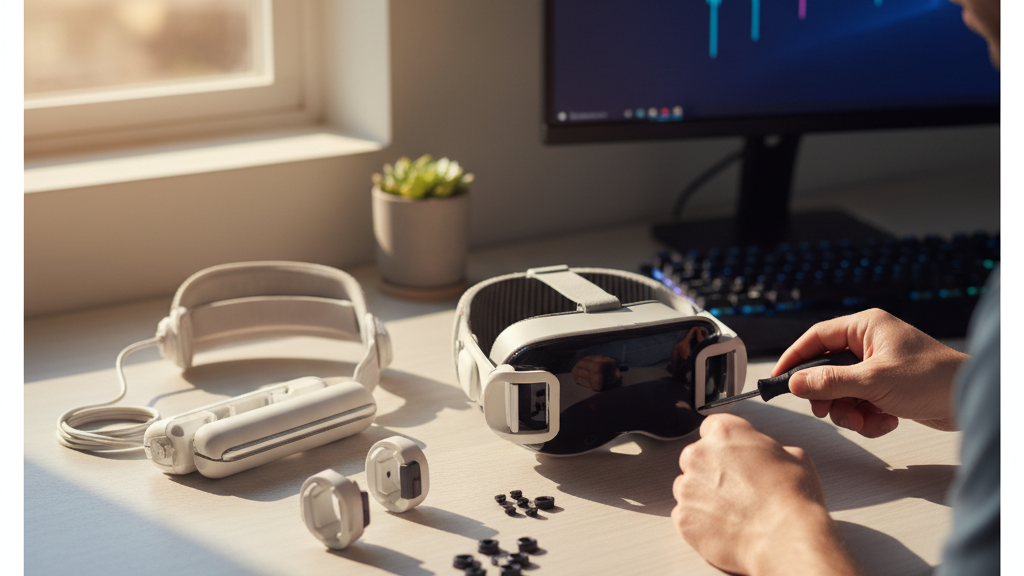
What you’ll need for installation
Before you touch the headset, gather parts and clear a workspace. Most comfort strap kits include the strap body, left and right side mounting brackets, a back or crown pad, and a full set of screws and spacers. Some premium kits add quick‑release connectors or a battery module; verify these extras fit your Quest 2 model.
- Tools: a small Phillips or flathead screwdriver (or hex wrench if included), and a soft cloth. Many kits include driverless thumbscrews — still keep a screwdriver nearby in case a screw is tight.
- Workspace: a flat, non‑slip surface with good lighting and a small container to hold screws and tiny parts.
- Inspection checklist: compare the laid‑out pieces to the kit inventory. Confirm both side brackets, the central strap piece, any spacers/washers, and correct screws are present and undamaged.
Do a dry fit by sighting connectors into the headset’s mounting slots without tightening. If any bracket binds, or you see burrs or stripped threads, don’t force it — contact the vendor for replacements. Wiping the headset’s mounting areas with a lint‑free microfiber cloth removes oils and dust that can prevent a solid seating. A little patience here prevents stripped plastic or a wobbly final fit.
Step-by-step installation guide
Install the new strap methodically to protect the headset and ensure a balanced outcome. Work slowly and test fit before final tightening.
- Power down and unplug: Turn off your Quest 2 and remove any headphones, face covers, or accessories.
- Remove the stock strap: Release side clamps or top strap gently. Keep screws and small parts in your parts container so nothing is lost.
- Clean the contact surfaces: Use a clean microfiber cloth to remove dust from the headset’s side slots and any mating surfaces on the new strap.
- Insert the side brackets: Align each bracket with the headset’s slot and slide straight in. They should seat flush — stop if you feel resistance and check alignment.
- Align guides and spacers: Ensure guides on the strap match the ridges on the headset. If your kit includes spacers or washers, place them where the instructions indicate to prevent binding or overtightening.
- Tighten screws evenly: If screws are used, tighten in a crisscross pattern to avoid uneven clamping. Make them snug — not overtorqued — to protect plastic threads.
- Attach padding and crown pad: Snap or slide on any included cushions. Confirm they sit flush against the strap without bulging.
- Quick fit test: Put the headset on loosely. Move your head through natural motions — look up and down, shake gently — and watch for tilt or slippage. If you get forward drift, recheck bracket seating and balance before final tightening.
Take your time on the first install. The difference between “snug” and “cracked plastic” can be a single extra turn of the screwdriver.
Fine-tuning fit: height, length, and tension
Tuning is where comfort transforms into endurance. There are three small adjustments that together eliminate hotspots and keep the image steady: top‑strap height (eye relief), side length (cheek and temple contact), and back‑strap tension (crown support).
Start with height for proper eye relief. Position the top strap so the pads sit about a finger‑width above your eyebrows. This places lenses in the right plane for your IPD and avoids pressing on the brow. If the image is soft or you see edge distortion, adjust the top strap up or down a notch and recheck focus.
Next, balance side length. Shorten or lengthen both side straps evenly. The cushions should make constant, gentle contact with your cheeks and temples — firm enough to seal but not dig in. If one side feels tighter, loosen both and re‑set by equal increments until pressure is symmetrical.
Finally, set back strap tension to share load between crown and face. Increase rear tension to shift weight away from the front; decrease it if the headset rides too high. For small heads or short necks, moving the rear pad up toward the occipital bone and letting the top strap take more of the load reduces neck torque. For wide faces, widen the cradle and raise the top strap slightly to keep glasses from pressing into the temples.
Test adjustments with movement: quick head turns, looking up and down, and a short walk. Watch for lens shift or slippage; re‑tune in small increments until stable. Small changes compound — a 2–3 mm tweak can be the difference between fatigue and a comfortable two‑hour session.
Comfort enhancements and ergonomics
Even a great strap can benefit from simple enhancements. Think of these as small investments that significantly cut neck strain and heat buildup during longer play.
- Back‑of‑head cushions: A thicker occipital pad or a gel sleeve behind the crown can redistribute the headset’s 503 g mass across a wider area, reducing torque. Many brands sell retrofit pads that attach with Velcro or snap in place.
- Memory‑foam add-ons: Slim memory‑foam trims for the temple and cheek areas soften sharp contact points and eliminate hotspots. They’re especially helpful for glasses wearers because they pad around the frame without shrinking internal space.
- Breathable covers: If you overheat, swap in mesh or moisture‑wicking covers for the forehead and cheek pads. These covers allow air circulation and are easy to wash.
- Counterweights or battery modules: For users who want maximum balance, a lightweight counterweight or an Elite Strap with battery can shift the center of gravity rearward. Keep in mind this adds mass and should be tuned with the rear pad position.
Small ergonomic tweaks solve surprisingly large comfort problems. For example, adding a thin gel sleeve behind the rear pad reduced neck complaints for a user who previously felt forward pull after 45 minutes — a small change in contact area produced a big change in perceived balance.
Maintenance, care, and lifespan
Routine care prolongs strap life and keeps performance consistent. A few minutes every couple of weeks is all you need.
- Cleaning: Wipe pads and strap covers with a cloth dampened in warm water and a drop of mild dish soap. Rinse away soap residue and air‑dry fully before reattaching. Avoid soaking foam or submerging snap connectors.
- Avoid solvents: Do not use alcohol, acetone, or citrus cleaners on cushions, covers, or connectors — these break down glue and foam and can damage plastic clips.
- Inspect regularly: Check screws, connectors, and padding for wear. Look for stripped screws, cracked brackets, frayed fabric, or compressed foam that no longer rebounds. Tighten screws gently if they loosen during use.
- Storage: Store the headset and strap flat or hung in a cool, dry place out of direct sunlight. Don’t tightly pack straps where they’ll be creased; avoid folding at hinge points to preserve the foam and connectors.
Replace components when padding compresses past the point of comfort or when connectors show visible stress. Many third‑party vendors sell replacement pads and brackets so you can refresh the strap without buying a whole new unit.
Compatibility, comparisons, and troubleshooting
Choosing between the stock Elite Strap, Elite Strap with battery, and third‑party options often comes down to tradeoffs. Official Elite Straps attach cleanly to the Quest 2’s side slots and offer a familiar balance and easy installation. Third‑party brands like AMVR, Kiwi Design, and FlitLift may offer denser foam, different crown placements, or quick‑release connectors that suit particular play styles. When comparing, check attachment method, padding density, added mass, and whether the strap keeps clearance for glasses.
Common issues and fixes:
- Strap slippage or tilt: Loosen both sides, reseat the side brackets fully into the headset slots, then tighten evenly in a crisscross pattern. If slippage persists, check for worn or cracked connectors and replace them.
- Uneven pressure: Identify which side feels tighter, ease it slightly, and retighten the opposite side in small increments. Ensure the top strap lies flat and isn’t twisted.
- Glasses pressure: Slide glasses forward and raise the top strap a notch to create temple clearance. Add a thin pad behind the temple to prevent frame tips from digging in.
- Noise or creak from hinges: Slightly loosen screws, realign parts, and re‑tighten. If the creak persists, shield contact points with a small felt washer or replace the noisy hinge if available.
- Model‑specific fit: Some Quest 2 revisions have subtle differences in anchor points. Always follow the strap manufacturer’s model compatibility guidance to avoid forcing incompatible brackets into the headset.
Quick‑start troubleshooting checklist: power off the headset, ensure brackets are fully seated, tighten screws gently in a crisscross, confirm pads are flush, and re‑test with natural head motion. This short routine solves most setup problems and prevents damage from overtightening.
Case examples: For a user with a wide face and glasses, widening the cradle and raising the crown pad eliminated temple pressure without losing seal. For a small‑headed user with a short neck, moving the rear pad upward and allowing the top strap to take more of the load reduced neck fatigue substantially.
Next step: After installing and tuning, schedule a 30‑minute trial session to monitor hotspots, sweat, and balance. Make one small adjustment at a time — comfort is an iterative process.


Share:
Endurance testing: which Quest Two strap remains comfy during long gaming sessions
The elite strap showdown: does the Quest Two official strap beat third-party headbands for comfort