

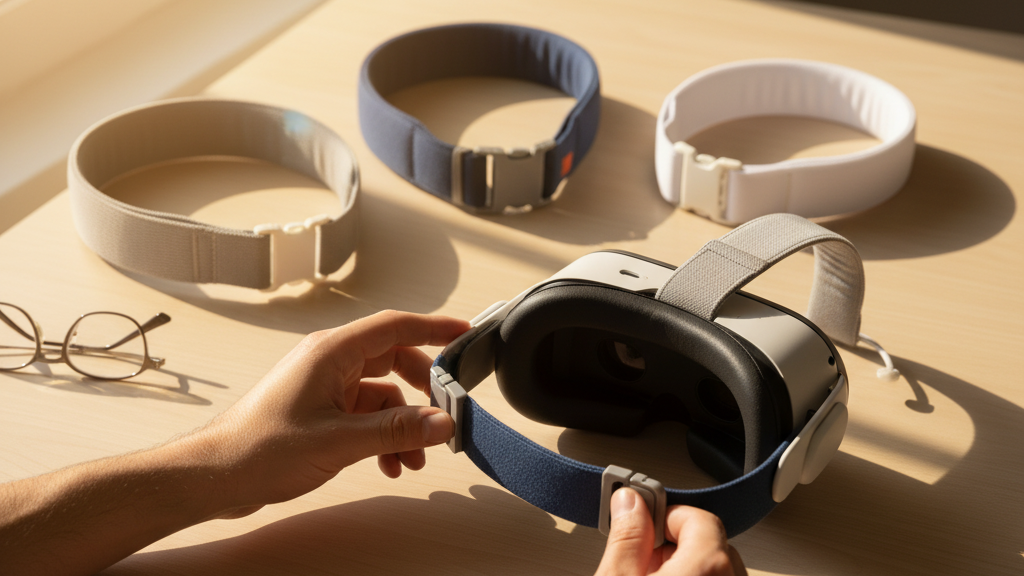
Third-Party Meta Quest Straps Compared: Durability, Comfort, and Value for Long Sessions
If you’re a Quest 2 owner logging multi-hour VR sessions, the stock strap will eventually show its limits. Third-party comfort straps promise better weight distribution, thicker padding, and modular features—but not all are created equal. This guide gives a practical, side-by-side look at what matters: materials and durability, real-world comfort, adjustability, installation, cost-per-hour value, vision-pro-vs-meta-quest-ergonomics-weight-straps-and-user-comfort" rel="nofollow noopener noreferrer">weight and balance with accessories, maintenance, and accessory compatibility. ⏱️ 10-min read
Below you’ll find clear buying checkpoints and hands-on tips so you can choose a strap that lasts, stays comfortable for long sessions, and fits your headset and play style without surprises.
Durability and Materials
Third-party straps mix materials to balance weight, stiffness, and comfort. Most mid-priced options use polymer composites for light frames; premium models add aluminum or reinforced metal at hinge points to reduce flex. Strap webbing is typically nylon or polyester—both strong, but blended or reinforced edges resist fraying better. Padding materials range from EVA and PU foams to memory foam cores; outer textiles often include moisture-wicking layers or breathable mesh.
Where straps fail most often is predictable: hinge cracks, loose strap anchors, and frayed webbing close to buckles or clips. Designs that concentrate stress at a single flex point—especially near the crown hinge—are more likely to develop cracks. Higher‑rigidity frames with fewer flex joints and riveted or metal-reinforced anchors tend to outlive snap‑in plastic clips. If you see exposed glue lines or thin plastic at pivot points, that’s a red flag.
Abrasion resistance and splash tolerance matter when you sweat through a session. Look for sealed seams or coated textiles to repel moisture; remember, most third‑party straps are water‑resistant at best, not waterproof. Care tips to extend life: avoid folding straps sharply, wipe sweat off after sessions, and inspect connector points monthly. Replace any frayed webbing immediately—small tears grow fast under tension.
Comfort and Ergonomics
Comfort is about pressure distribution, not just thicker foam. The best third‑party solutions use multi‑density padding: a firmer core for support with a softer surface layer to prevent hotspots. Wide contact areas across the crown and sides diffuse pressure, which reduces cheek and temple strain during long sessions. Halo or cradle designs that wrap the crown are particularly effective at spreading force away from the forehead.
Breathability reduces heat build-up. Straps with perforated foam, mesh panels, or moisture-wicking covers let air circulate and dry sweat faster. For long sessions, this matters as much as cushion density: thicker foam that traps heat can create irritation and shorten comfortable playtime.
Geometry influences stability. Single-strap systems are lightweight but can tug on one temple; double‑strap systems distribute weight across both sides; halo designs push force through the crown and rear. If you do a lot of standing or active play, a rigid or semi-rigid halo will reduce bounce and wobble. Glasses wearers should look for higher nose clearance and softer temple contact points—some straps include cutouts or tapered edges to avoid pressing glasses arms into the temples. Always test a strap with your frames on to confirm there's no pressure on the bridge or a slight lens tilt.
Fit, Adjustability, and Long-Session Comfort
Adjustment range and micro-tuning are where comfort becomes personal. A strap that sounds comfortable out of the box may create hotspots after two hours if you can’t tweak the crown height or temple reach. Prioritize systems that let you independently adjust crown height, side length, and rear support. That three-way tuning lets you set lens distance, cheek clearance, and rear counterpressure without trade-offs.
Typical hardware choices include ratchets, Velcro, sliders, and quick‑release clasps. Ratchet systems offer precise micro-adjustments and lock firmly—great if you rarely change users. Velcro and sliders are lighter and faster to adjust but can loosen under heavy movement or after repeated tweaks. Look for metal or reinforced plastic hardware; cheap plastic sliders are common failure points and lead to sudden fit changes mid-session.
How micro-adjustments affect comfort: small changes to crown height alter pressure on the forehead and redistribute weight toward the rear; tiny shifts in side length change cheek contact and can eliminate lens tilt. For long sessions, get into the habit of dialing and testing: wear the headset, do a few head turns, and pause to adjust before you start a long block. For multi-user households, choose a strap with quick presets or easy memory settings so you don’t have to fine-tune from scratch each time.
Installation, Setup, and Compatibility
Swapping a third‑party strap onto a Quest is straightforward if you know the mounting points and compatibility caveats. For Quest 2 and Quest 3, most straps use side rails and a top bracket. Installing usually means removing the stock strap, aligning the third‑party connectors with the side rails, then sliding or clipping them into place until they click. After installation, gently tug the strap and run through a few adjustments to ensure a secure fit.
Connector styles vary: slide-in rail connectors, clip-in brackets, and proprietary adapters. Check whether a strap requires a specific adapter for your Quest revision. Some third‑party makers sell universal plates or include spacers to maintain the face gasket seal. If the strap uses a quick-release, practice detaching and reattaching to ensure it doesn’t pinch cables or catch on the headset foam.
Third‑party designs build on the Elite Strap concept (rigid support and back counterweight) but differ in execution. Some add side rails for modular accessories, others focus on lightweight fabric for breathability. If you own multiple Quest revisions, look for “universal” claims and confirm that the mounting plate aligns with your headset’s camera area—bulky connectors can obscure sensors or interfere with passthrough cameras. Firmware updates to your Quest won’t change mechanical compatibility, but if an accessory includes electronics (like a powered battery pack), check for firmware notes from the accessory maker regarding passthrough or power negotiation.
Value, Warranty, and Longevity
Price tiers reflect materials and features. Budget straps ($15–$30) typically use basic nylon webbing and thinner padding—good for short sessions or occasional use but often show wear in months. Mid‑range options ($30–$60) add reinforced stitching, better foam, and sturdier adjustment hardware. Premium straps ($60–$120+) use metal hinges, multi‑density memory foams, and modular designs that accept battery packs or counterweights.
Warranty terms vary: many reputable brands offer a 1‑year limited warranty; some extend to 2 years. Warranties usually cover manufacturing defects—broken hinges, faulty buckles, or delaminating padding—but not normal wear from heavy use. To file a claim, you’ll typically submit a proof of purchase and photos; turnaround can range from a few days to several weeks. If long sessions are part of your routine, prioritize manufacturers that sell spare parts—replacement pads, clips, and straps—because replacing a worn cushion is cheaper and faster than buying a whole new assembly.
Estimate cost-per-hour to judge value. Example: a $60 mid‑range strap used 10 hours per week (≈520 hours/year) costs about $0.12 per hour in year one. A $30 budget strap under the same usage is $0.06/hour but may need replacing in months, raising long-term cost. A $100 premium strap lasting two years becomes roughly $0.096/hour. The takeaway: for heavy users, investing in a durable, modular strap with spare part availability often gives better long-term value than repeatedly buying cheap alternatives.
Weight, Balance, and Battery-Accessory Considerations
Strap weight ranges matter more than you think. Lightweight fabric bands often weigh under 100 g; battery-capable, rigid straps with metal parts can exceed 150–200 g once you include a mounted battery. The added mass shifts the center of gravity—forward bias makes the headset feel heavier on your face, while a rear-mounted battery pack can effectively counterbalance the front weight and reduce perceived strain.
When planning for accessories, consider how mounts and cable routing affect balance. A rear battery is a common counterweight and reduces front pressure, but it increases neck load during rapid movements and can make the headset feel bulkier in tight spaces. Some third‑party straps provide a dedicated rear pocket and secure cable channels to keep the battery’s weight centered and the cable out of the way. Without thoughtful routing, cables can tug or disconnect during active play.
Balance matters during dynamic movements. Quick head turns can highlight a strap’s shortcomings: a forward-heavy setup tends to tilt downward on saccades, increasing neck strain; a well-balanced strap remains stable and returns to neutral quickly. If you plan to attach third‑party wireless adapters or battery packs, confirm the strap’s declared weight capacity and mounting pattern. Practical tip: if you buy a strap and a battery pack separately, test them together before accepting returns—small differences in mount geometry or cable length can cause fit problems that aren’t obvious in product photos.
Maintenance, Cleaning, and Care
Regular care extends a strap’s useful life and preserves comfort. Material-specific cleaning keeps fabrics fresh and padding resilient. For nylon and polyester webbing, a soft cloth with mild soap and lukewarm water removes sweat and grime; avoid soaking. Neoprene and memory-foam covers tolerate a light rinse followed by a thorough air dry. Silicone or rubber components wipe clean with soap and water; avoid alcohol or solvents that degrade adhesives and seals.
Cleaning frequency depends on sweat and usage: wipe down after every heavy session; perform a deeper clean weekly or monthly based on how often you play. For stubborn stains, a paste of baking soda and water applied briefly and then rinsed can lift discoloration—always spot-test on an inconspicuous area first. Odors improve with exposure to fresh air; if a manufacturer permits it, an occasional odor-neutralizing spray can help but avoid saturating the foam.
Drying and storage matter: do not use direct heat or a dryer—high temperatures warp plastics and compress foam. Air dry in a well‑ventilated area away from sunlight. Store the headset with the strap loosely fastened in a cool, dry place; avoid folding straps tightly or hanging heavy items off connectors. Inspect seams, rivets, and clips periodically; catch fraying or loose stitching early and replace affected parts. These small habits typically add months to a strap’s lifespan.
Compatibility with Accessories and Cross-Brand Trends
As the Quest accessory ecosystem grows, cross-compatibility becomes a practical priority. Many third‑party straps now follow shared mounting patterns or provide universal adapters to accept batteries, counterweights, and wireless modules. Modular rails and quick-connect clips are trending, letting you swap headbands, face pads, and accessories without a toolbox.
But not every accessory plays nicely together. Bulkier cushions or misaligned mounts can obstruct cameras or break the facial seal, affecting tracking and passthrough clarity. If you plan to add wireless adapters or Vision Pro-style accessories, confirm screw sizes, clip types, and rail spacing. Manufacturers that publish detailed diagrams or provide adapter kits make mixing components far less risky.
For eyewear users, predictability is key: choose straps and modular face pads that list glasses compatibility or include cutouts for frames. Also check whether third‑party wireless adapters require additional clearance around the side rails. The broader trend favors modularity—universal clips, tool-free quick-connects, and standard rail widths—but always verify compatibility with your exact Quest revision. When in doubt, look for brands offering return windows and spare parts; modular ecosystems are only useful if you can actually swap parts without breaking a seal or blocking sensors.
Takeaway: prioritize your primary use case—long seated sessions, active room‑scale play, or heavy accessory use—and select a strap that balances durability, adjustability, and modular compatibility accordingly. If you need a next step, check the strap’s mounting style against your Quest model, inspect the hinge and webbing in product photos, and factor in spare-part availability before you buy.


Share:
Drying and storage techniques after cleaning your Quest two comfort strap
Choosing a Strap for Different Use Cases on Meta Quest Two: Gaming, Fitness, and Social