

Best Face Gaskets and Cushions for Oculus Quest 2: Comfort, Fit, and Hygiene
If you own a Quest 2, the small band of padding that sits against your face can make the biggest difference in comfort, fit, and hygiene. Swapping the stock interface for a better gasket or cushion is one of the fastest upgrades: it can reduce pressure points, block light leaks, protect lenses from glasses, and—the often overlooked benefit—keep skin and pads cleaner between sessions. ⏱️ 10-min read
This guide walks through material choices, leading brands and models, comfort upgrades for marathon play, fit and seal techniques, advice for glasses wearers, step-by-step installation tips, and practical cleaning routines. Read on for actionable recommendations so your next session feels lighter, cooler, and cleaner.
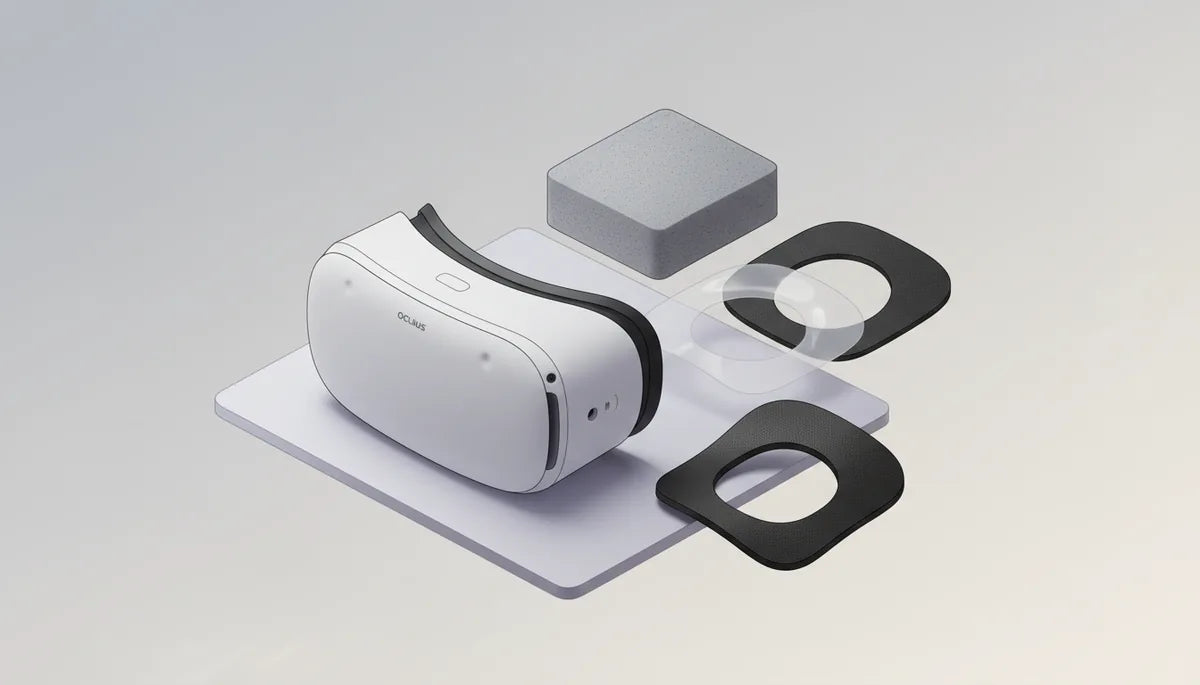
Material Choices: Foam, Silicone, and Leatherette Cushions
Choosing the right material is the foundation of a good Quest 2 experience. Each option—open-cell foam, closed-cell foam, silicone, and leatherette (PU)—has trade-offs in comfort, breathability, cleaning, and longevity.
Open-cell foam is soft and forgiving. It conforms to cheekbones and the bridge of the nose, producing a pleasant initial feel for long sessions. Its downside is porosity: open cells soak up sweat, oils, and odors, so cleaning is more involved and the pad will eventually flatten with repeated compression. It’s inexpensive and comfortable at first, but maintenance and replacement frequency are higher.
Closed-cell foam offers a firmer, denser option that resists moisture and holds shape longer. It won’t absorb sweat the way open-cell foam does, so it’s easier to wipe clean and tends to smell less over time. Many users trade a bit of softness for this durability and better hygiene—useful if you game frequently or share the headset.
Silicone cushions are non-porous and very easy to sanitize: a quick wipe with isopropyl alcohol or an electronics-safe disinfectant keeps them fresh. Silicone maintains its profile over time and creates a stable seal, which helps block light leaks. The main trade-offs are breathability and thermal comfort—some people feel warmer and sweat more during extended play. Silicone also runs higher in price, but its durability means fewer replacements.
Leatherette (PU) sits between foam and silicone. It looks tidy, wipes clean faster than open foam, and gives a smooth surface that some users prefer against their skin. Quality varies: higher-end leatherette with stronger stitching and a good backing will last, while cheap PU can crack or delaminate. Consider leatherette if you want a balance of cleanability and a softer touch without the full airtight feel of silicone.
Brand Options and Concrete Picks for Quest 2 Cushions
Several brands have built reputations for reliable Quest 2 cushions. Here are practical picks that cover hygiene, comfort, and budget-conscious choices, and how to match them to your priorities.
- VR Cover Premium Facial Interface — Available in washable fabric and premium silicone styles. The removable fabric covers are excellent for sweat-prone sessions and shared headsets because they’re easy to wash and quick to swap. Good hygiene profile; fits the official gasket layout.
- Kiwi Design Comfort Facial Pad — Known for plush velour or fabric pads that prioritize comfort. Their padding tends to be thicker with a softer finish, which makes it ideal for marathon sessions where cheek and nose pressure matter.
- AMVR Cushions (including Ventilated Face Pad) — Wide range: PU leather, ventilated mesh, and thicker “plus” options. AMVR models offer value and quick compatibility; the ventilated pads are budget-friendly ways to improve airflow compared with stock foam.
- Official Meta/Oculus Facial Interface — Basic replacement; inexpensive and easy to source. Use this if you want minimal change or a quick spare for backups.
Quick-win matchups: if hygiene is your top priority, choose washable fabric covers or silicone; if extended comfort matters, go for plush velour or memory-style foam with a firmer core; if budget is tight, an AMVR ventilated pad or the official replacement does the job without breaking the bank.
Comfort Upgrades for Long Sessions
For sessions that stretch beyond an hour, the cushion’s shape, thickness, and edge finish matter as much as material. Small changes redistribute pressure and reduce heat buildup, which compounds into far better comfort over time.
Look for pads with a wider contact area and contoured profiles that match facial anatomy rather than thin rims that focus pressure on the nose bridge. Dual-layer designs—soft outer layer over a firmer inner core—offer the best of both worlds: the edge feels plush while the core maintains support so the headset doesn’t sag or pinch during movement.
Some designs use a two-piece or split-pad layout to reduce pressure on the nose while keeping a solid seal around the cheeks. These can be a game-changer if you habitually get red marks on the nose after long sessions. Forehead padding or an integrated forehead pad also helps shift some of the headset’s weight away from the nose bridge and onto the brow, relieving common hotspots.
Airflow matters: pads with perforations, ventilated channels, or mesh-faced covers reduce heat and moisture. Sweat-wicking fabrics—microfiber, polyester blends, or treated velour—help sweat evaporate more quickly and reduce slippage. Edge finishing can also make a difference; soft, rounded edges reduce chafing, while smooth, stitched seams resist trapping sweat at the face-cushion junction.
Finally, consider strap upgrades in parallel with cushion choices. A comfortable facial pad with a weak strap still concentrates pressure. Upgrading to a balanced strap (oculus-quest-2-with-glasses-without-pinching-or-slipping-1" rel="nofollow noopener noreferrer">top strap or halo-style) spreads load and maximizes the return on your cushion upgrade.
Fit, Seals, and Adjustment Techniques
A premium cushion only performs if it seals correctly. Proper gasket position and even strap tension are the keys to blocking light, preventing pressure points, and maintaining comfort across sessions.
Start with positioning: place the upper edge of the gasket just under your brow and the lower edge against your cheeks. For wider faces, slide the gasket slightly toward the temples so the lower edge cups the cheeks. For narrower faces, tilt the gasket toward the nose bridge to close side gaps. Press gently along the perimeter to feel for even contact.
Adjustment is a two-stage process:
- Seat the headset with the top strap snug enough that the front faceplate sits against your face without pinching. This prevents forward tilt.
- Tighten the side straps evenly until the headset is stable. Small, balanced increments are better than large pulls that create hotspots.
Check for light leakage by dimming any strong light behind you and scanning the gasket edges inside the headset. Even small streaks of light at the nose or temple tell you where sealing pressure needs to shift.
To preserve even pressure across the face, test with short sessions and adjust. If you see red marks after longer use, back off a touch at the strap and retest. For repeated fits, mark your preferred strap notch with a tiny sticker or write on masking tape so you can replicate it quickly without trial-and-error. If leaks persist despite careful tensioning, consider a different gasket profile—often moving from a thin rim to a thicker, contoured pad fixes the problem.
Glasses-Wearer Considerations
Wearing glasses inside a Quest 2 raises two common problems: frames contacting the cushioning or lenses, and pressure on the nose bridge. The simplest, safest solution is the official Quest 2 glasses spacer, a small insert that moves the facial interface outward and creates extra clearance for frames.
If the official spacer isn’t available, look for reputable third-party spacers with similar depth and smooth rounded edges—sharp corners can catch frames and scratch lenses. Alternatively, pick gaskets specifically marketed as spacer-friendly or with deeper internal clearance; thicker, plus-size cushions or low-profile pads are good options depending on your frames’ shape.
Practical testing steps when trying a new cushion:
- Put on your glasses first, then the headset. Verify that the frames do not press on the lenses or bow inward.
- Check that the goggles still seal around your cheeks. If a spacer creates too much gap, light leaks may increase—adjust the gasket or strap tension accordingly.
- Observe for fogging. Extra clearance helps airflow and reduces fogging, but if you still see fog, lean into ventilation options like perforated foam or a mesh cover.
Cleaning around frames requires care: wipe lenses with a microfiber cloth and avoid solvents near anti-reflective coatings. When cleaning cushions, remove frames first to reduce accidental smudges or drops. If your frames are large or unusually shaped, consider prescription lens inserts that fit inside the headset—though these are a separate investment, they eliminate frame contact entirely.
Installation Guide and Quick Replacement Tips
Replacing your Quest 2 face gasket is a straightforward DIY task if you take a few precautions. Work on a clean, soft surface and power down the headset first to avoid accidental button presses or damage.
Removal
Start at a temple-side clip and gently lift the gasket away from the plastic frame. Work around the perimeter, releasing clips one at a time—don’t yank. Keeping clip tabs intact ensures the new gasket seats properly. If the old gasket is glued or stubborn, use plastic pry tools and patience rather than force.
Installation
Align the new gasket so its edge sits in the frame channel. For clip-on variants, press the top edge in first, then work the sides and bottom until each clip clicks. For adhesive-backed pads, clean the mating surface with a 70% isopropyl alcohol wipe and allow it to dry fully. Apply a thin, even layer of the supplied adhesive or follow manufacturer instructions, then press the gasket in place and hold for 30–60 seconds. Avoid adhesive on lenses and never touch the lens surfaces while installing the gasket.
Quick-swap and multi-user tips
- Keep pre-fitted covers: owning two or three removable covers allows instant swaps between users without removing the main gasket.
- Sanitize between users: a quick wipe of silicone or PU covers with alcohol is fast; fabric covers can go in a gentle wash cycle or be hand-washed and air-dried.
- Store spare gaskets flat in a clean bag to protect shape; don’t cram them between other items where edges could crease.
Before you finalize installation, run through this checklist: no visible gaps at the nose or temples, clips seated and undamaged, straps adjusted to your preferred setting, and lenses clean. Note warranty considerations: some third-party modifications can affect manufacturer warranty if they damage components—avoid adhesives that require altering plastic housings or mounting points if warranty preservation is a concern.
Maintenance, Cleaning, and Longevity
Regular care keeps cushions comfortable and extends their usable life. Cleaning routines differ by material, so treat silicone, foam, and leatherette according to their strengths and vulnerabilities.
Foam cushions
For open-cell foam, avoid soaking. Wipe with a microfiber cloth dampened in warm water with a drop of mild dish soap. Wring the cloth thoroughly and gently wipe the foam, then use a clean damp cloth to remove soap residue. Air-dry completely—about 24 hours—away from direct heat or sunlight. Avoid bleach, solvents, or abrasive cleaners that break down foam and stitching. Closed-cell foam can tolerate quicker wipes and dries faster; use a damp cloth for spot cleaning.
Silicone cushions
Silicone is the easiest: wipe down with 70% isopropyl alcohol or electronics-safe disinfectant wipes, then dry with a clean cloth. If heavily soiled, a gentle wash with mild soap and water followed by full air-dry works fine—silicone won’t absorb moisture. Avoid harsh solvents that can change the surface feel.
Leatherette (PU) cushions
Spot-clean with a damp cloth and mild soap. For deeper cleaning use a leather-safe cleaner and condition sparingly if recommended by the manufacturer. Avoid saturating seams; excessive moisture can delaminate the backing. Keep leatherette away from prolonged UV exposure to prevent cracking.
General maintenance tips:
- Sanitize frequently if the headset is shared. Removable covers make this much simpler.
- Replace cushions when they permanently flatten, crack, smell despite cleaning, or the seal degrades. For heavy users, expect foam pads to need replacement every 6–12 months; silicone and quality leatherette last longer.
- Store the headset in a cool, dry place. If you keep spare cushions, lay them flat in a clean pouch to avoid bending edges.
- Avoid using cleaning solvents on lenses; instead use lens-safe microfiber cloths and appropriate lens cleaners to prevent coatings from stripping.
Keeping a small care kit—microfiber cloth, mild soap, isopropyl wipes, and a spare removable cover—lets you maintain hygiene quickly and reduces the long-term cost of replacement pads.
Next step: pick the material that matches your priorities—silicone for easy sanitation, closed-cell foam for durability, or velour/fabric for plush comfort—then select a trusted model such as VR Cover, Kiwi Design, or AMVR, install carefully, and adopt a simple cleaning routine to keep your Quest 2 comfortable and fresh for every play session.


Share:
How to Choose a Quest 2 Comfort Strap That Fits Glasses Without Pressure
How to Adjust the Oculus Quest 2 Head Strap for Different Head Shapes and Sizes