

Front versus back weight: optimizing headset balance for VR
Comfort in VR is rarely about a single number on a spec sheet. Two headsets that weigh the same can feel miles apart depending on where that mass sits. Front-versus-back balance—how weight is distributed across the crown, temples, and face—is the practical lever that determines whether a session is effortless or ends with a sore neck and red marks across your cheeks. ⏱️ 10-min read
This guide walks you through diagnosing imbalance, measuring tilt and torque, practical adjustments you can make in minutes, and the accessories that help dial in a neutral, stable fit. Whether you own a Quest 2, are evaluating Vision Pro-compatible solutions, or shop for halo straps and counterweights, these steps will reduce strain and extend your playtime.
Diagnosing front- and back-weight imbalance
Start with simple body signals—your head is an excellent sensor. A forward-heavy headset typically produces downward pull at the nose and a feeling that the visor is trying to peel away from the crown of your head. You’ll notice increased chin or jaw pressure, frequent mid-session adjustments, and lens misalignment when you look up or turn quickly. Conversely, a back-heavy headset can irritate the occipital area at the base of the skull and cause the visor to ride higher on the face.
Physically inspect components that influence bias. Displays, front cameras, thick face cushions, and integrated batteries tend to push mass forward. Rear straps, halo systems, and counterweights pull the center of gravity back. Pay attention to contact points: a snug forehead clamp moves load forward while a well-padded crown contact distributes it across the top of the skull. Consider your head shape too—longer faces or pronounced cheekbones change where pressure concentrates.
To establish a baseline, use a short 5–10 minute test with your usual content. Log sensations at the 5- and 10-minute marks: where do you feel pressure, does the headset tilt, and do the lenses stay centered when you move? That quick audit gives you the information you need before you start experimenting with adjustments.
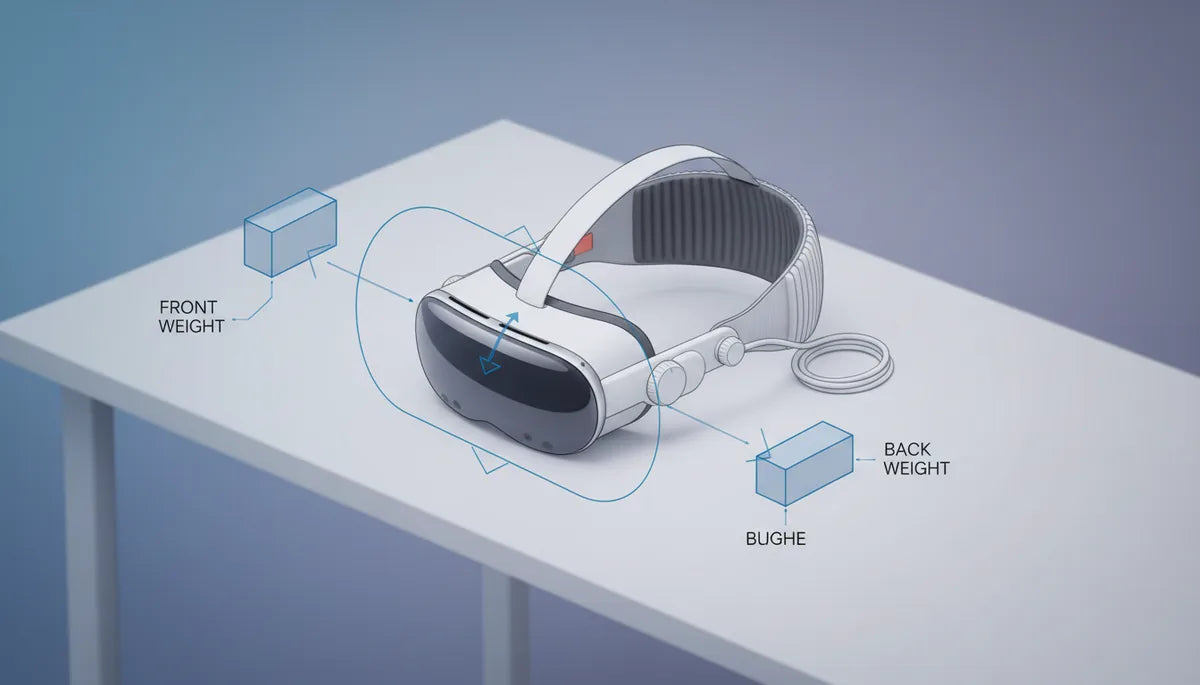
How to measure front vs back balance
Objective checks make adjustments far faster. Small tools and simple methods will tell you if a headset is nose-down, neutral, or back-heavy before you wear it. Place the headset on a neutral support—anything that mimics how it sits on a head, like a foam stand or a FlitLift GraviPro-style lift stand. Lay a spirit level across the brow area or top strap line to read tilt. A centered bubble indicates minimal pitch; a bubble toward the nose means nose-down.
For a torque proxy, use a smartphone inclinometer app: rest the headset on a horizontal support and measure the forward pitch angle. Larger nose-down angles mean a stronger nose-down moment (more torque). If you want to compare configs—different face cushions, straps, or accessories—record the angle for each setup. This gives you a repeatable metric rather than relying solely on feel.
Quick wear tests are still essential. After each change, do a 5–15 minute wear check and note chin/jaw contact, cheek pressure, and whether the headset shifts during nodding or rapid head turns. Keep a simple log: setup name, tilt angle, and subjective comfort at 5 and 15 minutes. Over a few iterations you’ll see which changes reduce forward pull and which merely move pressure to an uncomfortable spot.
Adjusting balance: a practical step-by-step guide
Balancing a headset is iterative. Make single changes, test, and record results. This systematic approach prevents swapping multiple parts and never knowing which move helped. Start with strap geometry, then tweak padding, and add or remove rear mass as needed.
- Step 1 — Baseline: Set straps to a neutral tension so the headset sits level when you look straight ahead. Note any immediate tilt.
- Step 2 — Top strap position: Move the top strap so it sits across the crown, not the forehead. This shifts load rearward and often removes nose pressure.
- Step 3 — Side strap tension: Tighten side straps just enough for lateral stability without clamping the temples. Over-tightening pushes load forward.
- Step 4 — Pad adjustments: Swap thicker or thinner gaskets incrementally. Thicker foam increases contact area, spreading pressure; a slimmer gasket reduces forward offset.
- Step 5 — Small rear weights: If tilt persists, add a 20–50 g counterweight behind the occiput and retest. Increase in small steps until neutral.
After each tweak, perform a motion stability test—look up and down, nod, and turn quickly. The headset should remain steady and the lenses centered. If the change introduces new pressure points, back out the last adjustment and try an alternate tweak. This methodical tuning gets you to a balanced fit that lasts through realistic play, not just a static pose.
Front-weight reduction strategies
If the headset pulls forward, the goal is to reduce forward torque without compromising tracking or sealing. Start by trimming mass at the front and redistributing what remains. One of the fastest wins is swapping to a slimmer face cushion—memory foam that’s a few millimeters thinner reduces forward offset and brings the center of mass closer to the ears.
Top strap tension also matters. A correctly positioned crown strap transfers some load to the skull’s top and reduces the moment arm that amplifies front-heavy feeling. If your headset has a removable battery, consider relocating it to a belt pack or rear clip; moving 100–200 grams from the visor to the back dramatically changes perceived balance. For standalone headsets like the Quest 2, even a modest 30–50 g change in front mass can be noticeable.
When physical reduction isn’t possible, counterweights offer a surgical fix. Use small magnetic or pouch-mounted weights at the back and add in 10–20 g increments. Keep attachments low-profile and centered to avoid top-heaviness. Finally, check the face gasket seal and reposition foam to shift pressure away from the nose bridge—sometimes redistribution creates the perception of less forward pull even when total mass is unchanged.
Back-weight enhancement strategies
Adding mass posteriorly is often the simplest path to neutrality. But it’s not just about throwing weight on the nape; it’s about how that weight is supported and distributed across the crown and occiput. A halo-style strap or rear-halo design moves the primary contact from cheeks and nose to the skull, dramatically lowering facial pressure. Look for models with broad crown pads and adjustable tension so the load sits comfortably across the top of your head.
If a halo isn’t an option, rear counterweights attached to the backpad can shift the center of gravity without interfering with your face gasket. Place weights low and centered—around the occipital protuberance—so the headset resists nose-down pitching without pressing painfully into the neck. Start with 30–50 g and increase as needed, watching for new pressure spots.
Battery relocation is another high-impact strategy. Moving a battery to a belt or rear clip not only reduces front weight but creates a flexible tether that keeps weight low and changes how momentum feels during dynamic movement. Combine these changes with minor crown pad realignment to ensure the added rear mass is carried by the skull evenly, not concentrated at a single point that could cause soreness.
Quest 2 comfort straps: setup, fit, and trade-offs
The Quest 2 ship strap and the Elite Strap represent a useful case study in how strap design impacts front/back balance. The stock soft strap is light and low-profile, which keeps the headset small but tends to concentrate weight on the face. That configuration is fine for short sessions, but many users report early nose and cheek fatigue during longer play.
The Elite Strap (and similar aftermarket halo systems) adds a stiffer backplate and an adjustable top band that transfers load toward the crown. Installation is straightforward: remove the stock strap, clip or screw the Elite in place, and tighten the rear dial or velcro until the headset feels secure without pinching. The trade-offs: slightly increased total mass, improved balance, and less facial pressure. Some users find the added rear mass makes quick head movements feel a touch heavier, but the reduced torque on the neck usually offsets that.
Tips for tuning Quest 2 straps: raise the top strap so the crown pad sits centrally, not on the forehead; tighten the rear anchor until the headset stops tilting forward, then back off by one notch to avoid over-compression; and if you use battery packs with the strap, attach them low and centered. These adjustments tend to extend comfortable sessions from 30–45 minutes to an hour or more for many players.
Counterweights and accessories that affect balance
Aftermarket counterweights, magnetic pouches, and pad swaps give you fine control over balance, but they require caution. Overloading the back can create a top-heavy feel where the headset rocks or applies localized pressure at the nape. Aim for incremental changes and keep adjustability—Velcro pouches or magnetic weights let you iterate quickly between users or activities.
Choose low-profile attachments that distribute mass across a small area rather than a single hard point. For instance, a 50 g magnetic kit that spreads weight across a 5 cm patch will feel less painful than the same mass concentrated on a 1 cm nub. Battery relocation accessories that use a soft tether to a belt clip are particularly effective: they move substantial mass off the visor while keeping inertia low during sudden head movements.
Pay attention to material and airflow. Thick memory foam pads help spread pressure but can trap heat; breathable silicone or perforated foam offers a compromise between comfort and cooling. Finally, make every attachment reversible and non-invasive—avoid permanent mods that could interfere with sensors, camera fields of view, or warranty terms.
Ergonomics and individual differences
No single setup fits everyone. Neck strength, head shape, facial contours, and play style all shape what balance feels best. People with short necks or prominent cheekbones often prefer more rearward bias to avoid chin pressure, while those with a rounder skull may need less pronounced rear support. Seated users can tolerate slightly different balance than room-scale players, who need a setup that remains stable during leaning, lunging, and rapid head turns.
Session length matters too. What’s comfortable for a 20-minute demo may not work for multi-hour workouts. For extended sessions, prioritize distributed contact over clamping tightness: broader crown pads, halo systems, and relocated weight reduce hotspots. Keep a short log—note how you feel at 10, 30, and 60 minutes after each change. Over several trials you’ll build a profile of what works for your anatomy and content types.
If you share headsets, design for adaptability. Use modular pads, magnetic weights, and adjustable halo straps so each user can quickly fine-tune balance. These small conveniences reduce the friction of switching users and protect the device from repeated over-tightening or ad-hoc stretching that damages factory straps.
Case studies and practical checklist to iterate
Small changes can deliver big wins. Here are three short examples that illustrate typical adjustments and results:
- Forward-heavy standalone headset — Adding a 50 g rear counterweight and swapping to a slim face gasket reduced nose pressure and stabilized lens alignment for a 60-minute session, improving aim stability for first-person shooters.
- PC headset with relocated battery — Moving a 300 g battery to a belt pack eliminated most facial pressure and reduced mid-session adjustments, making long simulation sessions more comfortable and preserving pupil alignment.
- Casual user swap — Switching to a thicker, contoured foam pad increased contact area and reduced red marks, extending comfortable playtime despite a small increase in perceived weight.
Practical checklist — use this as your next steps:
- Baseline: Perform a 5–10 minute wear test and record sensations (pressure points, tilt, lens shift).
- Measure: Use a spirit level or phone inclinometer to record tilt angle on a neutral stand.
- Tune straps: Adjust top strap to the crown and set side straps for lateral stability, not clamping.
- Pad swap: Try thicker or thinner gaskets incrementally and retest.
- Counterweight: Add small rear weights (10–50 g increments), centering them low on the occiput.
- Battery relocation: If available, move heavy power packs to a belt or rear clip.
- Record & repeat: Log each change and its effect at 5, 15, and 60 minutes; iterate until balanced.
Next step: pick one change—strap geometry, pad swap, or a 30–50 g rear weight—and test it tonight for 30 minutes. Keep notes and you’ll be surprised how quickly a small tweak turns an uncomfortable headset into one you can wear for longer, more immersive sessions.


Share:
Achieving Balance: Counterweights and Straps for Meta Quest 2 Ergonomics
Glasses-Friendly Meta Quest Straps Comfort and Fit for Spectacle Wearers