

Choosing the Right Quest 2 Comfort Strap: Official, Premium Padding, and Trusted Third‑Party Options
If you play VR for more than thirty minutes at a time, the difference between a sore forehead and a comfortable marathon session often comes down to your strap and padding. This guide walks Quest 2 owners through the real-world tradeoffs between Meta’s official Elite Strap family, simple padding upgrades, and third‑party head straps—plus step‑by‑step install tips, glasses adjustments, and maintenance advice to keep your headset feeling new. ⏱️ 11-min read
Read on for actionable comparisons, installation steps, and small adjustments that make long sessions noticeably better without guessing or unnecessary spending.
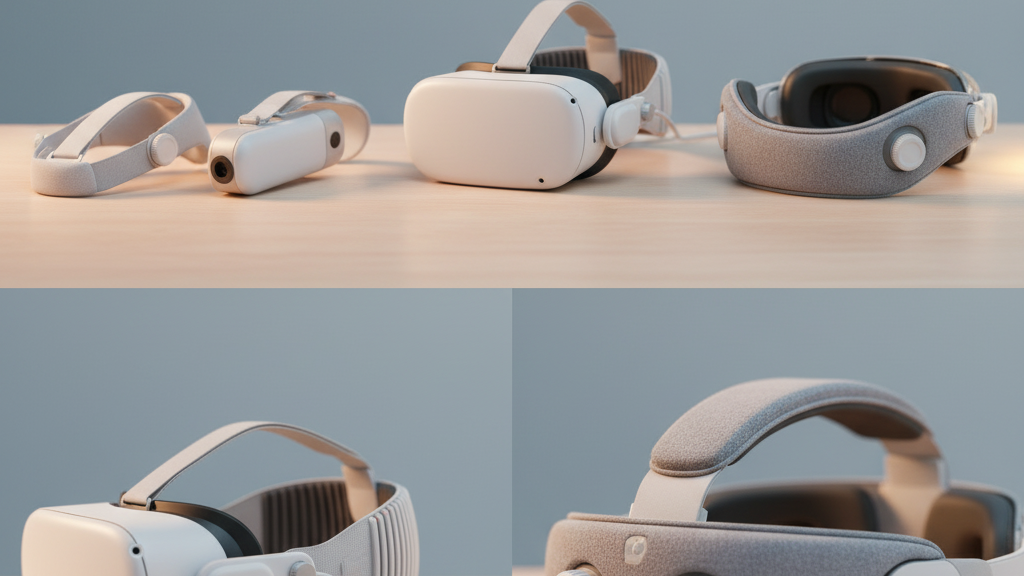
Official Quest 2 straps: Elite Strap and variants
Meta’s official options for Quest 2 comfort come down to two main picks: the Elite Strap (with Dial) and the Elite Strap with Battery. Both replace the stock fabric straps by attaching to the headset’s standard mounting points, giving a more secure, consistent fit. The quest-2-strap-for-glasses-wearers-comfort-without-pressure" rel="nofollow noopener noreferrer">Elite Strap’s goal is straightforward—distribute weight more evenly, reduce crown pressure, and tighten the headset with finer adjustments than the original elastic band.
In practice that means a reinforced side frame, a rear padding panel, and an adjustable dial that lets you micro‑tune tension without constantly fiddling mid‑game. The Battery variant takes the same approach but adds a rear‑mounted battery pack that shifts mass toward the back of your head. That shift typically reduces forward torque on the face and improves balance, while also extending playtime between charges—handy for multiplayer sessions or fitness apps that chew battery.
Installation is intentionally simple: the straps snap into the Quest 2’s clips or slides into the same slots used by the stock strap. You’ll hear a solid click when the attachment is secure. The official route gives you peace of mind on compatibility, support, and warranty handling if anything breaks, and the materials and stitching are chosen to withstand frequent use. If you value plug‑and‑play reliability and predictably balanced weight, the Elite Strap family is an efficient upgrade.
Premium padding upgrades that don’t require a new strap
You don’t need a whole new strap to find a huge comfort win. Premium face cushions and padding upgrades are one of the best value swaps for head-strap-stock-versus-third-party-for-diverse-use-cases" rel="nofollow noopener noreferrer">Quest 2 owners: they bolt onto the existing frame and dramatically change pressure distribution, seal quality, and breathability without altering headband geometry.
Materials matter. Memory foam pads conform to the curves of your face, spreading pressure across a larger area—excellent for multi‑hour sessions—but they can trap heat if the cover material isn’t breathable. Fabric covers (cotton blends, performance meshes) tend to stay cooler, dry faster, and are usually washable; however, fabric compresses over time and can lose some of its spring. Silicone rims are easy to wipe clean and resist oils and sweat, but they feel firmer and can reduce the plushness some players prefer.
Installation is generally plug‑and‑play: remove the stock foam by pulling the clips or Velcro free, align the new pad’s mounting points with the headset’s anchors, and press until the fasteners engage. Some premium pads require trimming or minor adjustments for compatibility—always verify the manufacturer lists compatibility with the Quest 2 or your existing strap model. A common aftermarket strategy is to pair the stock strap or an Elite Strap with a high‑quality memory foam pad: the strap provides stability while the pad significantly improves facial comfort and reduces fogging by forming a better seal.
Third‑party head straps: what to know before buying
Third‑party straps span a broad spectrum: from simple two‑strap replacements to halo‑style rigs with rear counterweights and integrated battery packs. Understanding common designs and quality cues helps you pick a strap that actually improves comfort instead of just adding bulk.
Design families to watch for include halo‑style arches that cradle the crown and connect to side bands, redistributing load across more of the head; rear‑weighted designs that pull mass back and reduce face pressure; and simple tightening straps that are lighter but may offer less stability during active movement. Power or battery additions can further improve balance—but remember they add weight overall, so the win comes from moving that weight rearward, not eliminating it.
When evaluating builds, inspect the frame and fasteners: reinforced plastics, metal sliders, and quality stitching signal a longer life. Padding should use breathable, durable materials—cheap foam that flakes or absorbs sweat quickly is a red flag. Warranty windows typically range from 6–12 months among respected makers; premium vendors sometimes provide longer coverage or extended support when sold through their official stores. Brands like Kiwi Design, VR Cover, and AMVR offer recognizable models: Kiwi favors halo and rear‑weight designs, VR Cover focuses on plush, replaceable cushions, and AMVR has battery‑assisted pro straps. Expect clear instruction sets and customer reviews that reveal how well a strap holds up under sweaty or vigorous play.
Weight, balance, and long‑session comfort
What makes a strap comfortable is less its weight and more how that weight sits relative to your eyes. The key concept is center of gravity: you want the headset’s mass balanced so the lenses stay aligned near eye level without the headset pulling forward on your nose and forehead.
Official Elite Straps and many rear‑weighted third‑party designs tackle this by moving mass to the sides and back of the head. Premium padding can improve comfort without changing center of gravity much, but thick face pads can nudge the headset forward or backward depending on how they shift the contact point. Small changes in pad thickness or rear pad height quickly turn into noticeable leverage differences over long sessions.
Practical balance tests you can do in minutes:
- Put the headset on with the strap adjusted for a neutral fit. Look straight ahead and let your jaw relax. If you feel forward pull on the bridge of your nose, you need more rearward mass or a looser top strap.
- With the headset on, nod sharply up and down. If the headset slides down, tighten the top strap or move weight backward. If it stays put but your forehead feels pinched, liberate the crown area by loosening the top strap slightly and tightening the rear band.
- Simulate a half‑hour session: wear the headset for 20 minutes, then check for red marks or hotspots on the forehead and cheeks. These are clues where pressure concentrates; swap pads or adjust strap tension until marks are minimal.
Remember: adding a rear battery usually increases overall weight but often reduces perceived front heaviness because it shifts the center of gravity back—this is often preferable for extended play despite the higher mass.
Glasses wearers: fit tips and adjustments
Glasses add two recurring challenges: clearance and fog. The right combination of strap adjustment and face pad choice can resolve both without forcing you to use contact lenses.
Nose bridge clearance is the most common issue. If frames press into your nose, try a thinner or tapered face pad, or use a spacer pad designed to raise the headset slightly away from the face. Some premium pads and VR Cover options include a low‑profile variant specifically for glasses. Slightly raise the top strap so the headset tilts away from the bridge; this nudges the unit backward without loosening the seal around your cheeks.
Fogging arises when warm breath reaches the lenses. Two quick fixes: improve the seal at the nose by swapping to a breathable pad that directs breath away from the lenses, and treat your glasses with an anti‑fog solution. A practical posture adjustment—tilting the headset marginally downward—redirects exhaled air and reduces condensation. If your frames still contact the inner foam, trim a millimeter off the lower foam edge or choose a face pad with a curved profile that follows glasses contours.
Finally, check strap length and rear pad height on whichever strap you choose. Glasses users often benefit from slightly longer straps that avoid pinching the temples and give room for temple tips to rest without pressure. If you opt for a rear‑weighted third‑party strap, make sure the added backpad doesn’t push the rim forward toward your glasses; balance adjustments may be necessary to maintain clearance.
Step‑by‑step install and adjustment guide
Swapping straps or pads should take 5–15 minutes. Follow these practical steps to avoid mistakes and keep the headset safe.
- Power down and unplug: Turn off your Quest 2, remove any connected accessories (earbuds, link cables), and lay it on a clean microfiber cloth to protect the lenses.
- Gather tools and parts: Most kits need no special tools, but keep a small Phillips screwdriver nearby if your strap uses screws. Have the new strap, any screws, and the replacement face pad ready.
- Remove the old strap: Loosen and unclip the side straps. If removing the top strap, release it from the mounts. For the standard cushion, peel away the face foam gently; it detaches from clips or Velcro anchors.
- Attach the new strap: Align the new strap’s mounting arms with the headset slots. Slide or snap them into place until you hear a click. If the kit has screws, insert them finger‑tight and then secure them snugly—avoid over‑torquing.
- Install the face pad: Align the pad’s notches with the headset anchors and press firmly to engage hooks or Velcro. Confirm the pad is centered and flush around the lens opening.
- Initial fit: Put the headset on and center the display. Tighten the rear band until the unit is stable, then adjust the top strap to remove forehead pressure. The dial (if present) should be tightened until the headset feels secure but not constricting.
- Final checks: Move your head sharply and jog in place for thirty seconds to ensure stable tracking and no slipping. Inspect the lens alignment by looking for even peripheral focus; re‑center as needed.
Safety notes: don’t over‑tighten screws, and avoid using solvents on straps. If a clip feels loose after initial install, recheck engagement rather than forcing fit—most issues arise from misaligned anchors, not faulty parts.
Care, cleaning, and longevity
Routine care keeps straps and pads comfortable and safe. Daily upkeep is simple: wipe sweat and oils away and let textiles dry between uses. For heavier use—fitness apps, long multiplayer nights—add a deeper cleaning step weekly to biweekly, depending on sweat levels.
Cleaning checklist:
- Daily wipe: Use a damp microfiber cloth with a drop of mild, fragrance‑free dish soap to wipe pads and straps. Rinse the cloth and wipe again to remove soap residue; air dry fully before storing.
- Deep clean: Remove reusable covers (if the pad has a removable fabric cover) and wash per the manufacturer’s instructions—most are hand‑washable or gentle machine cycles. Silicone and plastic parts can be wiped with a diluted soap solution and dried thoroughly.
- Avoid harsh chemicals: No bleach, strong alcohol, or abrasive cleaners—these break down foam, adhesives, and fabric finishes.
- Inspection routine: Monthly, check for foam compression, seam separation, cracked plastic, or loose screws. Replace compressed or cracked padding; tighten loose screws gently with the correct screwdriver.
- Storage: Keep straps in a cool, dry place away from direct sunlight. Store the headset in a breathable case or on a stand to avoid flattening pads.
Following this routine extends the life of both official and third‑party straps. If a pad starts to harden or lose shape, replace it—degraded foam contributes to hotspots and poor seals more than anything else.
Decision guide: official vs premium padding vs third‑party
Choosing between the official Elite Strap, premium padding, and third‑party options boils down to three questions: How long are your sessions? Do you prefer plug‑and‑play compatibility? And do you need glasses clearance or extended battery life?
Quick decision flow:
- If you want easy compatibility, clear warranty paths, and a fast, no‑fuss installation: choose the official Elite Strap. Add the Battery variant if you prioritize runtime and rearward balance.
- If your headset fits well but pressure points and fogging are the issue: start with premium padding. Memory foam or breathable fabric cushions deliver big comfort gains for a small cost and keep your existing strap and warranty intact.
- If you need advanced balance solutions—halo support, adjustable crown rests, or integrated battery options at different price points—consider a reputable third‑party strap. Prioritize build quality, tested reviews, and a 6–12 month warranty.
Budget guide:
- Low budget: premium face pad + stock strap. Cost‑effective and fast comfort improvement.
- Mid budget: official Elite Strap or mid‑range third‑party halo strap. Balanced investment for stability and long sessions.
- High budget: Elite Strap with Battery or premium third‑party battery‑assisted rigs. Best for marathon sessions and fitness VR where battery life matters.
Example use cases: a marathon gamer who logs multi‑hour sessions often benefits most from an Elite Strap with a high‑quality memory foam pad—the strap stabilizes tracking while the pad reduces hotspots. A glasses wearer might find a balanced third‑party strap with a higher rear pad and thin face cushion the most forgiving configuration. Whichever path you choose, test for pressure points and adjust the strap and pad until the headset feels like an extension of your head, not a heavy accessory.
Next step: pick one small change—either a premium face pad or the Elite Strap—and trial it for a week. Track comfort, fit, and balance. The right tweak will be obvious after a few sessions: fewer mid‑game adjustments, less fogging, and noticeably less neck fatigue.


Share:
Extending Strap Longevity: Material Care Habits for the Quest Two Comfort Strap
Endurance testing: which Quest Two strap remains comfy during long gaming sessions