

Third‑Party Accessories Compatibility Guide for Meta Quest 2
If you own a Meta Quest 2 and plan long VR sessions, the right strap, battery, and cushions make a huge difference. This practical guide walks you through compatibility, comfort choices, installation tips, and how to evaluate third‑party accessories so you spend less time adjusting gear and more time playing. ⏱️ 7-min read
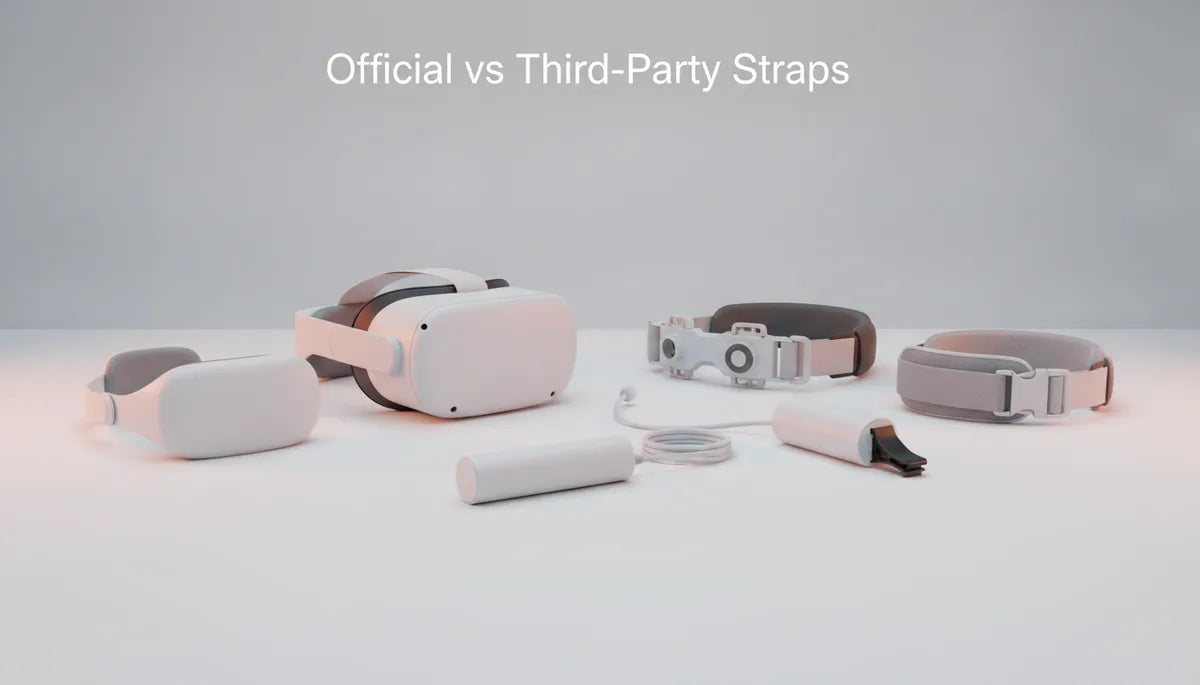
Compatibility landscape: official straps vs. third-party options
The Quest 2 ecosystem includes Meta’s stock soft strap, the Elite Strap (and Elite Strap with Battery), plus a flood of third‑party alternatives. Most third‑party straps are designed to work with Quest 2’s existing mounting points and side clip locations, but there are two important compatibility considerations:
- Connector and mount type: many accessories plug into the same side slots and top anchor points used by the stock strap. Before buying, confirm the vendor explicitly lists “Meta Quest 2” compatibility rather than generic “VR headset” claims.
- Accessory-space and battery fit: straps that replace the rear assembly can block or change how a battery pack mounts. Official battery packs and third‑party packs differ in shape and USB‑C cable routing—check whether the strap supports a rear counterweight bay or a dedicated battery pocket.
Also be aware of warranty and risk: swapping in a non‑official strap rarely voids the headset warranty by itself, but any modification that requires opening the Quest 2 casing or that damages the headset can. Using third‑party batteries brings extra caution—choose reputable brands and read safety certifications.
Comfort strap options for Quest 2: stock, Elite, and popular third-party choices
Comfort comes down to padding, adjustability, weight, and the way a design distributes pressure. Here’s how common options compare at a glance.
- Stock fabric strap — Lightweight and simple. Best for casual play but less ideal for long sessions because it concentrates pressure on the face and offers limited adjustment.
- Meta Elite Strap (OEM) — Stiffer structure and a more stable rear band significantly improve fit and reduce headset wobble. The battery version adds rear weight that shifts balance backward, reducing facial pressure.
- Halo and rigid third‑party straps (e.g., Kiwi Design, AMVR variants) — Move weight to the top/around the head or rear. They tend to reduce face pressure and suit marathon sessions; build quality varies, so inspect materials and adjustment mechanisms.
- Budget third‑party options — Often lighter and cheaper, but padding and clamps may wear faster. Good for trying a different fit without major investment.
For glasses wearers: look for straps and face cushions that increase eye‑to‑lens distance or provide an included glasses spacer. Softer, taller foam in the face cushion is usually more comfortable, but it can slightly reduce field of view—test before long sessions.
Step-by-step install and fit tips for Quest 2 comfort straps
Installing most replacement straps is straightforward if you follow an ordered sequence. These steps will help avoid common mistakes and ensure even weight distribution.
- Power off the headset and remove any face cover. Keep small parts in a clean area.
- If replacing the stock strap, release the side clips gently—pull evenly to avoid stressing the plastic mounts. If the new strap uses a clip kit, align pins with the slots and press until you hear a click.
- Attach the top strap and rear band according to the manufacturer’s guide. For straps with a rear battery pack, route the USB‑C cable so it doesn’t pinch or rub against foam.
- Initial fit: set strap length so the headset rests on your cheekbones with the display centered—avoid having the headset hang low on your face or push down on the nose bridge.
- Balance check: if the headset tilts forward, tighten or lower the rear band; if the rear lifts, loosen the rear or move the battery pack lower (if adjustable).
- Play a brief session and watch for hotspots. Reposition padding or adjust tension to eliminate pressure points.
Troubleshooting quick tips: persistent forward tilt usually means insufficient rear counterweight or too‑soft rear padding. Excess facial pressure can be addressed by raising the strap height, adding a small rear weight, or switching to a halo‑style band.
Weight, balance, and long-session comfort: optimizing Quest 2 wearability
Long sessions magnify poor decisions about weight and balance. Instead of just looking at total mass, evaluate how a strap design moves the headset’s center of gravity relative to your head.
- Front‑heavy setups create neck strain and more facial pressure; a rear‑mounted battery or counterweight shifts the center of mass backward and lowers fatigue.
- Stiffness matters: a rigid rear band prevents twisting and keeps lenses aligned, reducing constant micro‑adjustments that wear you out over time.
- Load distribution: halo and crown straps distribute force across the skull and forehead rather than the cheeks and nose, which many users find more comfortable for sessions over an hour.
When evaluating a strap for long sessions, ask: how does the strap attach a rear weight? Is the padding breathable? Can I adjust length and tilt independently? These answers will predict how comfortable it will be after 60–120 minutes.
Third-party accessories that pair with Quest 2: batteries, face cushions, and more
Beyond straps, a few categories of accessories reliably improve long‑session comfort and protection—if they’re compatible.
- Battery packs — Choose packs that specify Quest 2 support and include a USB‑C cable with safe charging profiles. Rear‑mountable packs are best for balance; side velcro packs work but can shift.
- Face cushions and glasses spacers — Brands like VR Cover and others make thicker or hypoallergenic cushions and spacers for glasses. Confirm they fit the Quest 2 bezel and don’t press lenses toward the face.
- Lens protectors and anti‑fog inserts — Useful but can introduce glare or reduce clarity. Pick high‑quality, thin protectors to minimize optical artifacts.
- Cable management and extension — For PC VR via Oculus Link, a ceiling or clip‑based cable management system reduces snagging and keeps weight off your head.
- Protective skins and cases — Cosmetic skins and hard cases protect during transport; verify cutouts for sensors and mounting points.
Compatibility notes: some face cushions block magnetic or clip‑on battery mounts; slim cushions are better for battery‑back setups. Lens protectors may require careful alignment to avoid internal reflections with certain face foams.
Cross-compatibility with other headsets and devices: Apple Vision Pro considerations
There’s occasional confusion about cross‑brand compatibility—especially between Quest 2 and high‑profile devices like Apple Vision Pro. In practical terms, accessories are rarely cross‑compatible.
- Different headsets use distinct shell shapes, mounting points, and weight distributions. A Quest 2 strap will not fit Vision Pro securely, nor vice versa.
- Lenses and face cushions are designed to match the headset bezel and sensor layout, so expect poor fit or blocked sensors with cross‑brand parts.
- When evaluating Vision Pro‑branded accessories claiming universal fit, check exact dimensions and mounting methods. If specs don’t list Quest 2 explicitly, assume incompatibility.
Bottom line: purchase accessories that explicitly list Meta Quest 2 compatibility to avoid returns and performance issues.
Care, maintenance, and replacement: keeping Quest 2 straps in top shape
Proper care extends the life of straps and cushions and keeps hygiene in check for long sessions and shared use.
- Cleaning: wipe foam and fabric with a damp cloth and mild soap; avoid soaking. Don’t use bleach or strong solvents on foam or the headset shell.
- Inspection: check straps, buckles, and mounting clips every 3–6 months for cracks, stretched elastic, or frayed stitching. Replace worn parts before they fail mid‑session.
- Storage and transport: keep straps loosened, store headset in a padded case, and avoid temperature extremes that can deform foam or adhesives.
- Warranty and receipts: keep purchase records for third‑party items and check return policies—reputable sellers often offer short return windows if fit or function isn’t right.
Choosing the best strap: a practical decision guide
Here’s a simple framework to pick the right strap and accessories based on how you use Quest 2.
- Casual player / budget — Stock strap or a low‑cost third‑party strap. Look for basic padding, clear return policy, and vendor images showing Quest 2 fit.
- Long sessions / competitive play — Sturdy Elite‑style or halo strap with rear battery option. Prioritize rigid rear support, good forehead padding, and the ability to add a counterweight.
- Glasses wearers — Face cushion with glasses spacer plus a strap that allows fine height adjustment. Ensure the cushion provides extra clearance without compromising lens alignment.
- Travelers — Lightweight, removable strap and a protective hard case. Opt for straps that are easy to detach for packing.
Buyer checklist before you click “buy”:
- Explicit “Meta Quest 2” compatibility listed.
- Clear mounting method and whether the strap supports rear batteries or counterweights.
- Material and padding description (breathable fabric, replaceable foam).
- Return policy and seller reputation; check recent reviews for durability.
- For batteries, certification/overcurrent protection and safe charging methods.
With the right compatibility checks and a focus on balance and fit, you can transform your Meta Quest 2 for comfortable, long VR sessions. Test fit where possible, favor reputable brands, and prioritize comfort features that match your play style.
Powered by Trafficontent

Share:
The Glasses-Friendly Advantage: Comfort Strap Ergonomics for Quest Two