

How to Choose a Meta Quest 2 Battery Pack: Safe Capacity, Comfortable Balance, and Real-World Runtime
Adding an external battery to your Meta Quest 2 is one of the fastest ways to extend playtime, but it’s also where comfort, safety, and performance intersect. The right pack keeps you in VR longer without painfully pulling your neck forward, overheating under your strap, or tripping safety circuits. ⏱️ 11-min read
This practical guide walks through how to size capacity, evaluate safety and thermal design, choose form factors that preserve balance, and translate specs into realistic runtime expectations. I’ll include step‑by‑step fit tips, compatibility checks for common straps and accessories, and real examples you can apply the next time you compare battery packs.
Assess Your Power Needs
Start by defining the session length you want to add, then estimate how much power the Quest 2 consumes in the situations you typically run. The headset’s draw varies with display brightness, wireless streaming, and game intensity; conservative ranges reported by reviewers and communities put typical active use between roughly 6–12 watts. Instead of fixating on a single number, pick an average that matches your habits—lighter experiences and streaming at lower brightness will land at the low end, fast-paced AAA titles and high brightness at the high end.
Translate that into capacity with a simple approach: decide desired extra hours, multiply by estimated wattage to get required watt‑hours (Wh), or convert amps to milliamp‑hours (mAh) if you prefer. For example, if you want three extra hours and estimate a 1.5 A (1500 mA) draw at 5 V (≈7.5 W), plan for roughly 4500 mAh. A safer workflow converts mAh to Wh using the pack’s nominal cell voltage (see the Capacity section below) and factors in conversion losses—expect only 70–85% of the pack’s rated energy to reach the headset in real use.
Also account for accessories. Powered Link cables, external fans, additional trackers, or an attached speaker system will increase draw. Finally, consider comfort trade‑offs: a pack that gives hours of runtime but adds heavy weight and heat will reduce enjoyment. Balance your capacity target with how much extra mass you can tolerate on the back of your head or on your belt.
Safety First: Compatibility, Protections, and Heat
Safety is non‑negotiable. The Quest 2 expects a stable 5 V USB‑C input and commonly draws 2 A or more while charging and operating. Verify any pack you consider can deliver 5 V at the current your headset needs—packs that advertise Power Delivery (PD) are often suitable, but PD support alone doesn’t guarantee the right constant 5 V output under load. Check product documentation for sustained 5 V/2 A (or higher) capability.
Inside the pack, quality protection circuitry makes the difference between a convenient accessory and a hazard. Look for explicit inclusion of overcurrent, overcharge, overdischarge, and short‑circuit protections, plus third‑party certifications like UL, CE, or similar safety markings where available. These circuits help prevent thermal runaways, damaging overvoltage events, and spontaneous shutdowns.
Heat management deserves separate attention: batteries and boost circuits generate heat when supplying significant current. Favor packs with an open or ventilated enclosure and avoid designs that tightly wrap cells inside thick insulating cases placed directly against your head. During long sessions, periodically check the pack’s surface; if it becomes noticeably hot to the touch, stop, let it cool, and diagnose—excessive heat is a sign of stress, poor ventilation, or defective cells.
Finally, use high‑quality, appropriately rated USB‑C cables. Thin, cheap cables can heat up and create voltage sag, forcing the pack to work harder and shortening overall life. If you see swelling, excessive heat, or unusual smells, stop using the pack and replace it—these are early signs of failure.
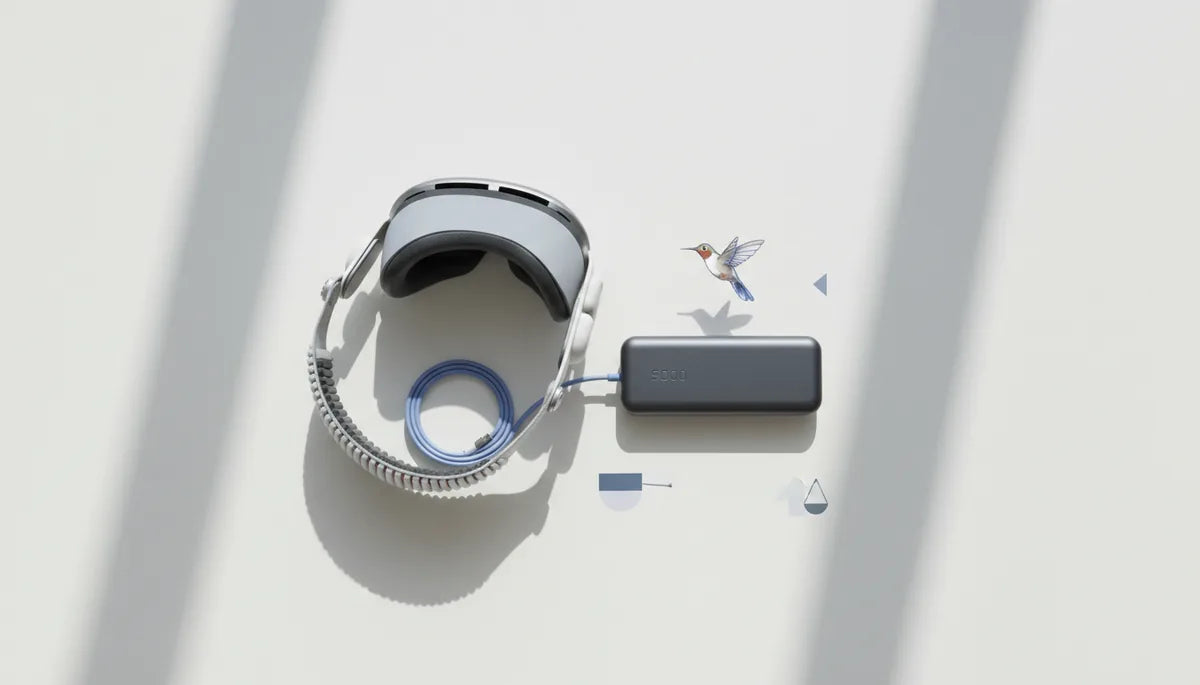
Battery Pack Form Factors That Work with Quest 2
How you mount the battery is as important as the capacity itself. Three common form factors work well with Quest 2: rear back‑strap packs, clip‑on side or back mounts, and belt/hip packs. Each has distinct tradeoffs in weight distribution, cooling, and convenience.
Back‑strap packs attach directly to the rear of the head strap. They keep weight close to the headset’s pivot point, which is ergonomically preferable for many users because the mass is centered and reduces forward torque. These are the simplest to install and provide a tidy look, but they concentrate heat near your skull unless the enclosure vents well.
Clip‑on packs (side or top clips) can tuck weight slightly lower or off to the side, smoothing balance for some comfort straps. They’re often slimmer and easier to swap in and out, but a poorly placed clip can interfere with strap adjustments or press against glasses. Belt or hip packs remove weight from the head entirely, eliminating neck strain for extended sessions; the drawback is a cable running from your belt to the headset, which requires secure routing to avoid tugging or catching during movement.
When choosing a form factor, test how it integrates with your strap: the Elite Strap, Elite Strap with Battery, and third‑party comfort solutions often have dedicated mounting points or recommended positions for packs. Avoid any mount that crowds the USB‑C port or forces the cable at an angle—this stresses connectors and increases the chance of accidental disconnection. The best mount is the one that gives you the runtime you need while keeping the headset stable, cool, and unobstructed.
Capacity, Runtime, and Real-World Performance
Capacity numbers on the box (mAh) don’t tell the whole story. To compare packs reliably, convert mAh into watt‑hours (Wh): (mAh × nominal voltage) / 1000. For typical Li‑ion cells use a nominal voltage of around 3.6–3.7 V when converting internal cell capacity. For example, a 4500 mAh pack rated at a cell voltage of 3.7 V equals roughly 16.65 Wh. That Wh figure lets you compare packs regardless of internal cell configuration.
Use the headset’s average wattage to estimate runtime: Runtime (hours) = pack Wh ÷ headset W. Then apply a usable factor of roughly 70–85% to compensate for conversion losses from boost circuits, cable resistance, and the pack’s electronics. Suppose your Quest 2 averages 8 W in your use case. A 16.65 Wh pack gives an ideal runtime of about 2.08 hours; after efficiency losses (useable = 70–85%), expect about 1.45–1.78 hours in practice.
To make this practical: a small ~10 Wh pack often yields 45–90 minutes depending on load and settings; a 20–30 Wh medium pack commonly doubles runtime to 2–3 hours; a >40 Wh pack can push you into 4+ hour territory but typically adds noticeable weight and requires careful heat and balance management. Take manufacturer specs and reviewer benchmarks as baselines, not guarantees—real-world runtime varies with brightness, Wi‑Fi activity, streaming, and how power‑hungry the currently running app is.
Finally, validate before committing: if possible, test the pack in a controlled session to confirm runtime and surface temperature. That real‑world test separates optimistic marketing claims from what you’ll actually get during a long play session.
Fit, Installation, and Comfort
Proper installation preserves balance, reduces pressure points, and keeps the cable free from snagging. Follow these steps for a comfortable, secure setup:
- Choose the mounting point: rear of the strap for centered balance, clip or side mount for minor adjustments, or belt for off‑head weight.
- Use a short, high‑quality USB‑C cable rated for the required current. Keep the cable run as short as practical to minimize voltage drop.
- Route the cable along the strap with small clips, Velcro ties, or adhesive mounts. Secure it so tension pulls on the battery, not the headset port.
- Adjust the strap tension and halo to compensate for added rear weight—looser forehead padding and a firmer rear strap often redistribute load better than tightening everything.
- Check for pressure points: wear the headset for 10–15 minutes and note any discomfort. Small pads or repositioning the pack by a few centimeters can make a big difference.
- Perform a dynamic test: walk, turn, and mimic your typical play moves. If the cable tugs or the pack shifts, re‑route or add a secondary anchor point.
Small hardware choices matter. Some packs come with silicone pads or dedicated strap attachments; these reduce slippage and cushion the contact area. If you wear glasses, ensure the pack’s placement doesn’t push the headset forward or compress the frames. For belt‑mounted setups, use a cable retainer at the base of the head strap to prevent sudden pulls—this is especially important in active roomscale scenarios to avoid headset disconnections mid‑game.
Compatibility with Accessories and Straps
Most third‑party straps and accessories change how a pack should be mounted. The Elite Strap and other comfort upgrades often include a rear battery mount or accommodate slimmer packs; check compatibility before purchasing. If you already own a third‑party strap, look for packs designed specifically for that strap or that offer multiple mounting options.
Two compatibility checks to make before buying: sensor and port clearance, and eye/glasses space. Ensure the pack won’t obstruct the headset’s sensors or prevent the facial interface from seating properly; a pack that shifts the headset forward or blocks the nose cutout will degrade tracking and comfort. If you wear glasses, confirm the pack’s rear contour doesn’t force the headset forward, reducing eye relief or pressing glasses against the face.
Also consider passthrough charging and simultaneous accessory use. Some packs supply power while the headset charges internally; others may not play well with powered Link cables or additional USB peripherals. If you use a Link cable for PC VR or an external fan, verify the combined current draw doesn’t exceed the pack’s continuous output rating—overloading a pack can cause voltage sag, thermal stress, or automatic shutdowns. When in doubt, consult the pack’s documentation or the manufacturer’s support for explicit compatibility notes with Quest 2 accessories.
Safety, Maintenance, and Longevity
Taking care of your battery pack preserves capacity and reduces safety risks. Follow manufacturer charging instructions and avoid pushing fast‑charge modes unless the pack explicitly supports them; high‑speed charging generates extra heat, accelerates wear, and can shorten cycle life. When possible, use a charger recommended by the pack maker or a reputable brand that matches the pack’s input specifications.
Store batteries at around 40–60% charge in a cool, dry place to slow aging. Avoid leaving packs fully charged for long periods or in hot environments—heat and high state of charge both accelerate capacity loss. Regularly inspect cables, connectors, and the pack’s enclosure for cuts, swelling, or deformation. If you notice bulges, cracked shells, or persistent warm spots after light use, stop using the pack and replace it.
Adopt a simple inspection routine: before each longer session, visually check the cable and connector for fraying, wiggle the USB‑C plug to ensure a solid fit, and touch the pack for unusual warmth. After heavy use, give the pack time to cool before recharging. For long‑term health, rotate between packs if you rely on external batteries every day; this spreads cycle wear and delays replacement. When retiring a pack, follow local recycling rules for lithium batteries—never put them in household trash.
Budget, Value, and How to Choose
Choosing the best pack is an exercise in tradeoffs between capacity, weight, heat, and cost. Think in tiers to simplify the buying decision:
- Entry level (2,000–4,000 mAh): Lightweight and portable, these packs add roughly 45–90 minutes depending on load. Ideal for casual users, demos, and travel. They’re inexpensive and minimally intrusive to headset balance.
- Mid tier (5,000–10,000 mAh): The sweet spot for many: 2–3 extra hours in common scenarios with manageable weight. Best if you want serious playtime without a major comfort overhaul. Choose models with good ventilation and sturdy strap attachments.
- High capacity (>10,000 mAh or >40 Wh): For marathon sessions or streaming marathons. These provide 4+ hours but are heavier and demand careful mounting, cable management, and thermal considerations. Often better as belt packs unless purpose‑built rear mounts are comfortable.
When comparing packs, don’t shop by mAh alone. Confirm sustained current and 5 V output, check for protection circuits and certifications, and read reviews focused on real‑world runtime, heat performance, and comfort—these are the points where marketing specs often fall short. If a product claims long runtimes but reviewers report significant voltage sag or hot surfaces, that’s a red flag.
Finally, factor in warranty and brand reputation. A slightly more expensive pack from a known manufacturer that offers reliable customer support and clear safety documentation is usually a better value than a bargain model with opaque manufacturing details.
Next step: measure or estimate your typical Quest 2 wattage, pick a capacity tier that matches the session length you want, and test a short session with the pack to verify runtime, temperature, and comfort before trusting it for marathon play.


Compartir:
Ergonomic Techniques to Minimize VR Fatigue During Prolonged Quest 2 Sessions
Oculus Quest Two Straps Showdown: Official vs Third-Party Options for Glasses Comfort