

From Pressure Points to Pain-Free: Ergonomic Strategies for Oculus Quest 2 Straps
If you love long VR sessions, the difference between a headband that simply holds the Meta Quest 2 in place and one that makes hours feel effortless comes down to strap design, fit, and small habit changes. This guide blends practical how‑to steps with the engineering behind why straps matter so you can pick, install, and maintain a setup that reduces forehead hotspots, neck strain, and shifting displays. ⏱️ 10-min read
You’ll get clear comparisons between the stock strap, the Meta Quest 2 Comfort Strap, and the Elite Strap; a beginner-friendly installation walkthrough; fine-tuning tips for marathon play; padding and glasses-friendly recommendations; compatibility notes for third‑party accessories; and a maintenance checklist to keep your gear comfortable and hygienic. Read on to make your Quest 2 sessions more sustainable and enjoyable.
Why strap design matters for Quest 2 comfort
A headset strap is not just a belt — it’s the interface that controls how force, weight, and motion transfer from the headset to your skull. Small differences in strap geometry, contact area, and materials dramatically change perceived weight, hotspots, and heat buildup during long plays. A strap that concentrates force into narrow contact points creates painful pressure under the forehead or at the crown; a well-designed halo or rear cradle spreads that same weight across a larger surface area, lowering peak pressure while improving stability.
Materials play a meaningful role: dense foam cushions but can trap heat and lose resilience over time; open‑cell foam breathes but flattens sooner; elastic adds flexibility but can dig in if overtightened; plastic frames hold shape but create hard edges if pads aren't shaped to the skull. Fit matters too—head shapes and hair styles vary, so a one‑size strap often misses. Look for separate crown/top and rear adjustments plus side sliders so you can tune vertical height, fore/aft position, and lateral balance independently.
In short: the right strap reduces face pressure, improves lens stability (reducing eye strain), and cuts neck fatigue by rebalancing weight. Those are the three wins that make extended sessions enjoyable rather than grueling.
Comfort strap options: Quest 2 Comfort Strap vs Elite Strap
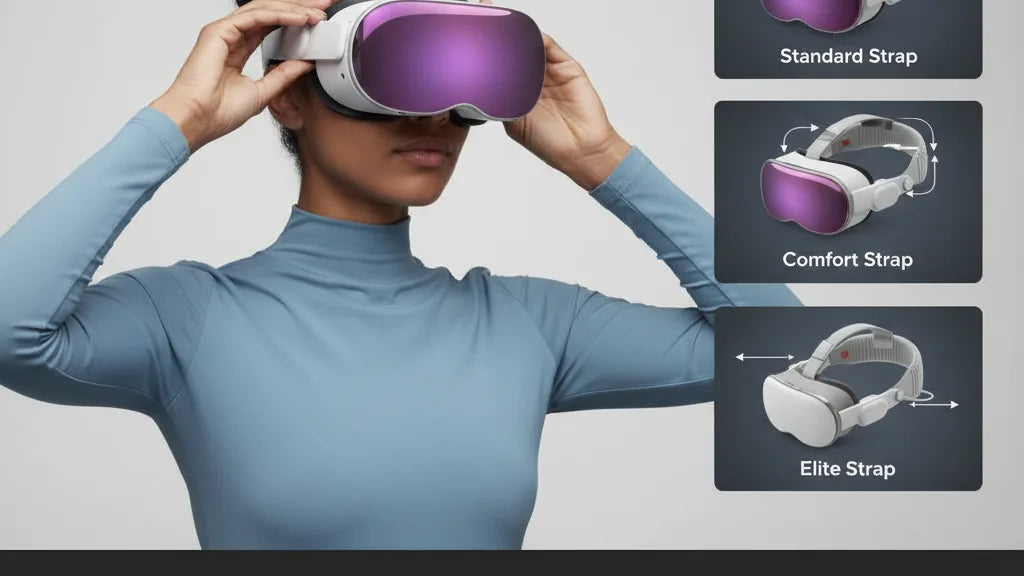
Meta’s two primary upgrades — the Quest 2 Comfort Strap and the Elite Strap — aim at different tradeoffs between price, simplicity, and long‑session ergonomics. The official Comfort Strap is soft, lighter, and uses extra foam padding to spread pressure across the forehead and temple area. It’s a quick improvement over the stock fabric band for short to medium sessions and for people who want minimal fuss and lower weight.
The Elite Strap uses a more rigid halo or rear cradle design. This moves the headset’s center of gravity back, lifting weight off the face and reducing cheek and forehead pressure. There’s also an Elite Strap with an integrated battery pack that increases playtime — a useful choice if you want longer sessions without swapping battery banks — but expect a bit more mass on the rear of the head. That extra mass can improve balance if positioned correctly, but it’s a judgment call for each user.
Which to pick? Use this simple criteria: choose the Comfort Strap if you value lighter weight, easier on/off, and lower cost; choose the Elite Strap if you need superior balance and stability for standing or room-scale play, or if you prefer a modular battery option. Consider head shape and hair (long hair and ponytails interact differently with a rear cradle), and whether you regularly wear glasses — some find the Elite’s rigid rear support pairs better with face gaskets for lens clearance.
Install and fit: Step-by-step Quest 2 comfort strap installation
Installing a replacement strap isn’t difficult, but a careful approach prevents damage and ensures the headset seals properly. Gather clean hands, a microfiber cloth, and a small Phillips screwdriver if your kit uses screws (the Elite Strap often includes screws; the Comfort Strap usually snaps in). Power off the headset and set it face down on a soft surface.
- Remove the stock strap: detach the side anchors and slide the fabric strap away from the rails. Wipe the headset rails and faceplate with the microfiber cloth.
- Align the new strap anchors: position the Comfort or Elite strap anchors with the Quest 2 side rails so the connector holes line up with the headset’s fastening points.
- Secure the anchors: snap in the Comfort Strap’s clips until you hear a click, or use the included screws for the Elite Strap — tighten until snug but do not overtighten. If the kit includes a rear pad or battery module, attach it now and secure any cable runs along the rear bracket per the instructions.
- Initial fitting: loosen all adjustments fully, put on the headset, center the display in your sightline, then tighten the rear band until it feels supported and the top strap until the headset comfortably seats against your face without pressing hard on your brow.
Common missteps: forcing anchors into the wrong orientation, tightening screws too hard and cracking plastic, or starting with everything tight (which hides poor balance). Safety checks: confirm the face gasket forms a clean seal around your cheeks, ensure there’s no pinching at the temples, and verify cables (if any) aren’t tugging on the headset when you move your head.
Fine-tuning fit for long sessions: height, length, and tightening tips
Fine-tuning is about small, deliberate adjustments. Start with lens clarity: set eye‑to‑lens distance so the image is sharp without pressing the headset into your forehead. If the image wobbles when you nod, the headset is too loose or unbalanced. Use the top strap to shift the headset a millimeter or two forward/back to balance optical alignment and comfort.
Tension balance matters more than absolute tightness. Begin with the rear band snug and the top strap just firm enough to prevent the unit from sliding. Then tighten both in small increments, using tiny turns or millimeter shifts. Avoid pulling one strap aggressively — uneven pull concentrates pressure on the brow or the back of the head. If you feel a hotspot, loosen both straps slightly, reposition the rear pad by a millimeter, and retighten evenly.
Micro‑positioning is a powerful habit: if the rear pad digs into the occiput (the bone at the base of your skull), lift it slightly or move it up a touch; if the brow feels pressure, swap or shift the forehead trim pad. Plan a 10–20 minute test with a range of movements — sit, stand, lean, look left and right — to observe shifts. Finally, avoid over‑tightening: you want stable optics, not a vise. Proper airflow is also part of comfort: leave a little gap around the face gasket for ventilation, especially in warm rooms or long sessions.
Padding, cushions, and pressure-point relief
Padding isn’t just about plushness; it’s targeted pressure management. Identify the hotspots — forehead, temples, cheekbones, or crown — and place cushioning where it disperses peak pressure rather than adding bulk everywhere. Memory foam face pads contour well and relieve facial hotspots, but they retain heat and can compress over time. Gel inserts are cooler and disperse heat but may add bulk and can shift if edges aren’t secured. Silicone liners are low profile and easy to clean but can slide on skin or fabric. Breathable covers (mesh or cotton blends) improve airflow at the cost of depth and long‑term durability.
Practical application: use a forehead pad to reduce brow pressure caused by the top strap, and a small rear occipital pad where the halo meets the skull to prevent digging without pushing the headset forward. Temple cushions help if you feel lateral pinch. For glasses wearers, a low‑profile face gasket or a spacer is critical — it creates clearance so your frames don’t press the lenses or your temples don’t rub against the gasket.
Installation tips: attach removable pads with Velcro or the adhesive strips provided, but avoid covering ventilation channels. Test pads in short increments — add one pad, use the headset for 10–20 minutes, and then add or redistribute if another hotspot appears. Well‑placed padding should reduce numb cheeks and forehead pressure while maintaining stable optics and ventilation.
Compatibility and accessories: glasses wearers, third-party straps, and cross-device considerations
For glasses wearers, lens clearance and anti‑fogging are the top concerns. Start with the Quest 2 spacer supplied in the box or install a low-profile face gasket from a reputable brand like VR Cover. These spacers increase nose bridge room and prevent frames from touching the lenses. Combine a spacer with anti-fog wipes and proper ventilation — or a silicone nose rest — to reduce fogging and pressure on the bridge.
When shopping third‑party straps, check these essentials: secure anchor systems, reinforced mount points, and a robust warranty. A halo-style rear cradle with an adjustable crown tends to outperform simple elastic straps for long sessions. If you plan to add a battery pack, ensure the strap’s rear mount is rated to carry the extra weight and that the pack’s cable routing won’t tug on the headset. Many battery packs are designed specifically for the Elite Strap to fit its rear module and maintain balance.
Cross‑device compatibility — like attempting to use Quest 2 straps on other headsets or vice versa — is trickier than it looks. Anchor geometry and screw types differ, and forcing incompatible parts can stress mounting points or scratch hardware. As for Vision Pro-related accessories, accessories built for Apple’s headset use different anchors and thermal profiles; don’t assume universal fit. If you’re buying third‑party parts, read compatibility notes carefully and prefer vendors who list device models explicitly.
Maintenance, replacements, and budget-friendly options
Hygiene and upkeep are as important as fit. For fabric and foam elements, create a regular cleaning routine — a light wipe after long sessions and a deeper clean weekly if you sweat heavily. Use a damp microfiber cloth with a small amount of diluted isopropyl alcohol or specialized electronics wipes. Avoid bleach, harsh detergents, or soaking foam parts, which can degrade materials and adhesives. Fully air‑dry components before reuse to prevent odors or mold.
Know the signs that parts need replacement: foam that stays flattened, elastic that sags, or plastic connectors showing hairline cracks or looseness. Replacing worn padding restores pressure distribution and hygiene; replacing anchor parts prevents headset slippage. You don’t need to spend a lot to get good results—budget upgrades, like DIY foam pads cut from firm craft foam and wrapped with breathable fabric, can be effective short‑term solutions. 3D‑printed rear cradles or inexpensive third‑party straps often deliver great value, but prioritize reinforced mounts and positive user reviews.
When choosing replacements, weigh warranty and return policy. A slightly more expensive strap with a solid warranty and replacement pads often saves money and frustration over time compared with a very cheap strap that fails quickly.
Real-world testing: weight, balance, and all-day comfort best practices
Comfort is measurable and iterative. Create a simple test routine: run 30–60 minute blocks that include sitting, standing, wide head turns, and quick nods. Keep a log — note pressure spots, slippage, eye strain, and any movement of the display within the session. After each block, make a single small adjustment (a millimeter of pad movement, a quarter‑turn of a strap) and test again. That adjust-and-repeat loop is how you converge on a setup that minimizes hotspots and maintains optical stability.
Weight distribution is key: if you add a battery pack, mount it so the extra mass counterbalances the face weight rather than creating a hard backward pull. A pack centered along the rear cradle usually works best. If you still feel neck fatigue, shorten session length, add a forehead pad to lift the headset slightly, and increase micro-breaks.
- All‑day comfort checklist: plan 5–10 minute breaks every hour; do gentle neck rolls and shoulder stretches during breaks; stay hydrated; keep room temperature moderate for ventilation; use breathable face covers in hot sessions.
- Observation checklist: mark hotspots on a sketch or notes, track how often you readjust, and rate eye comfort after 30, 60, and 90 minutes.
Over time, small preventative steps — replacing flattened foam, cleaning pads, and keeping straps aligned — add up to significantly longer and more comfortable playing sessions. Your headset should be an extension of your intent to explore, not a source of distraction or pain.
Next step: try a single modification (a forehead pad or a rear cradle) and run a 45‑minute test block while tracking hotspots. Use the adjust-and-repeat method above to evaluate improvement and decide whether the Comfort Strap or Elite Strap — or a targeted padding upgrade — is the right investment for your Quest 2 setup.


Compartir:
How Quest Two Weight Compares to Valve Index and PSVR Two
Front vs Back Weight Balance: Boost VR Comfort on the Quest