

Budget-Friendly Quest Two Comfort Straps: The Best Value Options Compared
If you play the Oculus/Meta Quest 2 for more than an hour at a stretch, the stock soft strap will quickly remind you that comfort matters. This guide helps Quest 2 owners choose, install, and maintain budget-first comfort-straps-pros-and-cons-and-compatibility" rel="nofollow noopener noreferrer">comfort straps so long sessions stay immersive and pain-free—without blowing your wallet. Expect practical buying criteria, 3–5 concrete budget options under $50, a comparison with the official Elite Strap, a step-by-step install guide, tips for glasses wearers, balance tweaks for long sessions, care advice, and compatibility notes. ⏱️ 12-min read
Budget-First Criteria for Quest 2 Comfort Straps
When you’re prioritizing budget, not every premium feature is necessary. Focus on three high-impact attributes: padding, adjustability, and weight distribution. Padding matters most because it increases contact surface area and reduces pressure points on your forehead and the rear skull. Synthetic memory foam or dense EVA foam in a breathable cover tends to offer comfort without being bulky. Avoid "padding" that’s just a thin foam cover—look for at least 8–12 mm of dense foam where the headset contacts skin.
Adjustability is the second most important factor. You want a strap that lets you change length and angle independently. A top strap that adjusts separately from the side/headband lets you dial lens-to-eye distance and tilt more precisely, which improves clarity and reduces cheek and forehead pressure. Common budget designs include elastic three-point straps, dual-velcro bands, and rigid-but-padded rear supports. Prefer straps with sturdy ratchets or solid clips over thin elastic if you regularly play for multiple hours.
Weight and balance are the third consideration—especially when a strap adds mass behind your head. A light strap that concentrates support at the back (a halo design) often outperforms a heavier strap with minimal rear support. For budget gear, target total added weight under 200 g (0.44 lb); anything heavier should offer compensatory rear cradles or counterweight options. Finally, set a price ceiling for your search: the sweet spot for inexpensive yet comfortable straps is generally $15–$50. Below $15 you’re likely getting basic elastic replacements; above $50 you’re getting into premium or official Elite territory.
Beyond those three, evaluate durability and easy installation. Look for reinforced plastic mounts where the strap connects to the Quest 2’s side anchors and for washable or replaceable fabric covers. Read reviews for seam quality and Velcro longevity—cheap Velcro fails after months of frequent adjustments. If possible, measure your head circumference (typical adult male 56–59 cm, female 54–57 cm) and compare to vendor sizing notes, because a strap that’s physically adjustable but too narrow or too short will still be uncomfortable during long sessions.
Best Value Straps Under $50: Concrete Options
Below are practical, budget-first strap options commonly available for under $50. Prices and availability change, so use these as representative choices and check current listings and user reviews for the exact model you find. Each option includes material notes, adjustability, pros, and cons for extended play.
- AMVR Deluxe Head Strap — Materials and adjustability: rigid plastic backplate with foam pad, elastic top strap, and Velcro side adjustments. Pros: strong rear support reduces front-heavy feeling, thicker forehead pad, straightforward fit. Cons: bulkier than simple elastic, plastic clips can creak with heavy movement; some models vary in pad quality between sellers.
- BoboVR M2 (or similar halo-style third-party) — Materials and adjustability: halo/halo-plus design with a rigid ring at the back, breathable foam cushion and a single ratchet or screw adjuster for head circumference. Pros: great weight distribution, minimal pressure on face, easy to adjust for long sessions. Cons: less precise top-strap angle control, slightly higher profile behind the head.
- KIWI Design Soft Padded Strap (or generic soft padded alternative) — Materials and adjustability: soft fabric and foam with wide Velcro straps; typically includes a padded top band and side anchors. Pros: comfortable initial feel, lightweight, often includes washable covers. Cons: less structural support, can allow headset to tilt during intense movement.
- DIY Padded Top Strap + Stock Side Anchors — Materials and adjustability: inexpensive neoprene or memory-foam pad strapped to original elastic using Velcro or clips. Pros: very cheap (often <$20), customizable padding thickness and cover fabric, quick to replace worn covers. Cons: no improved rear support; best when combined with a cheap rear cradle.
How to choose between them: if you suffer from forehead pressure or glasses pinching, prefer halo-style options like the BoboVR M2 variants that offload weight to the perimeter of the skull. If you want something unobtrusive and lightweight, the KIWI-style padded soft straps provide comfort while keeping profile minimal. The AMVR-style rigid backplate is the middle ground—more structure than soft straps, less cost than official Elite options.
Concrete check points before buying: confirm that the strap uses the Quest 2’s standard side anchor lugs (virtually all third-party straps do), check pad thickness (aim for 8–12 mm or denser), inspect the ratchet or Velcro strength (read reviews corroborating long-term use), and, where possible, choose washable or replaceable covers. These small checks keep a $30 strap functioning comfortably over months of regular use.
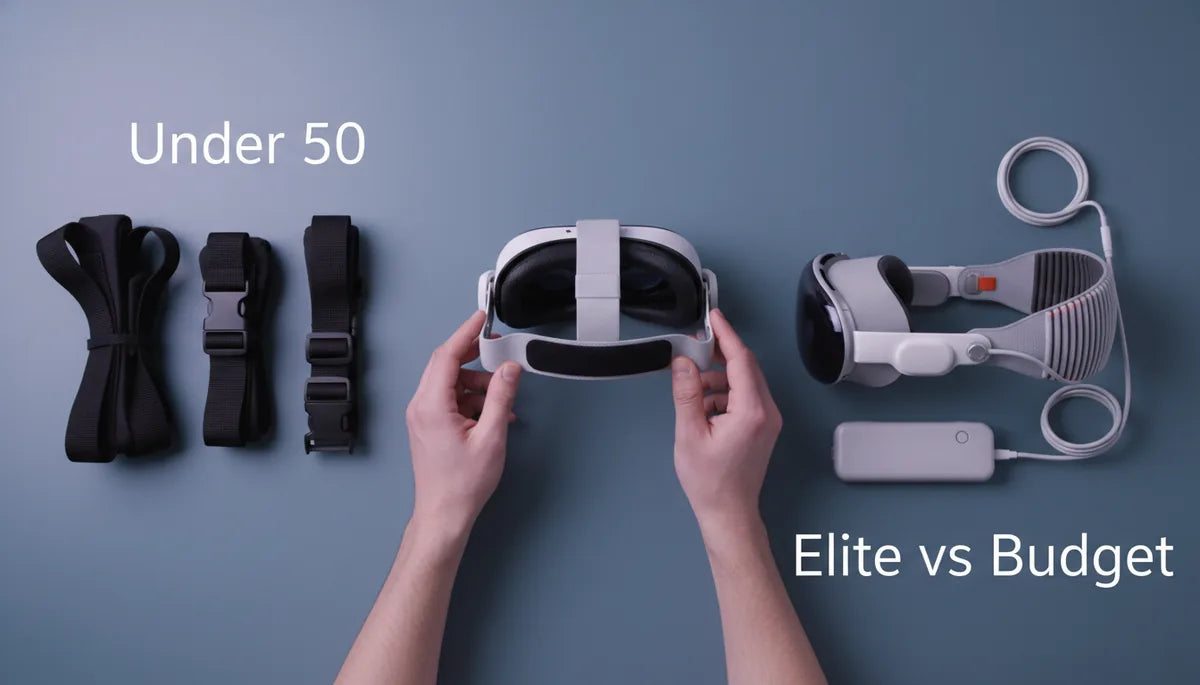
Elite Strap vs Budget Alternatives: What You Really Gain
The official Quest 2 Elite Strap is priced around $49.99 for just the strap, with the Elite Strap with Battery costing more. The Elite Strap’s main selling points are a rigid adjustable rear cradle, a top strap for stabilizing forward pitch, and a premium fit and finish. In practice, the Elite Strap reliably improves balance and reduces facial pressure for many users—but it’s not the only path to comfort. Budget alternatives can replicate core benefits at a fraction of the cost, often by using similar structural concepts: rear cradle, thicker padding, and separate top-band adjustments.
Where the Elite Strap typically outperforms budget options is in material quality and fit engineering. It uses reinforced plastics, a well-calibrated ratchet, and padding that fits snugly against the contour of many head shapes. Durability tends to be better as well—official parts are engineered to tighter tolerances. However, budget straps can match or come close to that comfort in the short term. Many third-party halo designs distribute weight as well as the Elite strap, and do so without the official branding premium.
Total cost of ownership also matters. If you pair the Elite Strap with the battery pack, you’re adding significant rear weight but gaining hours of play time without cables. Budget straps sometimes forgo integrated battery mounts, so if you plan to add a rear battery, verify compatibility (more on that in the compatibility section). Additionally, budget straps may require replacement sooner—cheap foam compresses and thin Velcro wears out—so factor a realistic replacement interval (12–18 months) into cost comparisons.
Bottom line: if your budget is strict, a $20–$40 third-party strap can deliver most of the comfort improvements you need. If you want maximum durability, a refined fit, or plan to add official accessories, the Elite Strap is a safer long-term bet. For many users, a hybrid approach—buy a budget halo first, then upgrade if you need a battery or tighter engineering—is the most cost-effective roadmap.
Step-by-Step Installation Guide for Quest 2 Comfort Straps
Installing a Quest 2 comfort strap is straightforward, but small details make the process faster and reduce wear on the headset anchors. Start by powering down your headset and removing batteries from any attached accessories. If your stock strap is the soft fabric type, gently extend it fully and locate the plastic anchors where the strap joins the headset sides.
To remove the stock strap, pull the flexible plastic anchor straight outward while stabilizing the headset body with your other hand. Most side anchors are friction-fit—don’t yank at an angle. If the strap is threaded, unthread the side bands carefully to avoid crimping them. Keep the stock strap if you want a fallback; many owners retain it for travel or quick sessions. Inspect the side anchor slots for dust or debris before inserting the new strap.
Attach the new strap by aligning the strap’s plastic mounts with the headset’s anchor slots. Press firmly until you hear or feel a click; some budget straps have a secondary safety tab—engage that too. For halo or rigid backplate designs, mount both side anchors, ensure the rear cradle sits flush against the back of your head, and then adjust the top strap so the headset sits level. If the new strap uses a ratchet, incrementally tighten while testing headset tilt and comfort.
Verify fit with these quick checks: 1) sharpness test—wear the headset and check whether the lenses align with your eyes without tilting your head forward; 2) pressure points—after five minutes, note any pain at the forehead, cheeks, or temples; 3) stability—perform a few natural head motions to ensure the headset doesn’t shift. Quick-release tips: some third-party straps include clips; learn their release pattern (usually a press-and-pull) so you can remove the headset quickly between sessions. If you’ll add a counterweight or battery, install it after fitting and re-check balance to avoid neck strain.
Comfort for Glasses Wearers: Design Tips and Adjustments
Glasses are one of the biggest comfort variables in VR. For glasses wearers, strap geometry and padding are critical because the headset must sit slightly farther from the face to avoid lenses contacting eyeglass frames. A strap that provides adjustable vertical play (tilt) helps create an optimal gap. Look for straps with either a sliding top band or a ratcheting rear cradle that lets you change the headset’s pitch without loosening the side straps dramatically.
Padding design matters: thicker facial interface cushions or aftermarket facial foams that increase eye relief by 2–4 mm can prevent glasses from touching the Quest 2 lenses. Pairing a budget strap with a thin spacer or an aftermarket facial interface designed for glasses can make a huge difference. Ensure the strap does not force the headset’s lower seal too tightly against your cheeks—this can press glasses frames into your face. A small forehead pad or a strap that shifts weight to the back of the head avoids tight seals on the cheekbones.
Practical fit tweaks include slightly increasing the side strap length to tilt the headset upward at the face, and tightening the top strap to counter-roll. This combination moves the contact zone from the cheekbones to the forehead and rear cradle—reducing glasses pinch. If you have wide frames, consider a halo/rigid rear cradle design that keeps the headset away from the face while maintaining a stable fit. For progressive lens owners, take extra care to center the headset to avoid lens distortion; small lateral adjustments can be easier with straps that allow micro-adjustments.
Finally, clean and check compatibility frequently: frame coatings can scuff the headset lenses. Use a dedicated lens protector when storing your headset, and periodically remove and clean the facial interface and gasket to remove oils from glasses that might transfer. If you frequently switch between glasses and no-glasses sessions, keep an easy-to-reach microfiber cloth and a small eyeglass repair kit near your VR station—quick tweaks save a lot of discomfort over long play sessions.
Weight, Balance, and Long-Session Comfort: Practical Tweaks
Weight distribution is the single biggest mechanical factor in long-session comfort. A headset that feels heavy on the front will create torque on your neck; a balanced headset distributes that torque across the back of the skull. The most budget-conscious way to improve balance is to move the center of mass rearward. Halo-style straps and rear cradles do this naturally. If you have a strap that’s comfortable on the forehead but still nose-dives, add a small counterweight at the back—many users use 50–150 g weighted battery packs or DIY weights wrapped in fabric for a cheap fix.
Where to place padding and tweaks: if you feel pressure across the top of the head, the top strap is likely pulling too hard—loosen it slightly and shift padding toward the rear cradle. If you feel cheek pressure, raise the headset using the top strap and then tighten the back cradle until the headset rests primarily on the rear skull. For extreme sessions (2+ hours), take short posture breaks every 30–45 minutes to relieve soft tissue compression and avoid soreness. Simple neck stretches between sessions can also prevent accumulated fatigue.
Battery packs and external accessories change the balance equation. Adding a rear-mounted battery pack can cure front-heaviness but adds mass; aim to put the battery low and centered in the rear cradle to minimize rotational torque. For budget users, smaller 2000–5000 mAh USB-C packs (150–250 g) work well—secure them with Velcro straps so they don’t shift mid-play. If you add weight, re-evaluate strap tightness: more rear weight usually means you can loosen the forehead strap slightly while maintaining stability.
When modifying balance, track objective comfort: measure perceived pressure areas after 10, 30, and 60 minutes. If a tweak reduces immediate pressure but creates a new sore spot after 30 minutes, refine the placement. Many users iterate through 2–3 configurations before finding the “sweet spot” for long sessions. Keep records of settings (top strap length, rear ratchet clicks, counterweight grams) so you can reproduce your best fit quickly.
Maintenance and Longevity: Cleaning, Care, and Storage
Regular maintenance prolongs strap life and keeps your Quest 2 hygienic. For daily users, wipe down the facial interface and strap contact points with a microfiber cloth after each session to remove sweat and oils. For deeper cleaning, remove any detachable foam covers and wash them according to manufacturer guidance—typically hand wash with mild detergent, rinse thoroughly, and air dry. Avoid machine washing unless the vendor explicitly permits it; stitching and Velcro can degrade quickly in a washer.
For the strap structure, use a soft damp cloth and mild soap. Isopropyl alcohol (70%) can be used sparingly on hard plastic components for disinfecting, but avoid repeated alcohol exposure on foam pads and synthetic leather covers, as it accelerates drying and cracking. If a strap has a removable breathable cover, wash covers every 1–2 weeks if you sweat heavily; otherwise, a monthly clean is often sufficient. Inspect Velcro and seams monthly—loose stitching can be repaired with a few hand stitches to extend life.
Storage matters: store your headset with the strap in neutral tension (not fully tightened) to avoid compressing foam and creasing fabric. Use a stand or shelf that supports the headset’s body and strap


Share:
Counterweight Solutions: Balancing Quest 2 Weight for Less Fatigue During Extended Play
Glasses Friendly VR: How to Adjust Quest Two Fit for Glasses Wearers