

How Facial Interface Geometry and Strap Design Shape Perceived Weight on Quest Headsets
If you’re spending multi-hour sessions in VR, the headset’s mass isn’t the only thing that decides whether you feel fresh or fatigued. On Quest headsets, the facial interface—the gasket, foam, and how the headset touches your face—controls torque, pressure distribution, and ultimately how heavy the device feels. Small geometric adjustments often deliver bigger comfort gains than shaving a few grams from the shell. ⏱️ 9-min read
This article walks VR gamers and developers through the mechanics of perceived weight, practical strap and cushion choices, fit tuning, glasses-friendly setups, maintenance for Quest 2 comfort straps, and balance strategies when using battery packs or wireless modules. Expect concrete steps and clear trade-offs so you can stretch sessions without neck pain or red marks on your nose.
Facial interface geometry and weight perception on Quest headsets
The facial interface is more than a cushion—it's the physical bridge that converts headset mass into forces on your skin and neck. Geometry determines where those forces act. A small contact patch concentrated on the nose bridge or a narrow band across the forehead creates high peak pressure and a pronounced forward pitch; a broader, better-shaped gasket spreads load across the cheekbones and temples, reducing perceived weight.
Think in mechanical terms: contact area and its location change the moment arm around your head. A large patch that sits low near the nose increases forward torque, pressing into the bridge and making the headset feel front-heavy. Conversely, padding that engages the upper cheekbones and lower temples produces a restoring counterforce that lessens neck strain and feels lighter despite identical mass.
Curvature matters. A gently contoured pad that follows the brow-to-cheek arc avoids digging into the cheeks while keeping the device stable. Overly pronounced curvature near the brows will push load onto the forehead, transferring discomfort to a sensitive area and changing the force path when you look up or scan the environment. In short, good facial geometry distributes pressure across multiple, sympathetically loaded regions—forehead, cheekbones, and the upper nose—producing a calmer, more balanced feel that supports longer play.
Strap options and their impact on weight distribution
Straps are the primary tool for shifting the headset’s center of gravity. Stock Quest 2 straps are lightweight and minimally padded, which keeps mass down but often leaves more load on the face. Meta’s Elite Strap (and similar third-party rigid or semi-rigid band designs) adds material and structure, increasing headset weight slightly but dramatically improving how that weight is born—by pulling the shell back and stabilizing the eye box.
Common third‑party options range from soft padded fabric bands to rigid plastic arches with rear counterweight mounts. Those that add a rigid frame limit micro-movements and maintain consistent geometry even during quick head turns. Foam and fabric straps deliver plush contact and reduce chafing but allow some sag under repeated motion; that sag increases forward pitch and the perception of heaviness. Materials like denser EVA foam or molded plastics resist compression better, preserving the intended load distribution during long sessions.
When judging strap choices think in terms of trade-offs: minimal weight and flexibility versus stability and balanced load. A well-designed strap may add 50–150 g, but if it shifts the center of gravity rearward and holds the headset rigid, you’ll typically feel less fatigue than you would with a lighter but poorly distributing strap. Also consider micro-movement: straps that allow the headset to shift slightly with head motion amplify perceived weight because pressure points migrate and reestablish repeatedly, increasing skin irritation and muscular effort.
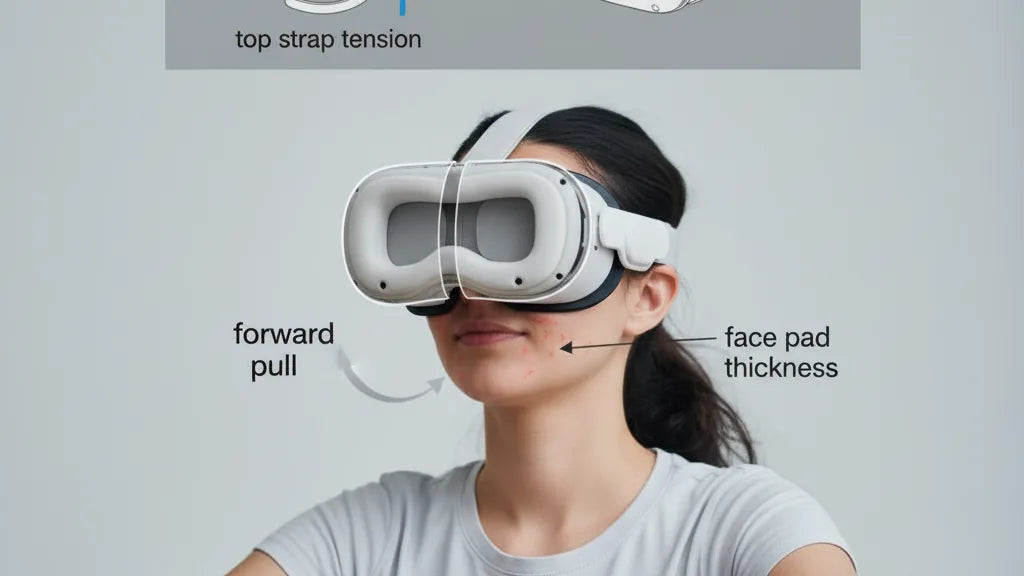
Fine-tuning fit: height, strap length, top strap, and cushion thickness
Small fit tweaks produce big comfort dividends. Start with the basic principle: shift load toward the occiput (rear of the head) and widen contact zones up front. Here’s a practical routine to minimize forward weight and cheek pressure.
- Initial don: loosen all straps, seat the headset on your face so the eye box lines up with your eyes, then tighten the rear strap until the headset feels stable—not tight.
- Top strap tension: tighten the top strap to lift the front just enough that the cheekbones are relieved. A useful guideline is the “one-finger test”: you should be able to fit a finger between the top strap and your head comfortably while the front is neutrally seated. This produces a lift without pinching.
- Side strap fine-tune: adjust side straps symmetrically so the headset sits flush across your forehead. If one side rides higher, you’ll get asymmetric pressure and rotation around the nose.
- Cushion thickness: choose pads that increase contact area without forcing the headset away from your face. For many users, low-profile pads (4–8 mm additional fill) suit broader faces and keep lenses at the correct distance. Medium pads (8–15 mm) work for most users, increasing area on the cheekbones. Thicker pads (15–25 mm) help narrow faces by preventing nose digging, but beware of changing IPD/lens distance—verify comfort and image clarity after swapping.
As a final check, perform a dynamic test—look up, down, and side to side. If the front lifts or digs repeatedly, loosen or reposition straps and consider a firmer pad or a strap with a rigid frame. The goal is minimal shifting and even pressure across the forehead and upper cheeks.
Comfort considerations for glasses wearers and facial geometry
Glasses introduce clearance and temple pressure considerations that can magnify perceived weight. When a headset compresses the frames or presses temples into the face, discomfort escalates quickly. The strategy is to maintain clearance without sacrificing contact area and symmetry.
Start with compatible cushions: low-profile or specially notched face pads increase horizontal clearance for frames while still distributing load across the cheekbones. Many aftermarket pads include a narrower nose channel or a softer bridge section to prevent frames from pinching. If you use clip-on prescription inserts, they can keep lenses inside the headset from shifting, but they add tiny amounts of mass; their benefit is usually net positive because they prevent repeated contact and frame movement.
Temple pressure is decoupled from strap routing. Ensure the strap spreads load across the upper occiput and not behind your ears. A top strap slightly firmer than usual helps lift the front away from the cheek-temple junction. If you still feel pressure on the temple tips, try adjusting pad geometry or adding thin silicone gasket strips at the temple zones to spread contact. For narrow faces, deeper pads that push the headset out slightly can reduce frame pinch but must be balanced against added torque—always recheck dynamic stability after any change.
Finally, never assume one cushion fits all: glasses wearers often prefer breathable, low-profile fabrics that cut heat and allow small micro-adjustments in positioning. Test configurations in 15–30 minute blocks to catch pressure build-up early and iterate until you find the best combination of clearance and distributed support.
Step-by-step installation and maintenance for Quest 2 comfort straps
Installing a comfort or counterbalance strap on a Quest 2 is usually straightforward, but alignment and routine maintenance determine long-term performance. Follow this condensed sequence to get the best fit and longevity.
- Remove stock strap: gently peel or unclip the side straps from the headset. Keep original hardware handy in case you revert.
- Attach new strap: position the new strap’s side anchors into the headset’s attachment points—ensure clips or screws are fully seated and flush.
- Align the rear cushion: center the rear pad so it sits low on the occipital bone rather than high on the crown; this gives better counterbalance.
- Set initial tension: loosely fasten and perform the don-and-lift sequence described earlier—tighten the top strap enough to lift the front, then secure the rear strap so the unit remains stable during movement.
- Test for seal and IPD: make small lateral adjustments to match your eye position and ensure no light leaks or exaggerated pressure zones.
Maintenance cadence keeps distribution consistent: clean foam and fabric weekly if you sweat heavily, otherwise every 2–4 weeks. Use a mild soap solution on removable pads and air dry completely. Inspect straps and cushions monthly for compression (pads that don’t spring back), fabric thinning, or detached stitching—those degrade how load spreads and increase hotspots. Replace foam or pads annually under regular use; heavy daily users may need to swap at six months. Finally, check attachment points for loosening every few uses—any play at the anchors allows micro-movement that reintroduces stress to the face.
Weight management beyond the strap: battery packs, wireless modules, and balance
Accessories like battery packs and wireless modules change the math. They add mass, but when positioned intelligently they can reduce perceived front-heavy torque by moving the center of mass backward. The trick is moderation and placement.
Battery packs commonly add 100–250 g. Attaching a pack low and centered at the rear—close to the occipital bone—gives the largest reduction in forward pitch. If a pack sits high on the crown or off-center it can introduce a new moment and create rotational discomfort. Many counterweight solutions combine a slim battery with a small pouch that clips into the rear strap; this keeps added weight low and aligned with the head’s natural support.
Caveats: adding too much rear weight can cause neck extension fatigue, especially during long sessions where your neck muscles work against backward pull. Also, heavier packs increase inertia, making quick head motions feel sloggy. If you use wireless modules, favor lightweight radios and keep antennas close to the headset shell to avoid altering strap geometry. Experiment with incremental mass: try 50–75 g at a time and perform a 30–60 minute test play to detect neck strain. If fatigue appears faster, reduce rear mass or reposition it lower until you find the best compromise between counterbalance and total head mass.
Cross-device compatibility and practical takeaways: Apple Vision Pro straps vs Quest 2 options
Device ecosystems are converging on modular accessories, but cross-compatibility has limits. Apple Vision Pro uses a different headband philosophy and attachment geometry than Quest 2; while some third-party straps advertise cross-device capability, adapters are often required and may change the effective geometry.
Adapters can allow a Vision Pro-style band to attach to a Quest 2 shell, but beware: even if the hardware connects, the curvature, padding placement, and tension points are rarely identical. That mismatch can move contact patches and create new hotspots or lens alignment issues. For users juggling multiple devices, choose straps that prioritize adjustable geometry—wide anchor points, adjustable rear pad position, and modular padding—so you can tune the fit for each headset rather than relying on a one-size solution.
Practical recommendations:
- If you’re primarily Quest-based, opt for a strap purpose-built for Quest 2 with a rear-weight option and replaceable face pads.
- If you plan to switch headsets, buy a strap with easily removable pads and a neutral attachment interface—this reduces the risk of geometry conflicts when you adapt it to another device.
- Always test any cross-device adapter in short sessions first. Check for changes in IPD, light leakage, and new pressure hotspots before committing to long play.
Next step: perform a quick pressure check—slide a thin strip of paper under the headset interface to locate hotspots, try one strap-and-pad configuration for 30 minutes, and iterate until you find a setup that keeps pressure low and the headset stable. Small geometric changes usually beat weight reduction alone when your goal is longer, more comfortable VR sessions.


Share:
Materials, Padding, and Durability: What Makes a Quest Two Comfort Strap Last
The science of weight distribution and Quest two balance for comfort