

How Mass, Centre of Mass and Strap Design Shape Quest 2 Comfort — And What to Do About It
Long VR sessions can quickly turn joyful immersion into a sore neck, forehead marks, or a creeping headache. Comfort isn’t just padding; it’s physics. Small shifts in where the headset’s mass sits relative to your skull change how much torque the device places on your neck and where pressure concentrates on your face. ⏱️ 11-min read
This article explains the mechanics behind that ache and gives clear, practical choices — straps, batteries, counterweights, padding tweaks and setup steps — so you can reduce neck strain and facial pressure during longer Quest 2 sessions. Read through for the reasoning, then use the checklists and adjustment routine to test changes in minutes, not weeks.
The physics of comfort: torque, centre of mass, and pressure points
Comfort with a VR headset is a mechanical problem as much as it is ergonomic. Torque — a rotational force produced by a weight sitting forward of a pivot — is the central culprit. The Quest 2’s display, lenses and electronics sit in front of your face. That forward mass applies a moment about your neck: the farther forward the centre of mass (COM), the larger the torque your neck muscles must counteract to keep your head upright.
Think of your head as a lever. The pivot is where your neck meets your skull; the headset’s COM is the load. Move the COM a few centimetres back and the torque drops noticeably. Move it forward and even a light headset can feel heavy. That’s why two headsets with similar total mass can feel very different: a well-balanced 600 g can feel lighter than an unbalanced 500 g.
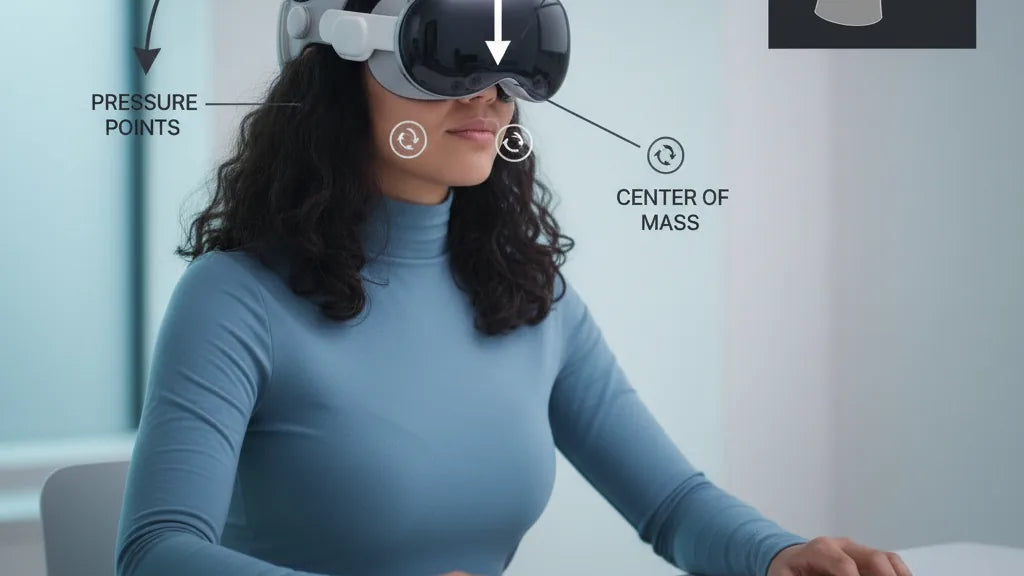
Torque also changes how load is distributed across your face. If the strap and padding don’t shift the COM rearwards, the nose bridge, forehead and cheeks become the primary contact points. Concentrated contact creates hotspots — red marks, numbness, headaches — often within an hour. The goal: reduce torque by aligning the headset’s COM with the natural COM of your head (roughly over the ear line or slightly behind the crown), and spread load so no tiny patch of skin bears most of the pressure.
Quest 2 in numbers: weight, balance and how it compares to other headsets
The official Meta comfort-strap-onto-a-quest-2-headset" rel="nofollow noopener noreferrer">Quest 2 headset weighs about 503 grams (around 1.1 pounds) for the HMD alone. That mass is concentrated at the front where the display and optics sit, producing the forward pull most users notice. When you add straps, foam replacements, or external batteries, total system mass and its distribution change quickly.
For context: lightweight mobile headsets tend to be in the 400–600 g range; PC-tethered headsets can easily exceed 600–800 g because of heavier optics and cooling hardware. But weight alone isn’t the full story — distribution is. The Pico 4, for example, keeps a similar total weight but moves the battery to the rear strap, producing a more balanced feel. Sony’s PS VR2 uses a halo-style support that distributes force around the crown and reduces facial loading despite the headset’s mass.
Accessories change the equation. An Elite Strap or aftermarket halo can add 100–300 g but push that mass rearwards; external battery packs often add 150–300 g at the back. Those additions increase total weight but usually reduce perceived weight by bringing the COM toward the head’s centre, lowering torque. In short: small mass shifts, even a few centimetres, change comfort more than adding or subtracting tens of grams in the wrong place.
Which components move the centre of mass (and how they affect comfort)
To rebalance the Quest 2, first understand what components move the COM. The main front-heavy movers are the lens assembly, display housing and any front-mounted electronics. The internal battery also contributes to forward bias when it sits near the front shell.
External components that affect balance include:
- Rear battery packs — add mass behind the head and simultaneously increase runtime; they’re the simplest way to shift the COM rearwards.
- Elite Strap and rigid rear-cradle designs — move contact points and sometimes include a battery pocket, both of which shift how load is carried.
- Padding changes — thick frontal foam can move contact points forward, slightly worsening torque; conversely, occipital (rear) padding can move the perceived COM back by supporting the rear of the skull more firmly.
Controllers and body movement have a secondary effect: during active gameplay your arms and body shift your overall center of gravity, but this rarely outweighs headset distribution. The practical takeaway: to reduce neck loading, add mass behind the COM (rear packs, counterweights) or change how the headset seats against the skull so the forces distribute across a wider area including the crown and occiput.
Strap types and real trade-offs: stock strap, Elite Strap, halo/ring and third-party designs
Strap choice is the single biggest user-controlled comfort variable. Each design has trade-offs between stability, ventilation, adjustability and how it shifts the COM.
Stock Quest 2 strap — light and inexpensive, the stock strap uses narrow side bands and a top strap. It’s minimal, which helps with heat and weight, but concentrates load on the nose and cheeks, leading to hotspots during long sessions. It’s fine for short or casual play but poor for extended, active use.
Elite Strap (Meta) — wider side supports and a rear anchor improve stability and reduce facial pressure. The Elite Strap with Battery integrates a rear power brick, simultaneously extending runtime and shifting the COM back. That creates a notably more comfortable balance for seated or active users, though it adds overall mass and some heat.
Halo/ring harnesses — these suspend the front of the headset from a ring that cups the back of the skull. By offloading much of the facial contact to the ring, nose pressure drops and forward tilt is reduced. This design works well for long sessions, but the added rear and crown mass can feel awkward to some people and can reduce ventilation at the crown.
Third‑party rigid and counterweight systems — various aftermarket solutions use rigid rear plates, adjustable counterweights or hybrid halo cages. They’re often the most customizable and can be lighter than battery-based solutions if just using small counterweights. Watch fit accuracy and material quality: cheap rigs may cause hotspots where the rack meets the skull or interfere with passthrough cameras and headphones.
How to choose the best Quest 2 comfort strap for long sessions
Picking a strap comes down to priorities: Do you want maximum balance for long play or minimal added weight for portability? Use this decision checklist to match features to use-case.
- Adjustability: Look for fine-grain vertical and rear tension adjustments. Micro-adjustments (small incremental changes) let you tune the headset to sit just above the eyebrows without pinching.
- Rear counterweight/battery integration: If you want balanced comfort and longer runtimes, choose a strap with an integrated battery pocket or easy battery mount. If you prefer lighter kit, choose straps that accept optional counterweights instead.
- Padding material and breathability: Memory foam spreads pressure but compacts over time; breathable fabrics improve long sessions. For active play choose straps with sweat-wicking covers.
- Glasses compatibility: Ensure the strap and face gasket leave enough space and don’t push on temple arms. Some halo designs reduce cheek pressure for glasses wearers.
- Install complexity and budget: Meta’s Elite Strap is a simple, supported upgrade. Third-party rigs can be cheaper or more feature-rich but may require more fiddling and risk compatibility issues.
Examples: If you need a no-fuss upgrade for longer sessions, Meta’s Elite Strap or Elite Strap with Battery is a reliable option. If you want to prioritize balance over added weight, consider a halo-style harness or a modular strap plus a small rear counterweight from a reputable third-party maker. Always read compatibility notes to ensure the mount won’t block sensors, charging ports, or your chosen audio solution.
Step‑by‑step install and adjustment checklist for ideal balance
Small setup mistakes often defeat even the best strap. Follow this sequence to get the Quest 2 sitting where your neck does the least work.
- Attach the strap correctly: Align the strap clips with the Quest 2 latching slots. Push until you feel a light click and ensure the band lies flat — no twists.
- Set vertical height: Loosen the top strap and place the headset so the bottom edge of the lenses sit just above your eyebrows. Aim for the sweet spot where the image is clear and the facial seal is even.
- Snug the rear strap: Tighten the rear side straps gradually so the headset settles back toward the occiput. You want a snug lock-in without pinching; the headset should not slide forward when you nod.
- Position rear mass: If using a battery or counterweight, start with it low and centered on the rear strap. Small shifts — even 1–2 cm — make a big difference. Move it slightly higher or lower to find where the forward pull reduces most.
- Fine-tune top strap tension: Tighten the top strap only enough to remove lifting action from the forehead. Over-tightening transfers too much pressure forward.
- Movement tests: Tilt your head down and look up, nod, and shake gently. If the headset rocks or pinches at the occiput, loosen and re-seat. Ideal setup holds steady without pressure spikes.
Specific tips: For the Elite Strap, seat the rear cradle on the widest part of your occiput (just above the neck). For halo rigs, ensure the ring is centered and level; misaligned halos create uneven loads. If you feel a hot spot, reposition padding rather than tightening — you want distributed contact, not focused clamping.
Accessories and balancing mods: batteries, counterweights and lifting systems
Aftermarket accessories let you tune the COM precisely. Here’s a practical guide to options, with pros and cons and how each affects comfort and utility.
Rear battery packs: These are the most common dual-purpose solution. A compact 5,000–10,000 mAh pack often weighs 150–300 g and plugs into the headset to extend playtime. Placed low and centered, they shift the COM rearwards and reduce cheek pressure. Pros: more runtime, clear balance improvement. Cons: added total weight and potential cable clutter; some packs can warm the rear strap area.
Small counterweights: Metal or lead shot packs (50–200 g) let you trim balance precisely without adding runtime. Start light and increase in small increments. Pros: minimal bulk and heat. Cons: no extra power — you’ll still run on internal battery.
Lifting systems (e.g., FlitLift-style): These redistribute weight to the crown or shoulders via straps that anchor higher on the head or to clothing. They’re effective at offloading the face and can be great for standing play. Pros: substantial reduction in face pressure. Cons: more complex fit, potential interference with hair or head-mounted audio, and reduced portability.
Hybrid solutions: Elite Strap with Battery gives both power and counterbalance in a supported package. Third-party modular systems allow swapping between battery and weight packs depending on session length. Remember: symmetry and cable routing matter. Uneven mounts or dangling cables negate the comfort gains and can create new hotspots or sensor occlusions.
Reducing perceived weight without losing features: padding, posture and small mods
Perceived weight (how heavy something feels) is influenced by ergonomics and posture as much as by true mass. You can reduce perceived load with a handful of small, reversible changes.
- Firm forehead support: Paradoxically, firmer forehead pads can reduce slippage and prevent the headset from rocking forward, lowering torque spikes. Avoid overly soft foam that compresses fully under load.
- Firmer rear strap or band: A more rigid rear cradle stabilizes the occiput and spreads load; combined with a slight backward seat of the headset, it reduces facial pressure.
- Thinner or shaped face foam: Very thick front foam pushes the headset outward and increases lever arm. A slightly thinner or contoured foam can reduce forward torque while keeping seal quality.
- Posture and micro-breaks: Keep your spine long, shoulders relaxed, and avoid tilting the head forward for long periods. Short breaks to re-seat the headset and reset tension prevent cumulative strain.
- Lightweight replacements: Use lighter audio solutions (on-ear buds instead of heavy attached headphones) and remove unnecessary accessories during casual play.
When these swaps backfire: if you over-thin face foam you may lose seal and image clarity, or if you over-firm the rear brace you can create an occipital hotspot. Test each tweak in 15–20 minute increments before committing to permanent modifications.
Cleaning, maintenance and compatibility notes (including Apple Vision Pro lessons)
Comfort gains are only meaningful if your kit stays clean, intact and compatible. Replace face foam and strap covers when they compress or lose shape — typically every 6–18 months depending on use and sweat. Velcro and clips wear; inspect latches and replace cracked plastic early to avoid sudden failure mid-session.
Compatibility cautions: some third-party rear battery packs or plates can block passthrough cameras, impede charged accessories, or interfere with the Elite Strap clip geometry. Before buying, check seller photos for clearance around the Quest 2’s side ports and camera windows. Also note that integrated battery straps tend to be optimized for single vendors; generic mounts may require custom cabling.
What to borrow from Apple Vision Pro and modern designs: Apple’s headset emphasizes weight distribution toward the crown and uses lifting geometry to move the COM closer to the head’s natural center. You can replicate elements of this approach by prioritizing crown support and modular counterweights rather than just piling mass at the rear. FlitLift-style lifting systems — designed as unobtrusive crown anchors — demonstrate how moving some load up and off the face dramatically improves comfort during long sessions.
Final practical takeaway: start by tuning strap geometry and posture; if torque remains, add rear mass incrementally (battery or small counterweight) until the forward pull drops. Test each change with short play segments, and keep a maintenance schedule for pads, velcro and mounts. That methodical approach yields lasting comfort improvements without unnecessary weight or cost.


Share:
Facial interface geometry and perceived weight on Quest headsets
Reducing Pressure with Quest 2: Ergonomic Facial Interfaces and Cushions That Work