

Optimize Your Quest 2 Comfort Strap Fit: Balance, Pressure Distribution, and Longer Play
If your Quest 2 leaves your nose sore, temples pinched, or your view tilting after 30–60 minutes, the problem is rarely the headset alone—it's how the strap carries the weight. This guide walks you through practical, no‑fluff adjustments and choices so the headset sits level, pressure is spread across more surface area, and you can play longer without fatigue. ⏱️ 8-min read
Read on for quick checks, a clear comparison of strap options, a step‑by‑step install and initial fit, a simple three‑step fine‑tune routine, long‑session pressure tips, maintenance advice, weight context, and targeted fixes for glasses wearers.
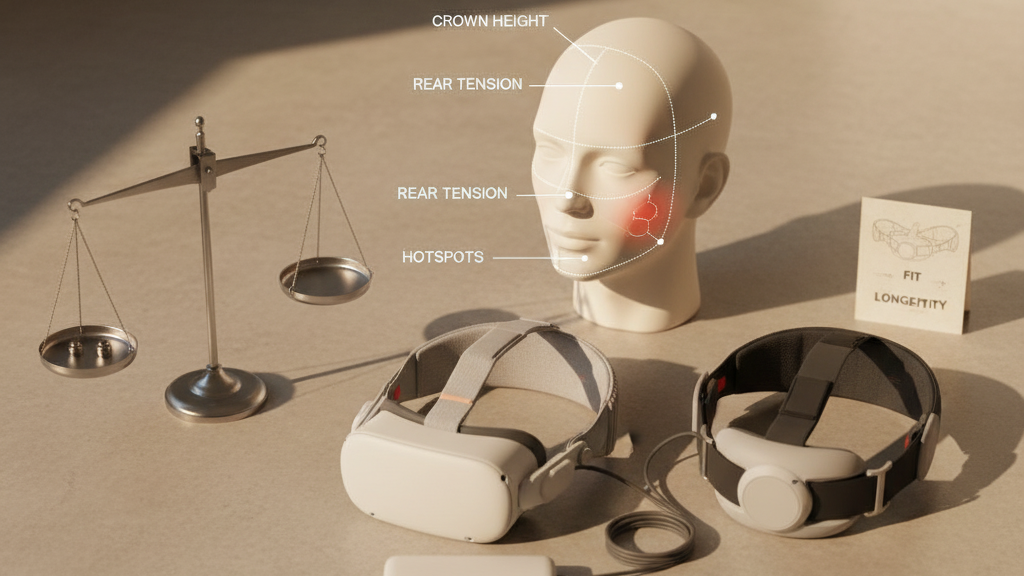
Understanding balance: where weight lands
The Quest 2’s center of gravity sits forward of your face, so the strap system must actively counter that pull. A good harness pushes some load up onto the crown and back toward the rear band; otherwise the front drops, lenses tilt, and pressure focuses on the nose, cheeks, or temples.
Three strap variables control where weight lands: strap height over the crown, rear band tension, and side strap length. Different face shapes respond differently—low nose bridges often benefit when the top strap lifts weight off the cheeks, while prominent cheekbones or flatter temples get better stability from increased rear tension.
Quick mirror test (do this with your eyes closed so you feel, then open to confirm):
- If the headset presses mainly on your nose, raise the top strap or loosen rear tension slightly.
- If your temples pinch, try raising the top strap and reducing eyebrow/facial contact in small steps.
- If the headset shifts forward during a light head turn, increase rear tension to shift some weight backward and improve stability.
Choosing the right strap: Comfort vs Elite vs third‑party
Not every strap is made for every use. The right choice depends on play length, activity level, head shape, and whether you wear glasses.
Comfort Strap
Lightweight, simple to adjust, and easy to swap between sessions. Best for shorter play sessions or users who prioritize minimal setup time. Its slimmer profile often helps glasses wearers by reducing cheek contact, but it offers less rear lift on long sessions.
Elite Strap
Heavier than the Comfort Strap, but designed for broader adjustability and a more dialed-in fit. It excels during extended play: more precise crown positioning and rear support move weight off the face and reduce neck strain. Choose this if you play long sessions or move actively in VR and want a steadier view.
Third‑party options
Quality varies. Some third‑party straps add thick padding and innovative geometries that increase comfort; others cut corners on clip durability or padding density. Before buying, verify Quest 2 compatibility, check how the clips attach, and compare padding firmness. A firm, supportive pad can feel better than an overly soft one that collapses under load.
When to prefer each:
- Comfort Strap — casual players, quick sessions, glasses wearers who need slimmer cheek clearance.
- Elite Strap — frequent players, longer sessions, active movement where stability matters.
- Third‑party — when you need specialized padding, alternative mounting, or a balance of comfort and price; pick a reputable maker and confirm attachment points.
Step‑by‑step install and initial fit
Use this beginner‑friendly sequence to install a strap (the steps reference a typical modular system such as the FlitLift GraviPro) and establish a neutral baseline fit before fine‑tuning.
- Power off the headset and remove any existing strap—disconnect gently to avoid breaking clips.
- Attach the top and side mounting points: slide side mounts into the headset slots until they click; secure the top strap into its anchor. Ensure quick‑release connectors sit flat and fully engaged.
- Set the side strap height roughly midway up the ear line and the rear band so it rests across the lower skull—not the crown—before you put the headset on.
- Put the Quest 2 on and center the display. Tighten side straps in small, equal increments so the headset feels balanced between forehead and rear band.
- Adjust crown height so the top strap runs over the highest point of your head without digging into hair; the goal is even contact across the top strap, side straps, and rear band.
- Do a quick movement test: nod, shake your head gently, and walk in place. If the headset slips or tilts, loosen or tighten the rear band slightly and re‑center.
Initial fit checklist:
- Headset sits level—the lens plane should be parallel to your eyes.
- Even contact across forehead, crown, and rear band (no single hotspot).
- No hard clip edges contacting comfort zones.
- Clearance for glasses temples if you wear spectacles.
Fine‑tuning fit: height, length, and strap tension
Micro‑adjustments make the biggest comfort difference. Follow this practical three‑step process to reach a balanced fit without over‑tightening.
- Set crown height: With the headset on, slide the top strap up or down so it rests on the highest point of your skull. Raising the crown lifts the front slightly and relieves nose pressure for low-bridge faces; lowering it increases front contact for users who need a closer seal.
- Adjust side strap length: Shorten or lengthen the side straps to change how the headset seats on your temples and cheeks. Small changes can shift pressure away from the forehead to the crown or vice versa—test by nodding and checking for slippage.
- Tweak rear tension: Increase rear band tension to move weight back (better for active play or flatter temples). Reduce tension if you feel brow tightness or forehead numbness. Always tweak in small increments and re‑test with light movement.
Guiding principle: aim for a fit that feels secure but not constrictive. If you notice tingling, numbness, or breathing‑restricted forehead skin, you’re too tight.
Pressure distribution techniques for long sessions
To avoid forehead numbness, temple pain, or rear headaches over extended VR sessions, distribute contact across multiple points and give any one area a break.
- Add thin padding at high‑pressure contact points—the forehead, temple edges, or rear band. Use breathable, low‑bulk foam or fabric sleeves so the pad won’t compress excessively.
- Rotate or vary strap positions between sessions. Even shifting the crown a few millimeters can move pressure to less fatigued tissue.
- Schedule short micro‑breaks every 30–45 minutes to let skin and soft tissue recover; during breaks, loosen the strap slightly or remove the headset for a minute.
- Use strap geometries that move load to the crown and rear instead of focusing on the face; many players find a rear‑heavy setup reduces nose pressure despite adding a few grams of strap weight.
Real case: after switching crown height and adding a slim forehead sleeve, a player reports reduced temple pressure and comfortably playing two‑hour sessions—proof that small changes often yield big gains.
Maintenance and longevity: care, cleaning, and replacements
Routine care keeps your strap performing and prevents comfort loss from compressed or degraded padding.
- Wipe down after use: a soft, slightly damp cloth and mild soap if needed. Avoid harsh cleaners that degrade fabric or foam.
- Inspect connectors, sliders, and buckles monthly for cracks or looseness. Replace damaged clips to avoid sudden failures.
- Refresh contact pads when they feel flat or uneven—most users replace foam or pads every 6–12 months depending on frequency and sweat exposure.
- Store in a cool, dry place away from direct sunlight and heat sources which can warp plastic and break down adhesives.
- When adding third‑party accessories (batteries, larger pads), re‑balance the headset—added rear weight can help or hurt depending on how it shifts the center of gravity.
Weight and balance comparisons: Quest 2 vs others
The Quest 2 weighs roughly 0.5 kg (about 1.1 lb). Strap systems add a small amount of weight but can dramatically change perceived comfort by shifting where that mass sits.
Key points:
- A heavy strap with solid rear support often feels lighter on the face because it moves weight toward the skull and rear—this reduces nasal and cheek hotspots but increases load on the back of the head.
- Lighter straps minimize total mass but may leave more weight on the face, increasing hotspots during long sessions.
- Compared with some competitor headsets that use different crown geometries, the Quest 2 benefits more from rear or crown‑focused straps to counter its forward CG.
Takeaway: choose a strap that moves weight to a part of your head that tolerates pressure better—some users prefer a little extra strap weight for dramatically better balance and longer comfort.
Troubleshooting and practical tips for glasses wearers
Glasses add an extra layer of fit complexity: frames can rub, fog, or press into skin. Here are concrete fixes that make a big difference.
- Raise the crown slightly to create more clearance between the headset faceplate and your cheekbones. This reduces frame contact at the temples.
- Use slim, low‑profile foam padding around the nose and cheeks to prevent frames from being pushed into the skin.
- Try anti‑slip temple pads or small adhesive bumpers on cheek areas to stop frames from shifting during movement.
- Keep a small microfiber cloth handy to wipe lenses and frames to reduce fogging; brief breaks help air the glasses and headset interior.
- Consider frames with thinner arms or smaller temple profiles if you frequently use VR—some eyewear brands market VR‑friendly frames for this reason.
- Test strap options for vertical adjustability—straps that can shift the contact point away from temples toward the crown reduce sustained frame pressure.
Finally, retest fit after any change. Small tweaks—padding swaps, a millimeter of crown shift, or tiny rear tension changes—often eliminate the issues glasses wearers experience.
Next step: pick one small change—adjust crown height, add a thin forehead sleeve, or tighten the rear band slightly—and test it for a 30–45 minute session. Log the settings that work best so you can reproduce that comfortable fit every time.
Powered by Trafficontent


Share:
Step-by-step setup for a comfortable Quest 2 head strap with glasses
Stock vs aftermarket head straps: which keeps Meta Quest stable during intense play