

How the Meta Quest 2’s Weight and Balance Compare — and Exactly What to Change to Make Long VR Sessions Comfortable
If you own a Meta Quest 2 or are shopping for one, comfort quickly becomes as important as resolution or game library. The Quest 2’s relatively light overall mass hides a common problem: the way that mass is distributed often creates front-heavy pressure that shortens play sessions. This guide explains, in plain terms, how raw weight and center of mass influence what you feel on your face and neck, where the Quest 2 sits versus other headsets, and which straps, counterweights, and small adjustments deliver real, measurable comfort improvements. ⏱️ 11-min read
Read on for practical comparisons, a clear strap‑selection checklist, a step‑by‑step install and adjustment routine, accessory tradeoffs (batteries, audio, cushions), maintenance tips, and a simple testing protocol so you can evaluate changes in one 30–60 minute run. No vague promises — just actionable choices that reduce hotspots, neck strain, and slippage.
VR weight basics: mass, center of mass, and contact points
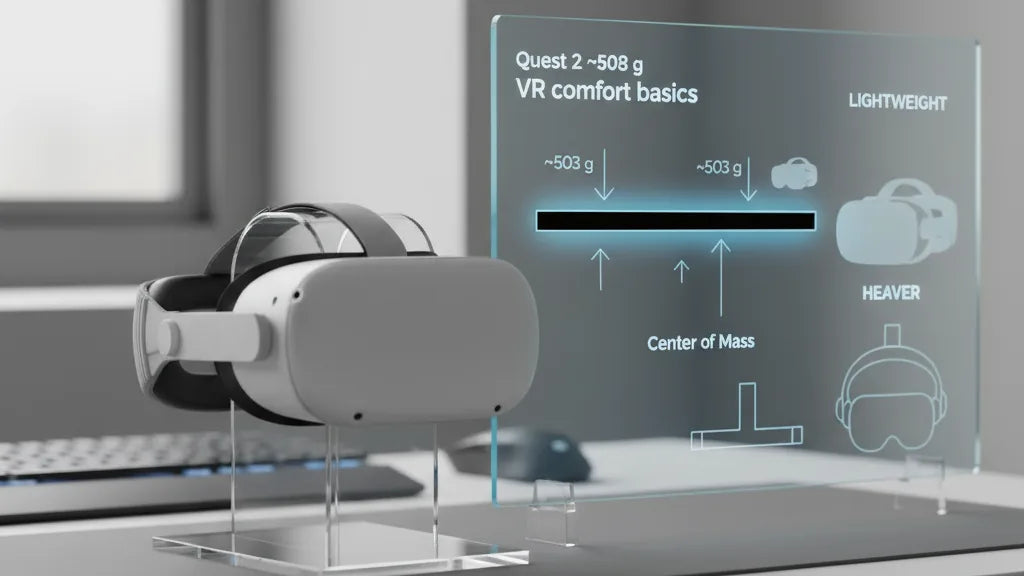
When people talk about headset weight they mean two related but different things. Mass — the number printed in specs — is the total weight of the headset plus anything attached (measured in grams). Center of mass (COM) is the single point where that mass would balance if the headset were supported at one spot. Put simply: mass tells you how heavy the object is, COM tells you where that weight is focused.
For many standalone headsets, including the Quest 2 (around 503 g), important electronics, optics, and the battery sit in front of the ears. That forward bias shifts the COM ahead of your head’s midpoint. The result is predictable: more load on the forehead and nose bridge, and higher tension where the rear strap meets the occipital bone (the lower back of the skull).
How you perceive weight depends on contact points. A soft, wide face gasket spreads pressure across cheekbones and the forehead; a rigid halo moves load to the top and back of the skull. That’s why two headsets with similar gram weights can feel very different. To check official specs, look on the manufacturer’s site for “weight” and confirm whether that includes removable accessories like batteries or audio modules.
How weight and distribution affect comfort during long sessions
Weight distribution matters more than absolute grams for long sessions. A well-balanced 700 g headset can feel comfortable, while a poorly balanced 500 g headset can make your brow ache after thirty minutes. The most common physical complaints are neck strain, forehead or nose bridge hotspots, strap chafing, and intermittent image blur caused by slippage.
Neck fatigue arises when the head’s muscles must constantly counterbalance a forward-leaning load. This becomes obvious in active games where head movement is frequent — the more the COM sits forward, the more your neck muscles fire to keep the display aligned. Localized pressure points happen when the contact area is small or hard: a narrow forehead pad or thin gasket concentrates force and produces red marks or soreness.
Simple rules of thumb help reduce these problems: (1) spread load across larger contact areas to lower peak pressure; (2) move mass closer to the head’s natural pivot (rear of the skull) to reduce torque on the neck; (3) use short, regular breaks — five minutes every 30–45 minutes — to allow muscle recovery. Frequent micro-adjustments during a session are normal, but a good strap will minimize the need for them.
Where the Quest 2 sits: a practical comparison to other headsets
The Quest 2 is often described as "light" because its raw mass (~503 g) is lower than many PC-tethered headsets. That weight, however, is concentrated toward the front due to integrated optics and electronics. In practice that makes it feel front-heavy on the stock elastic strap, especially during dynamic movement.
Contrast that with the Valve Index, which weighs considerably more (~809 g) but uses a robust halo design that spreads load around the crown and rear of the head. Because the Index moves the support points off the face, many users find it less fatiguing for long play despite the higher mass. The Pico 4 takes a different engineering route: the front module is lighter (roughly 295 g) because its battery lives in the rear strap, creating a naturally balanced experience. Each approach is a tradeoff between features, battery placement, and how manufacturers prioritize comfort versus compactness.
Other modern headsets follow similar patterns: some add mass for high-end optics and sensors and compensate with halo frames or rear-mounted batteries; others prioritize low front weight but require better attachment systems. The takeaway: don’t read weight numbers alone. Ask where the weight sits relative to the eyes, and examine the strap system that bears and redistributes that mass.
Straps and balance systems: official Elite Strap, third‑party, and counterweight options
Fixing front‑bias is mostly about moving weight rearward and increasing the contact area that supports it. Meta’s official Elite Strap is a rigid, cradle-style upgrade over the stock fabric band; it stabilizes the headset and shifts some load to the back of the skull. The Elite Strap with Battery combines rigid support with a rear-mounted battery pack: it extends runtime and, crucially, acts as a natural counterweight to reduce face pressure.
Third‑party solutions fall into a few common categories. Halo (or ring) straps encircle the top of the head and use a dial to tighten: they excel at transferring load off the face to the crown and occiput, which eliminates many forehead-hotspot complaints. Rigid hard-shell straps from makers like BoboVR, Kiwi Design, and others provide sturdy lateral support and are often cheaper than official options. Soft padded straps are lightweight, breathable, and inexpensive, but they typically do less to counter torque.
For incremental fixes, rear counterweights are a practical hack: a small pouch or clip-on weight attached to the rear strap shifts the COM back and dramatically reduces forward tilt. Separate battery packs provide the same mechanical benefit while also increasing playtime. If your priority is stationary comfort at the desk, a headset lift (stand) lets you rest between sessions without repeatedly fiddling with straps.
Choosing the right Quest 2 strap: checklist and product categories
Before you buy, use this short checklist to match a strap to your needs:
- Glasses compatibility: thick frames need extra face depth and side clearance.
- Padding type: breathable foam vs. dense memory foam — the latter feels plush but can trap heat.
- Adjustment range: top strap plus side or dial adjustments for micro‑tuning height and tilt.
- Weight/balance features: does it accept a rear battery or counterweight pouch?
- Durability: reinforced mounting points, replaceable cushions, washable fabric.
- Price tier: set expectations: budget, midrange, and premium.
Product categories and quick recommendations by budget:
- Affordable: padded third‑party fabric straps and soft replacements (AMVR, VR Cover categories). Pros: inexpensive, breathable. Cons: limited rear support; may still allow forward tilt.
- Midrange: rigid third‑party or official Elite Strap. Pros: better balance, solid build, often accepts counterweights. Cons: heavier than soft straps, price rises accordingly.
- Premium: Elite Strap with Battery or high‑end halo systems with optional battery packs. Pros: best balance—rear mass and halo support reduce facial pressure and neck torque. Cons: added weight and cost; battery adds mass but shifts COM back beneficially.
Choose based on your typical use: active, movement-heavy games benefit most from rear weight or halo systems; passive viewing and VR cinema favor lightweight, breathable options with good face cushioning.
Step‑by‑step install and adjustment guide for Quest 2 straps
Upgrading a Quest 2 strap is straightforward. Follow this sequence to get a comfortable, stable fit quickly:
- Remove the stock strap: power off the headset. Pull the facial interface slightly forward and away from the frame to expose side arm clips. Press the small release tabs on the side arms and slide them out; then remove the top strap from its slot.
- Fit the new strap: line up side arms with the headset mounts and click them into place until you hear a snap. Insert the top strap if required by your design.
- Initial tensioning: place the headset on your head and set side straps to a loose, comfortable fit. Avoid overtightening — the headset should sit firmly without pinching.
- Balance front/back: if you have a counterweight or rear battery, attach it now. The goal is a neutral feel where the headset neither tilts forward nor requires strong chin force from the strap.
- Height and gasket alignment: adjust the top strap so the display aligns with your eyes; you should not have to tilt your head for a clear view. Ensure the face gasket sits evenly on the cheeks and forehead.
- Final micro‑adjustments: with the headset in place, perform several head movements (look left/right, nod) and feel for hotspots or slippage. Loosen or tighten the halo dial, side cams, or top strap a few clicks until slippage stops and no single pressure point remains dominant.
After installation, play for 10–15 minutes and make a final micro-tune. A good fit reduces the need to readjust mid-session and keeps the lenses aligned for consistent clarity.
Accessories that change weight and balance: batteries, audio, cushions
Accessories change both mass and its distribution. Rear battery packs are a popular two-birds-one-stone fix: they add mass but place it behind the head to counter the forward electronics. That often reduces facial pressure and neck torque despite increasing overall weight. Be aware: adding a battery raises total system mass and can generate a small amount of heat at the rear strap area.
Audio choices also impact balance. Built-in on‑ear speakers keep the headset lighter but sit near the sides of the head. Upgraded over‑ear headphones add more mass and can shift the distribution slightly depending on their mount. Lightweight earbuds minimize added weight but may compromise immersion compared to over‑ears. Many users find an over‑ear solution that clips onto the strap strikes the best balance between sound quality and ergonomics.
Face cushions are underrated. Thicker pads redistribute pressure across a larger area and can move the eyes a few millimeters farther from the lenses, which affects perceived fit and eye relief. Memory foam inserts are comfortable but trap heat; replaceable silicone or breathable foam covers help regulator sweat. When changing cushions, check that the additional thickness doesn’t push the optical sweet spot out of alignment — a small top‑strap adjustment usually corrects this.
Cleaning, maintenance, and when to replace your Quest 2 strap
Clean, well‑maintained straps last longer and resist sagging that ruins fit. For routine cleaning: wipe plastic and rigid parts with a soft cloth slightly dampened with water and mild soap; never submerge. For fabric or foam pads that are removable, hand‑wash with gentle detergent and air‑dry completely before reattaching. Avoid harsh chemicals that can degrade foam and fabrics.
Routine checks save headaches. Inspect fasteners and side‑arm mounts for cracks, test Velcro and elastic for lost grip, and examine cushions for compressed foam or thinning fabric. If adjustment knobs become loose or the halo no longer holds tension, the strap will not distribute weight effectively and should be serviced or replaced.
Replace the strap if you notice: persistent sagging, cracked or loose mounts, foam that won’t spring back, or hygiene issues like permanent sweat stains or odors. In shared setups, swap face covers frequently and consider silicone covers that are easier to disinfect between users.
Quick fixes and testing protocol to reduce discomfort now
If you want improvement fast, try these low-effort hacks before buying new hardware:
- Add a small rear counterweight: a coin pouch or a purpose-made rear weight (50–150 g) clipped to the back strap often eliminates forward tilt immediately.
- Change tightening order: place the headset, tighten side straps first to stabilize depth, then snug the top strap to adjust tilt — this reduces face pressure more predictably.
- Use temporary padding: a small strip of self-adhesive foam on the rear cradle can shift how the weight sits and soften occipital contact.
- Mind posture: sit with a neutral spine and tuck the chin slightly; this reduces neck strain during prolonged viewing.
- Schedule breaks: adopt 5–10 minute breaks every 30–45 minutes and perform simple neck stretches to avoid stiffness.
Test comfort improvement with a simple protocol: run a 30–60 minute session doing representative activities (active game, passive video, or mixed). Take notes at 10, 20, 30, and 60 minutes — note hotspots, slippage, and neck fatigue on a scale of 1–10. Re-run the test after each change (e.g., after adding a rear weight or changing straps) and compare scores. Small improvements like a drop from 6 to 3 in forehead pressure are meaningful and will compound over hours of play.
If you’re shopping, start with your budget and primary use: for Beat Saber and active games, favor halo or rear-weight solutions; for casual viewing, prioritize breathable cushions and a lightweight strap. Try before you buy when possible, and run the 30–60 minute comfort test to be sure your chosen combination solves the real pain points.
Next step: pick one change — a rear counterweight or the Elite Strap — and run the 30‑minute test above. Small adjustments often deliver the largest comfort gains, and once you find a balance that works, extended VR sessions become far more enjoyable.


Share:
Mastering weight distribution: balance Quest 2 with counterweights for comfort
How to choose a Quest 2 comfort strap for different head shapes