

From Unboxed to All-Day Comfort: Installing the Elite Head Strap on Your Oculus Quest 2
Upgrading from the Quest 2’s stock fabric strap to the Elite Head Strap makes a night-and-day difference for stability, comfort, and extended play. This guide takes you step‑by‑step from unboxing to a dialed‑in fit—whether you have the standard Elite Strap or the battery-equipped version—so you can get back into VR without guessing at adjustments. ⏱️ 10-min read
You’ll find practical prep tips, a clear parts checklist, a careful installation walkthrough, and hands‑on advice for long sessions: weight distribution, cushions, and maintenance. Read this once, follow the steps, and you’ll have a comfortable, secure fit that stays put during active play.
Preparation and compatibility
First things first: make sure the accessory in your hands is actually designed for the Oculus Quest 2. The Elite Head Strap is engineered specifically for the Quest 2 (sometimes sold under the Meta Quest 2 name). It will not fit the original Quest or the Quest 3. Confirm the model printed on the box and match it to your headset before you proceed.
There are two common Elite Strap variants: the standard rigid halo-style strap and the version with an integrated rear battery pack. Both share the same side-arm connection points for the Quest 2, but the battery model has a bulkier rear module and slightly different balance characteristics. If you have the battery unit, check that the battery’s mounting orientation matches the photos in the manual—most modules are keyed so they only mount one way.
Finally, test glasses clearance before installing if you wear spectacles: put the headset on with the original strap and note whether the lenses press on your frames or if the headset rides too low. The Elite Strap gives more vertical adjustment, which usually helps, but it’s good to know baseline clearance so you can position the Elite strap for both comfort and optical alignment.
Tools, clutter-free prep, and parts check
One of the great things about the Elite Head Strap install is that you rarely need specialized tools. Still, a thoughtful setup saves time and prevents little mistakes.
- Workspace: a flat, well-lit table with a soft mat or microfiber towel to protect the headset’s plastic and lenses.
- Cloth: keep a clean microfiber cloth ready for cleaning connection surfaces and wiping fingerprints.
- Optional tools: most users won’t need anything beyond their hands. However, a small Phillips (#0/1) or precision screwdriver, a plastic pry tool/spudger, and tweezers are handy if your kit includes tiny screws or spacers.
- Parts tray: a shallow tray or magnetic dish to hold screws or small clips prevents losses.
- Documentation: keep the manual and any parts list out so you can verify everything is present before disassembly.
Open the packaging and lay out each component: the left and right side arms, the top/halo band, the rear cushion, the adjustment dial assembly, and any included screws or spacers. If you have the battery model, make sure the battery module and its cable (if provided) are present and undamaged. Missing parts? Don’t force anything—contact the seller or manufacturer for replacements before you proceed.
Remove the existing strap and clean surfaces
Power down your Quest 2 and unplug any accessories. You’re about to expose the side rails and contact points, so working on a powered-down headset eliminates accidental inputs and protects internal electronics.
Remove the stock fabric strap: pull back the top velcro band, then gently unclip each plastic arm from the two side attachment points. These arms slide out with a firm but gentle motion—if you feel resistance, stop and check for a clip or latch you might be overlooking. Place the removed strap away from your workspace to avoid tangles.
With the headset bare, clean the side rails and the top contact area where the Elite Strap will mount. Use a lightly damp microfiber cloth (water or a mild electronics-safe solution) to remove skin oils, dust, and residue. Avoid alcohol or abrasive cleaners that can dull or crack the plastic. Inspect the mounting slots and surrounding shell for hairline cracks, chips, or stress marks. If you find damage, pause and contact support—installing a stiff strap on a compromised shell can worsen the problem.
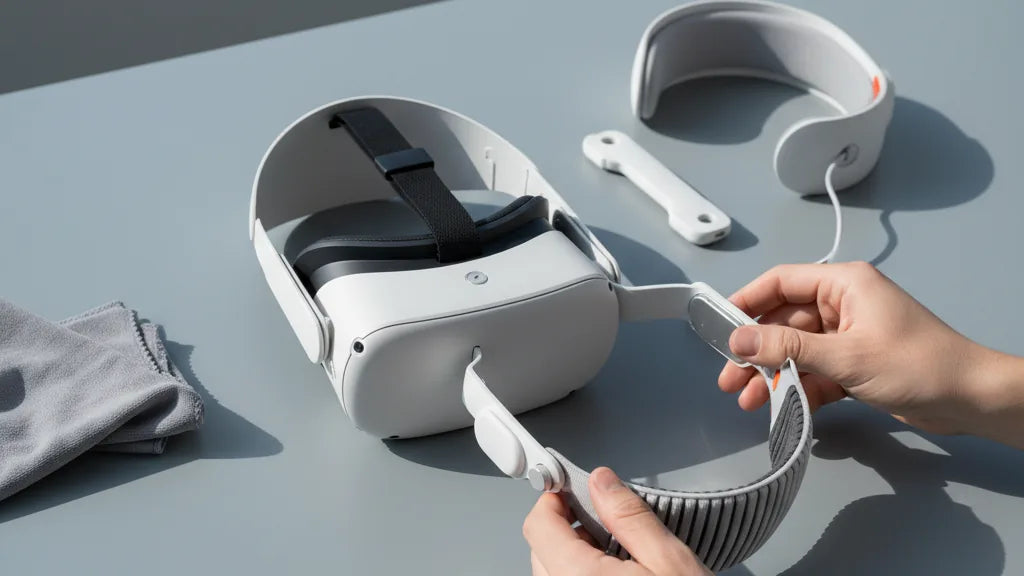
Step-by-step install for Elite Strap
With the headset cleaned and the Elite Strap at hand, follow this methodical sequence. Take your time on the first side—alignment is the most common place people make mistakes.
- Orient the headset so the front faces you and the side rails are visible.
- Pick one side arm of the Elite Strap and line up its connector with the corresponding slot on the Quest 2’s rail. You’ll usually see a keyed notch—rotate the arm until the shapes match.
- Gently slide the arm forward into the slot. Aim for an even, flush insertion. You should feel or hear a light click when it’s fully seated.
- Repeat for the opposite side. Once both arms are in place, confirm symmetry: the halo/top band should sit level across the crown.
- Press both sides firmly (but without forcing) to ensure the clips fully engage. If either side doesn’t click, remove and realign; forcing can break the plastic tabs.
If you’re installing the battery-equipped Elite Strap, pay special attention to the battery module orientation. Most modules attach to the rear of the halo and lock into a cradle. Slide it into the cradle until the latch engages; if a short cable plugs into the headset, connect it now and ensure the cable is routed without kinks. Seat the battery so its weight is centered low on the back of your head—this improves balance.
After installation, power on the headset briefly and test that nothing obstructs vents or sensors. Then proceed to fit adjustments below before committing to long sessions.
Fit adjustments and dialing in comfort
Fitting the Elite Head Strap is a two‑part process: set the top/halo and then fine‑tune the side tension. The goal is secure support with even contact and minimal pressure points.
Start with the top strap and rear dial:
- Place the headset on and allow it to sit naturally on your face. Position the top strap so it rests across the crown, not too far forward.
- Use the rear dial to bring the halo snug around your head. Turn slowly—clockwise tightens. Stop when the headset sits level and doesn’t slide when you shake your head gently. Avoid over-tightening; you should feel support, not a clamp.
Now tune the side straps:
- Loosen both sides to a mid-point. Bring them in equally in small increments until the headset is stable laterally. Uneven side tension tilts the headset and generates hotspots.
- If you wear glasses, slightly raise the headset so the nose cutout doesn’t press into your frames. The Elite Strap’s additional height range makes this easy—use it to balance lens alignment with cheek clearance.
Run a short comfort test: put the headset on for five minutes and move naturally—look up, down, and side to side. Pay attention to any numbness behind the ears, pressure on the forehead, or slippage. If you find hotspots, back off the top dial one notch and re-balance side tension. Small increments are the key—most fine-tuning takes only a minute or two.
Stability for long sessions and weight distribution
Extended play exposes small fit flaws. The Elite Head Strap’s rigid halo and rear dial help manage the Quest 2’s front-heavy tendency, but you’ll still want to nudge the weight toward the rear and center of gravity for marathon sessions.
Here are practical adjustments and add-ons that improve stability over hours:
- Rear weight bias: use the dial to transfer more load to the back of your head. A slightly tighter halo with a relaxed front reduces nose pressure and facial fatigue.
- Pads and cushions: consider a thicker rear pad or a softer brow pad if you notice pressure points. Replaceable pads are available—choose breathable foam for sweat management.
- Center the headset: a centered headset minimizes torque on your neck. When putting it on, place the face gasket evenly on your face and then tighten the rear dial; this avoids twisting the headset into a torque position.
- Glasses strategy: if glasses create pressure, raise the headset slightly and loosen side straps; shifting the weight to the rear helps glasses sit comfortably without the headset compensating on the nose.
For active titles that involve fast head turns or physical movement, check the strap alignment beforehand. A well-balanced Elite Strap keeps your view steady, reducing the need for frequent readjustments and lowering the risk of motion blur and eye strain.
Care, maintenance, and longevity
Treat the Elite Strap like other precision accessories: light maintenance extends life and keeps comfort consistent. Daily dusting and periodic deeper cleans are all you need.
- Daily: wipe the halo and rear pad with a dry microfiber cloth. Remove skin oils before they embed into foam or fabric.
- After sweaty sessions: use a lightly dampened cloth (water or diluted mild soap). Wring the cloth well—excess moisture can damage foam. Avoid alcohol or harsh solvents that degrade plastic and fabric adhesives.
- Drying: air-dry the strap completely before storage. Do not place it near direct heat or in a hot car, which can warp plastic and shorten pad life.
- Storage: keep the headset in a cool, dry place. A hard-shell case designed for the Quest 2 and Elite Strap is ideal for travel or long-term storage.
- Inspections: monthly, check the side arms and clips for hairline cracks, loose screws, or warped tabs. Replace worn pads and clips as needed—don’t wait for catastrophic failure.
When adjusting, always use the rear tightening knob rather than forcing plastic tabs. Being gentle pays off: the Elite Strap’s plastic is robust but will fatigue faster under rough handling.
Troubleshooting and common questions
Even with careful installation, a few small issues can crop up. Below are common problems and quick fixes that solve most cases without a trip to support.
Installation and fit issues
- Side arm won’t click: rotate the arm slightly and re-attempt insertion. The connectors are keyed—proper orientation solves most misalignment issues. If it still won’t seat, remove and inspect for foreign debris or a broken tab.
- Headset tilts forward: check side strap symmetry first. Uneven tension is the most likely cause. If symmetry is correct, ensure the rear dial is tightened enough to pull weight away from the face.
- Too much pressure on the brow or nose: loosen the top dial one notch and rebalance side tension. Consider swapping to a thicker brow pad if you consistently feel pressure.
Noise, wear, and component failures
- Squeaking joints: wipe moving parts clean and re-seat them. A tiny amount of dry lubricant (like a PTFE-based spray on a cloth—not directly on plastic) can help, but avoid oily or solvent lubricants.
- Pads wearing out: replace them. Most third-party and OEM replacement pads are inexpensive and easy to fit.
- Cracked clips or plastic: stop using the strap if major cracks exist. Continuing to use it can stress the headset shell. Contact Meta support or your retailer for a warranty replacement.
Glasses and facial contour concerns
If your glasses feel crowded, raise the headset slightly and shift the load rearward. The Elite Strap’s extra clearance often solves this, but if not, try thinner-frame glasses or aftermarket spacer inserts for the facial interface to add extra eye relief.
Third‑party compatibility
Some third-party straps or mods advertise compatibility but use different clips or force-fit hardware. If you choose a non‑OEM strap, verify return policies and proceed with caution—nonstandard fittings can stress the Quest 2 shell and may void warranty terms.
Quick mini-cases (real users)
Case 1 – The careful first-timer: A new owner followed the parts checklist, aligned both side arms visually, and waited for the clicks before tightening the dial. They reported zero hotspots and stable fit through a two-hour session. Patience and testing are the secret—don’t rush the clicks.
Case 2 – The hasty upgrader: An experienced user forced one side arm without confirming alignment. The tab popped and cracked, requiring a return. Lesson: the arms insert with a clear click when aligned. If it’s stiff, stop and realign—forcing costs more than a minute of extra care.
If you’ve exhausted these steps without success, document the issue with photos showing the misalignment or wear and contact Meta support or the seller. Warranties vary, but clear evidence speeds replacements.
Next step: if your Elite Head Strap is installed and adjusted, run a 30–60 minute test session with motion-heavy content and note any adjustment needs. Tweak incrementally—small changes compound into much more comfortable long sessions.


Share:
Third-party vs official Quest 2 straps: a cost, comfort, and durability showdown
Upgrading Your Quest Two Facial Interface: Silicone Gaskets and Eye Comfort