

How strap geometry and weight distribution determine Quest 2 comfort — choose the right strap to keep balance for long sessions
If your Quest 2 feels like it’s tilting forward, pressing into your forehead, or tugging your neck after an hour of play, the solution is often not more foam but better geometry. How the strap connects to your headset — where it anchors, how it pulls, and how tension and padding are arranged — governs where the weight lands on your skull and how the system behaves during movement. ⏱️ 11-min read
This guide walks Quest 2 owners through the physics and practicalities: weight-distribution-on-meta-quest" rel="nofollow noopener noreferrer">how strap design shifts weight, which common strap styles create which balance profiles, and how to install, tune, and maintain a setup that stays comfortable through marathon sessions. Expect concrete steps, real-world examples, and a checklist you can use the next time you try a new strap or accessory.
How strap design shapes balance on Quest 2
The Quest 2’s display, batteries, and optics live in the headset’s front shell, which creates a natural forward torque. Even with a snug strap, that torque can pull the headset toward your eyes, leading to forehead hotspots and a sense of heaviness. Strap geometry — where the top strap sits, how the side anchors route load, and whether there’s a rear pad — changes the fulcrum of that torque. A top strap that pulls upward at the crown provides lift; side anchors transfer some load to the temples; a rear strap or pad delivers counter-leverage.
Padding density matters too. Dense foam concentrates support into a smaller area: great for preventing slip but prone to hotspots. Softer, thicker padding spreads the load across a wider surface, reducing pressure but potentially allowing more micro-movement. Strap tension controls leverage. A top-band tightened enough to gently lift the headset counters forward tilt; too tight and you trade forehead pressure for crown ache. Too loose and the headset can rock on sudden movements, making the display feel heavier. The ideal design routes enough weight to the back and crown to neutralize forward pull while keeping contact broad and gentle to avoid localized pain.
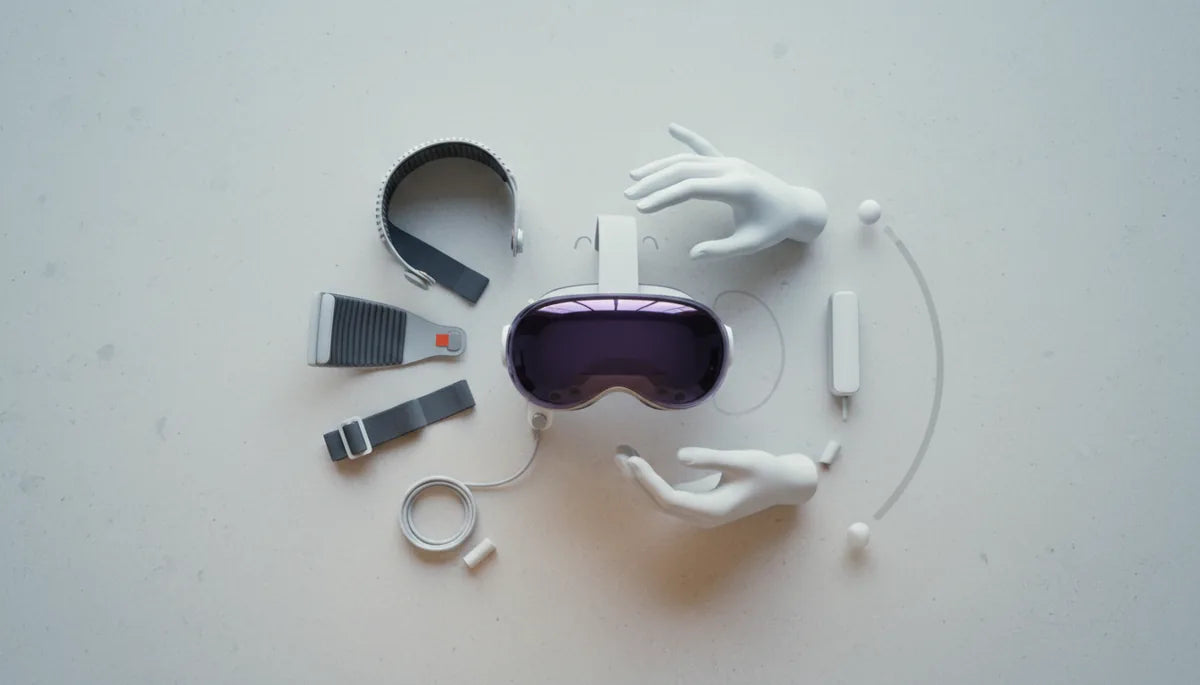
Major strap options and their balance profiles
Not all Quest 2 straps behave the same. The stock soft strap is light and flexible, but it tends to let the headset sag toward the face under forward torque. The Oculus (Meta) Comfort Strap adds padding and wider side anchors to spread load more evenly across the temples and forehead. The Elite Strap introduces a stiffer backbone and an optional rear battery mount, shifting the center of mass rearward when used with a counterweight.
Halo-style straps (or halo hybrids) loop across the crown and use a ring or band to transfer weight to the top and back of the skull. In practice, halo straps reduce forehead pressure and keep the front steadier during quick looks and bends, but they can produce intense crown contact if overtightened. Rigid-frame or Elite-style straps rely on a stiff side backbone to distribute forces laterally toward the temples, improving side-to-side stability and limiting front-back sway — useful for fast motion titles. Soft fabric straps prioritize even pressure distribution in seated or relaxed play, though they may need retightening during active, sweaty sessions.
Accessories interact with these profiles. A rear battery pack adds useful counterweight to a soft or Comfort Strap, pulling the center of mass back and dramatically cutting forehead load. On the Elite Strap the same battery often works more seamlessly because the frame is designed to bear the extra mass; on soft straps a heavy battery can create sag unless you add reinforcement or a counter-sling. When choosing, think about how you plan to use the headset (active play, seated social apps, long productivity sessions) and whether you’ll add an external battery or counterweight later.
Install and fine-tune for optimal weight distribution
Installation and a few minutes of tuning are where most users win big. Start by fitting the strap so the headset sits level across your face with the display centered. Aim to set the top strap height and side-length so the headset’s weight is nudged slightly back from the forehead rather than pulled into it. A quick rule: adjust the top strap until the headset just lifts a few millimeters off the face when you lightly loosen the side straps; then re-tighten the sides for a balanced hold.
Once installed, perform the following tuning routine:
- Adopt a neutral posture: sit or stand tall and look straight ahead.
- Loosen the strap slightly, then tighten the top crown strap until you feel gentle upward lift — enough to counter forward tilt but not to compress your scalp.
- Tighten the side anchors evenly until the headset is stable against moderate head turns, then test with small nods and quick glances.
- If the headset still slides forward during leaning or looking down, add a few degrees of rearward top-strap angle or increase rear-pad pressure (if available).
Listen to your body as your test: forehead numbness, tingling, or a burning hotspot means the load is too focused; slipping or a sensation of the display “lagging” during turns means the strap needs a firmer top adjustment or a different geometry. Keep notes — you’ll often find the same tweaks work across similar titles or sessions.
How to compare balance: a step-by-step evaluation
Comparing straps objectively helps avoid buyer’s remorse. Use a simple, repeatable test sequence to evaluate perceived balance, hotspots, and stability. This method removes guesswork and highlights differences that only become obvious after motion.
- Baseline setup: seat yourself with a tall spine and level head. Fit the first strap to a comfortable, secure snugness without pinching.
- Motion test: perform a sequence of small nods, rapid head turns, and a minute of simulated play (walking in place and looking up/down). Note if the headset shifts forward, rides up, or feels secure.
- Pressure mapping: with eyes open, lightly press along the forehead, temples, and crown to locate hotspots or numb areas. Spend 30–60 seconds and compare left to right.
- Repeat with the next strap, keeping the same baseline posture and motion sequence for consistency.
- Log results: record forehead pressure, temple pressure, crown comfort, slip, and perceived neck load on a scale (for example, 1–5).
In my experience testing multiple straps, the Halo-style often scores high on reducing forehead pressure and minimizing forward tilt, while rigid straps win for lateral stability. Soft straps often get top marks for short, seated comfort but fall behind during active sequences unless paired with a rear weight. Use the logs to identify which trade-offs you find acceptable.
Glasses wearers and varied head sizes: fit considerations
Glasses add thickness between your face and the headset, shifting the seal and sometimes changing how pressure is distributed. For glasses wearers, prioritize straps that avoid pressing directly over the temples and side frames. Rigid straps that concentrate force toward the temples may pinch the arms of glasses; a halo or broader padded band that distributes load across the crown and upper-rear skull can reduce temple compression.
Head geometry alters where straps need to contact. Wider heads generally benefit from longer side straps and broader contact patches to avoid a pinchy temple line. Tall crowns require extra top strap range or taller crown pads to prevent the band from sitting too high and driving load into the skull’s apex. Conversely, while narrow heads might prefer softer bands that wrap snugly without creating temple pressure.
Practical adjustments:
- Glasses: add a thin foam spacer or use the Quest 2 glasses spacer to increase room and then slightly loosen the lower side straps so the headset sits without pressing the frames into your face.
- Tall crown: raise the top strap anchor and shift the rear pad lower to move contact rearward and avoid apex pressure.
- Small heads: tuck excess strap neatly and use micro-adjusters to prevent slippage without overtightening.
When possible, try a strap for at least 30–60 minutes while wearing your glasses and performing typical movements; short trials often miss issues that appear after repeated motion or sweat buildup.
Weight-reduction tactics and back-weight strategies
One of the fastest ways to reduce forehead and eye strain is to move mass rearward. Adding a battery pack or a dedicated counterweight at the rear of the strap shifts the headset’s center of mass backward, reducing torque on the face and lowering neck strain during long sessions. On the Elite Strap, battery packs often clip into a native mount and maintain balance well. On softer straps, consider a small pouch with a compact battery or a counterweight that clips to the rear anchor — the key is secure anchoring so the weight doesn’t swing independently.
If adding weight isn’t desirable, weight-reduction tactics can help. Swap to a lighter face gasket, remove unnecessary attachments (like heavy microphone booms), and choose lightweight third-party padding options designed for reduced mass. Even replacing a denser foam pad with a slightly softer, thinner one can drop grams from the front, changing the balance noticeably.
When using rear weights, tune strap tension carefully: tighten the crown and side anchors just enough to prevent vertical slip, but avoid compressing the crown until it becomes painful. A useful technique is to tighten until the headset resists a quick forward flick of your head, then back off until pressure is comfortable. This finds the “grab” point where the strap provides stability without creating numbness or poor blood flow.
Third-party compatibility and integration with accessories
Third-party straps and battery packs can be excellent, but compatibility varies. Check how a strap anchors to the Quest 2’s shell: some third-party systems use proprietary clips, while others rely on the standard side anchors. Verify that the strap’s mounting points match your headset and that any battery pack or counterweight attaches securely to the strap’s frame, not only to a soft pouch that could shift during use.
Accessories like thicker face gaskets and spacers change how the headset sits relative to your eyes and cheeks. A thicker gasket pushes the entire headset slightly forward, which can increase forward torque and make a previously balanced strap feel front-heavy. If you install a different gasket or a prescription lens spacer, plan to re-tune strap height and tension. Also, consider how a foam replacement affects friction: some aftermarket pads have more grip and reduce slipping, helping soft straps perform better during active play.
When buying a third-party strap or battery, look for:
- Clear mounting instructions and return policies to allow testing.
- Secure attachment mechanisms (screw mounts, clip locks, tight Velcro with load-bearing backing).
- Compatibility statements regarding official Meta accessories (face gaskets, Elite clip mounts, etc.).
Reading a few in-depth reviews that include motion tests will reveal common pitfalls — loose pouches, incompatible clips, or straps that apply pressure in problematic zones.
Care, maintenance, and longevity tips
Good balance is a moving target: straps stretch, foam compresses, and clips can loosen. A weekly inspection routine keeps your setup performing. Check the strap anchors for cracks and the fasteners for play. Work the sliders and dials across their full range to detect stiffness or slop; replace parts that wiggle excessively. Wipe padded surfaces with a damp cloth and mild soap after sweaty sessions and let them dry completely before reattaching to prevent adhesive or fabric breakdown.
After cleaning or long use, re-torque any screws and reseat the straps to ensure symmetry. Over time, padding compresses unevenly — reseating and rotating pads can extend life and restore original balance. Keep a simple log when you try new configurations: record the strap type, padding, any added weight, and how comfortable you were at 15, 45, and 90 minutes. This habit makes it easy to spot trends like a strap that was fine short-term but caused hotspots later.
Replacement parts matter. Instead of buying a whole new strap for a worn-out pad, see if the manufacturer sells replacement cushions, Velcro strips, or battery clips. Small replacements are cheaper and preserve the strap geometry you already prefer.
Quick-reference checklist for strap balance
Use this checklist each time you change straps or accessories. It’s a compact diagnostic you can complete in under five minutes and an ideal way to document what works.
- Neutral posture check: Head level, shoulders relaxed — does the headset feel centered? If not, adjust top strap angle.
- Forehead vs. crown: Can you feel most weight on the crown or forehead? Move load rearward if the forehead dominates.
- Temple and cheek pressure: Are temples pinched or cheeks numb? Loosen temple load or change pad width.
- Motion stability: Nod and perform quick head turns. Does the headset slip or feel steady? If slipping, increase crown tension or add rear traction.
- Accessory interaction: Have you added a battery, spacer, or gasket? Re-tune after each change.
- Duration test: Note comfort at 15, 45, and 90 minutes and log any hotspots.
- Maintenance: Inspect connectors and padding for wear; schedule replacements as needed.
Document the strap name, settings (top strap position, side tension, any pads used), and session outcome. Over time you’ll build a personal database of what balance profile suits specific activities — for example, “Halo + 200 g rear battery = best for sprint-based shooters; Elite + no battery = optimal for productivity.”
Takeaway: start with geometry before adding foam. If your Quest 2 feels front-heavy, look for a strap that shifts the center of mass rearward and gives firm, broad crown contact. Test straps with motion, tune crown and side tension, and consider a small rear counterweight before accepting persistent forehead or neck fatigue. With the right strap and a few minutes of calibration, your Quest 2 will stay balanced and comfortable for hours — exactly what long sessions require.


Share:
Comfort strap vs official Elite Strap: which Quest 2 option improves marathon sessions
Glasses Wearers Rejoice: How to Rebalance Quest Two for All-Day Comfort