

Master Quest 2 Balance: Reduce Neck Strain with Smarter Straps and Weight Placement
If your Quest 2 starts feeling heavy after an hour—chin tucked, neck sore, view tilting—you’re not alone. The headset’s front-heavy design concentrates mass around the display and lenses, so small misfits quickly become nagging neck strain. The good news: most discomfort is mechanical, not inevitable. With a few tests, the right strap, and simple weight adjustments you can push the center of gravity back, stabilize the display, and extend play sessions without fatigue. ⏱️ 10-min read
This guide walks Quest 2 owners through a practical, step-by-step comfort workflow: assess your baseline, choose a strap that matches your playstyle, install and tune it correctly, add counterweights or a rear battery if needed, make the headset glasses-friendly, and keep everything performing with routine care. Expect clear examples, quick checks you can do in five minutes, and the small tweaks that deliver the biggest payoff.
Assess Baseline Comfort: Weight, Balance, and Pressure Points
Before buying accessories or making big changes, take five to ten minutes to understand how the Quest 2 currently sits on your head. A thoughtful baseline will stop you from guessing and help you target the real problems—pressure points, forward tilt, or slipping—rather than chasing symptoms.
Put the headset on with the stock soft strap and play a familiar demo or watch a short video. Pay attention to these specific sensations and timings:
- Where do you feel pressure immediately? Forehead, temples, cheeks, or the nasal bridge?
- When do hotspots appear: within 5–10 minutes or only after 30–60+ minutes?
- Does the headset tilt forward when you look down or nod? Does it slip with quick head turns?
- Are there light leaks around the nose or sides—indicating a poor seal—or uneven pad compression?
Also note personal factors that affect fit: head size, hair volume or style, whether you wear glasses, and your typical play posture (seated, standing, or highly active). For a quick comparison, swap to Meta’s Comfort Strap or a rigid strap if you have one available. A lightweight stock strap will feel less bulky but often leaves the front-heavy balance uncorrected. The Comfort Strap should reduce cheek pressure and stabilize the display slightly; if it doesn’t, you’ve identified where the fit needs work—more rear support, a thicker face pad, or a counterweight.
Write these observations down—pressure spots, timing, and which movements cause tilt. This simple checklist makes subsequent adjustments objective: you’ll know whether tightening the rear strap or swapping the facial interface actually fixes the issue.
Choose Your Comfort Strap: Official vs Elite vs Third-Party
Choosing a strap is the single most impactful upgrade for long-session comfort. Strap designs vary widely: soft OEM straps are light and unobtrusive, rigid halo or hinged straps move mass toward the skull, and rear-support or halo systems give extra stability for active play. Your best pick depends on session length, activity level, and whether you wear glasses.
Here’s how the main options perform in practice:
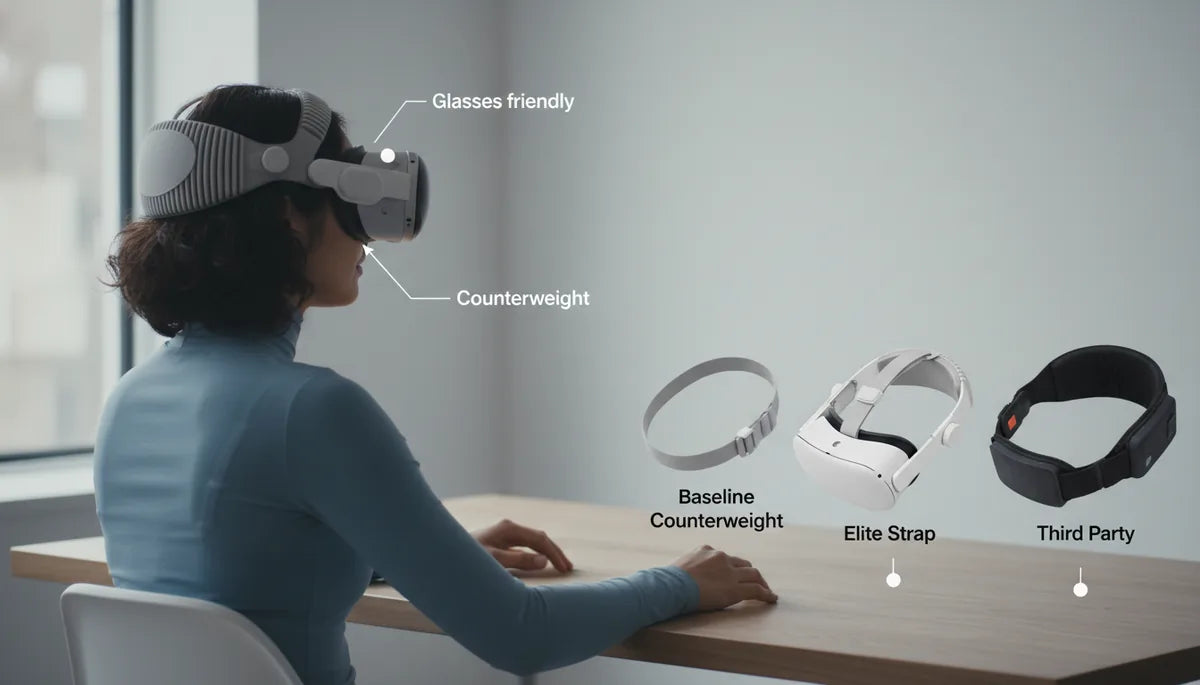
- Stock soft strap — Lightweight and low-profile, great for short sessions. It minimizes bulk but doesn’t counterbalance the forward weight of the headset, so you may feel more forehead and cheek pressure in longer sessions.
- Meta Quest 2 Comfort Strap — A simple upgrade that improves padding and slightly better distributes pressure. Easy to install; good for casual players who want increased comfort without much bulk.
- Meta Elite Strap (with optional battery) — Rigid or semi-rigid construction moves weight toward the back of the head and reduces front pull. The battery-equipped version simultaneously extends runtime and shifts weight rearward, which can significantly reduce neck fatigue for marathon sessions.
- Third-party rigid/halo straps — Many reputable manufacturers offer hinged halos, wrap-around designs, or modular systems with adjustable rear support and integrated battery pockets. These often provide more granular fit options for different head shapes and active gameplay.
Consider glasses: straps with a slightly raised facial interface and soft, forgiving forehead padding are kinder to temples and nose bridges. If you switch to a rigid strap, check that lens clearance and IPD adjustments remain easy to access. Finally, balance installation difficulty against how often you’ll swap straps—if you change frequently, favor quick-attach designs or those with simple clips.
Step-by-Step Strap Installation for Beginners
Installing a comfort strap is straightforward, but a careful approach prevents misalignments that create new pressure points. Begin with a calm, well-lit workspace and follow these steps for a clean swap and correct lens alignment.
- Loosen all straps and remove the Quest 2 from your head. If available, place the headset on a clean surface or a stand to keep it steady.
- Detach the stock strap by unhooking the side clips or sliding out the anchors—different straps have different attachment methods. Keep any small clips for later reuse.
- Align the new strap’s side anchors with the headset’s attachment slots. Gently insert and secure each anchor until you hear a click or it seats firmly. Don’t force it; misaligned anchors can stress the frame.
- Seat the headset so the lenses are roughly centered over your eyes. Adjust the top strap height so the headset sits level across your brow—not tipping forward or back.
- Tighten the rear strap gradually (small increments) while keeping the front pads lightly in contact. Have someone watch for forward tilt, or gently nod your head to test.
- Adjust IPD and lens clearance last. Confirm the lenses align with your pupils and that the view is sharp at your usual play distance.
Cable management tip: if your strap includes a battery or rear accessory, secure any cables with the supplied clips or small zip-ties. Prevent cable tug by routing cable runs along the strap so movement doesn’t pull on connectors. For temporary fixes, binder clips or silicone cable snaps work well and are reversible.
Fine-Tune Fit: Straps, Height, and Wheel Tension
Once the strap is installed, fine-tuning is the step that separates "functional" from "comfortable." The goal is even pressure and a neutral forward weight distribution so your neck muscles don’t need to fight to hold the headset level.
Start with all straps loose, then follow a repeatable order: rear strap, top strap, then any micro-adjustment wheels. Tighten the rear strap in small increments until the headset stops tilting forward during a gentle nod. If the front still pulls down, raise the top strap slightly to lift the headset while maintaining rear support. The top strap should prevent the front from sagging without pushing too much pressure into your forehead.
If your strap has a tension wheel (often on Elite-style designs), use it to micro-adjust comfort—small turns can make a noticeable difference. Use this sequence:
- Rear strap to establish base counterbalance.
- Top strap for vertical positioning and to reduce forehead pressure.
- Tension wheel for precise snugness; stop when the headset feels secure but not constricting.
Test with movement: nod, look up, turn quickly, and make the same in-game motions you normally do. Watch for slipping, pinching, or light leaks. If you feel concentrated pressure on your forehead, slightly loosen the top strap and add a touch more rear tension. If the headset feels top-heavy or pressure moves to the back of your skull, relax the rear strap a little. Remember: the goal is even contact across the forehead, cheekbones, and temple—no single hotspot.
Redistribute Weight with Counterweights and Battery Placement
When strap tuning alone doesn’t solve forward pull, adding a rear counterweight or a back-mounted battery is an effective next step. These solutions shift the headset’s center of gravity toward the occipital area (back of the head), reducing the neck moment required to hold the headset level.
Start conservatively: small weights, placed low and centered, often produce the largest comfort gains with the least fuss. Place weights near the rear strap anchors or on a broad rear pocket rather than perched high on the strap—closer to the head is more effective and less likely to create wobble. If you choose a battery pack, pick a slim, low-profile unit rated for headset use and designed to attach securely to the Elite or third-party rear pocket.
Compatibility and safety checklist:
- Keep left-right symmetry—uneven weights create torque and can worsen strain.
- Avoid adding so much mass that the rear strap pinches or creates a new pressure hotspot.
- For battery packs, watch for heat: choose packs with good ventilation and check temperature during extended sessions.
- Secure cables with clips and route them along the strap to avoid tugs on the headset connectors.
Practical example: add a 50–100 g counterweight (a few small coin weights or a purpose-built weight) and test with your usual play routine. If comfort improves, increment in small steps. Many users find a modest battery pack (200–300 g) balances the headset beautifully and adds runtime, but start light and reassess—adding too much rear mass can feel unnatural and introduce its own neck strain.
Glasses-Friendly Comfort: Seating, Cushions, and Spacing
Glasses wearers face unique fit challenges: temple and nose pressure, fogging, and lens clearance. A well-tuned strap and thoughtful facial interface choices will prevent hotspots and protect both your glasses and the headset foam.
Key adjustments and gear choices for glasses-friendly comfort:
- Choose softer, deeper facial pads that increase the distance between your face and the Quest 2 lenses. This reduces temple and nose pinch while maintaining a reliable optical seal.
- Use silicone covers or thin foam that’s specifically cut for glasses—these wick sweat and reduce friction that can move the headset during play.
- Adjust IPD and lens distance carefully to avoid pressing the frame of your glasses against the lenses. Small lens shifts can eliminate contact without sacrificing clarity.
- Loosen the top strap slightly and rely more on rear support so temples don’t get wedged against the foam. Even pressure distribution is kinder to glasses.
Seating and posture matter: reclining slightly or using a chair with a headrest can minimize forward tilt and reduce temple pressure. If you frequently switch between glasses and no glasses, consider an interchangeable facial interface (thinner vs thicker) so you can swap based on session type. Finally, be careful when putting the headset on or taking it off—guide your glasses through the facial opening to avoid bending frames or scratching lenses.
Care, Maintenance, and Ongoing Comfort Checks
Comfort is not a one-time fix; foam compresses, straps stretch, and sweat degrades materials. A simple maintenance routine preserves fit and helps you spot problems before they cause pain.
Weekly and monthly upkeep tasks:
- Weekly: Wipe down facial pads and straps after heavy use with a damp cloth and mild soap solution. For silicone covers, remove and wash as instructed by the manufacturer. Let everything air-dry completely before reassembly.
- Monthly: Inspect strap anchors, clips, and the tension wheel for wear. Replace any frayed straps or stretched Velcro to preserve a predictable fit.
- Quarterly: Rotate or replace the facial interface. Foam compresses and loses resilience; new pads restore the original seal and pressure distribution.
Troubleshooting quick checks:
- If the headset slips: tighten the rear strap slightly and add a rear clip. If slipping persists, a modest rear weight may help.
- If hotspots return after a few sessions: swap to a thicker or different-density foam, or clean and re-seat the pad to remove uneven compression caused by oils and sweat.
- If the headset wobbles during physical games: ensure rear weight is centered and straps are snug but not overtightened—use a halo-style strap for extra stability if needed.
Finally, schedule a short comfort check before every long session: 30 seconds to confirm straps are even, the view is centered, and the headset feels balanced. Small, frequent checks are easier than undoing hours of neck fatigue later.
Next step: run the five-minute baseline test right now—note pressure points, try the Comfort Strap if you have one, and make a single small adjustment to the rear strap. That single change will tell you whether you need thicker pads, a rigid halo, or a light counterweight to unlock longer, pain-free play.


Share:
Glasses-Friendly Meta Quest Straps Comfort and Fit for Spectacle Wearers
Material Matters: Padding, Mesh, and Durability in Quest 2 and Vision Pro Straps