

How Quest 2 Head Straps Shift Weight and Deepen Immersion: A Practical Guide for Longer Sessions
The Meta Quest 2 is a brilliant, portable gateway into virtual worlds — but its front-loaded design can quickly turn long sessions into a race against face pressure and neck fatigue. How a head strap redistributes that weight determines whether you lose presence to discomfort or stay fully immersed for hours. ⏱️ 9-min read
This guide unpacks the mechanics of weight distribution, compares popular strap options, walks you through installation and fine-tuning, and gives practical checklists for glasses wearers, accessory compatibility, and endurance gaming. Read on for clear, actionable steps you can test in 15–20 minute increments to find a setup that keeps the world steady and your neck happy.
Weight distribution mechanics across Quest 2 head straps
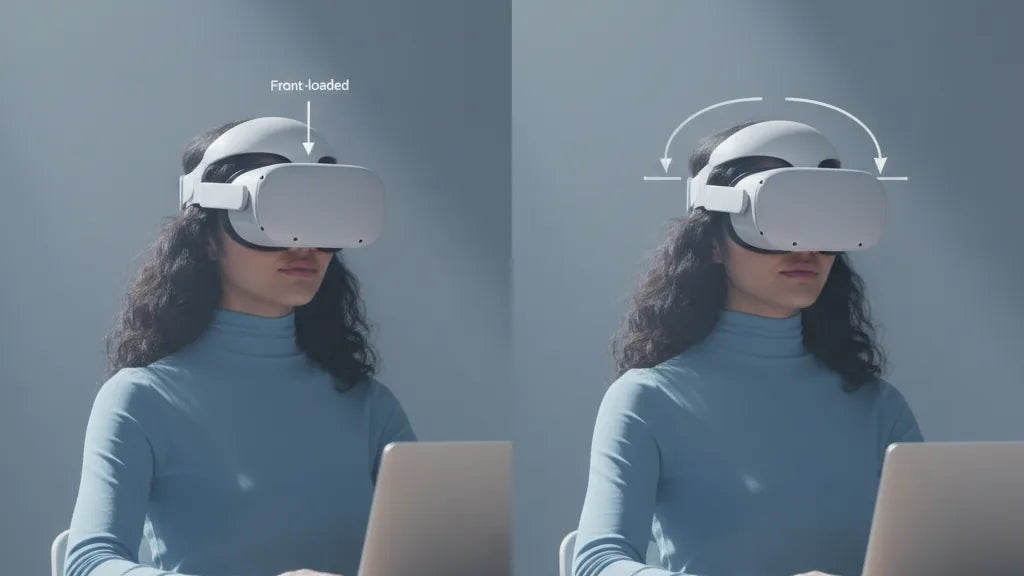
The Quest 2’s internals — display, lenses and electronics — sit at the front of the headset, creating a forward center of gravity. Left unchecked, that forward bias pulls on your face, concentrating pressure on the cheeks and forehead and creating tilt that leads to blurred edges and constant micro-adjustments. Head straps don’t make the headset lighter; they change how the load is carried. Think of them as simple physics: move the effective pivot point rearward and the perceived front weight drops.
There are three mechanical levers a strap changes: where the band anchors on the crown, how much of the skull's surface the strap contacts (surface area), and whether the strap adds a rear counterweight. Crown height matters: a higher crown contact moves the fulcrum up, altering the angle at which the headset pulls. Back-of-head contact near the occipital ridge (the bony bump at the lower skull) is ideal — it’s a stable anchor that supports torque without compressing soft tissue.
Tightness and padding density also change perceived weight. A very tight fabric strap can pull the headset forward against your face; overly soft pads can compress and let the front droop after half an hour. Rigid rear cups or halo frames extend the lever arm and reduce face pressure but concentrate force where they touch. The engineering goal is even pressure across the forehead and rear head, minimizing moments that cause tilt and neck extension.
Choosing among Quest 2 strap options and their balance effects
Start with what bothers you most in use: constant forehead pressure, a headset that slides during quick turns, or neck strain after long sessions. The stock fabric strap is lightweight and breathable but focuses load on the face and temples. The official Elite Strap uses a rigid plastic frame and a rear cup that shifts load rearward — it improves stability and typically reduces facial pressure. Add an Elite Strap with a battery pack and that rearward mass doubles as a counterweight, often turning a 30-minute session into comfortable two-hour stretches.
Third-party options vary in approach. Halo-style straps (BoboVR and similar) lift the headset slightly and distribute weight across the crown and back, which can dramatically reduce cheek pressure and increase perceived lightness. They can feel less secure during vigorous movement unless their side supports are well designed. Other third-party straps (Kiwi Design, VR Cover variants) combine thicker face cushions with broader rear pads to spread force over larger surface areas — helpful for passive viewing or mixed use.
Material selection matters for long-term behavior. Neoprene and fabric feel softer but can stretch with sweat and heat, subtly increasing perceived weight. Rigid plastics resist stretch and keep optics aligned but may concentrate force if not adjusted precisely. Leather or faux-leather trims look premium and resist soaking but can trap heat. Active gamers should prioritize side stability and a secure top frame; spectators or movie-watchers will prefer thick cushioning and breathability.
Installation, adjustment, and balancing for optimal immersion
Proper installation and incremental adjustments are where comfort wins. A loose fit slips and creates blur; an overly tight fit pinches and saps endurance. Follow this practical sequence to install and balance a new strap:
- Detach and inspect. If swapping straps, loosen side straps and press the quick-release tabs to remove the old strap. Inspect connectors for wear or cracks before attaching the new unit.
- Secure the new strap. Align the strap connectors with the headset slots and click them into place. Give them a gentle tug to confirm a solid fit and remove any lateral slack that could rotate the headset.
- Establish a baseline fit. Put on the headset and tighten the side straps until snug but not pinching. The top strap should sit on the crown and engage the rear pad enough to keep the front from sagging.
- Find the visual sweet spot. With both eyes open, center your pupils in the lenses. Adjust crown height and side tension to minimize lens shift; even small movements here improve edge clarity and reduce glare.
- Balance using the occipital ridge. Slide the rear cup or pad downward until it rests near the occipital ridge — this bony area absorbs torque efficiently and stabilizes the headset without compressing soft tissue.
Fine-tune in short tests: wear the headset for 10–15 minutes, look up/down and make quick head turns. If the front still pulls, incrementally increase rear pad contact or add a small counterweight low and centered. If you feel pinching at the crown, raise the top strap slightly and redistribute tension through the side straps to widen contact.
Immersion and comfort: how weight distribution affects presence
Comfort and presence are tightly linked. When weight is distributed evenly, you spend less cognitive energy adjusting straps and more on the virtual environment. A stable headset reduces micro-movements — tiny tilts and shifts — that break the illusion and contribute to motion sickness. Even a small reduction in front-face pressure can translate into longer uninterrupted sessions and fewer mid-experience breaks, which is crucial for story-driven VR or rhythm games that punish pause-and-recenter behavior.
There are measurable practical benefits. An evenly balanced headset decreases neck extension and reduces the frequency of corrective head movements that blur the display. That steadier visual input lowers the chance of vestibular mismatch, the root of many VR nausea episodes. For competitive and motion-heavy titles, a strap that holds the headset firmly in place improves aim and reduces the need to re-acquire visual targets after a quick turn.
Perceived lightness also matters psychologically. When a headset feels balanced, users report less distraction from equipment and a stronger sense of "being there." This is why many marathon gamers describe the same headset as "light" after switching to a strap that shifts the center of gravity back — the actual weight hasn't changed, but the head experiences less torque and pressure, allowing the brain to treat the device as background rather than foreground.
Glasses wearers and ergonomic fit
Wearing glasses adds another layer of ergonomics: frames need clearance, temples shouldn’t be pinched, and lenses must stay centered to preserve field of view. The right strap choice and small adjustments can keep glasses safe and the image sharp.
Start with a three-point fit: balanced tension across the crown, the sides, and the rear pad. Loosen the rear strap slightly to prevent temple pressure and slide the headset down a touch so your glasses sit comfortably under the lenses. If the foam presses against the temples, switch to a glasses-friendly face pad or a slim spacer — VR Cover and similar brands offer thinner, firmer inserts that maintain seal without impinging on frames.
For large frames, look for straps with broader rear pads and higher crown clearance. Halo-style and rigid rear-cup straps often provide better temple relief than the stock fabric band because they focus contact away from the sides. When centering, make sure your glasses are aligned to avoid cropping your field of view; misaligned frames can introduce glare or uneven distortion.
Cleaning both headset and glasses regularly is a simple but important habit. Smudges on either lens reduce clarity and force you to adjust fit more often. If you frequently switch between glasses and contacts, keep a lightweight glasses-specific face pad or spacer on hand so you can tweak clearance without reconfiguring the entire strap.
Compatibility, maintenance, and accessory ecosystem
Accessories like battery packs, wireless adapters and counterweight mods can dramatically reshape balance — but they come with trade-offs. Clip-on battery packs add rear mass, pulling the center of gravity back and reducing face pressure; choose low-profile packs with heat-dissipating enclosures to avoid transferring warmth to the headset. Secure cable routing is essential: a loose cable can tug during movement and undo careful balancing.
Not all accessories play nicely with every strap. Before you buy, verify that rails, clips and pouches align with your strap’s frame. Some third-party straps integrate pouches or Velcro channels specifically for batteries, while others require bespoke mounts. Also pay attention to reported durability issues: certain rigid Elite Strap variants have seen cracking under heavy use, so inspect plastic connectors periodically and avoid over-tightening.
Maintenance keeps comfort consistent. Clean foam pads and fabric straps after sweaty sessions; salt and oils compress padding over time and alter how force is distributed. Replace pads when foam density drops — a flattened pad shifts pressure back to your face even if the strap frame remains intact. If you plan to buy replacement components, check warranty terms; modifying the original strap with non‑authorized accessories can void coverage in some cases.
Best practices for long sessions: practical tips and checklists
Think of endurance VR like marathon running: preparation, incremental testing and recovery matter. Use the checklist below to build a reliable, comfortable setup and then refine it with short, focused trials.
- Initial test: try any new strap for 15–20 minutes, noting forehead and neck fatigue on a simple movement-heavy scene.
- Balance checklist: ensure rear pad sits near the occipital ridge, crown strap clears the hairline without pressure, and side straps are even to prevent lateral tilt.
- Counterweight strategy: add small rear weights or a battery pack incrementally — enough to neutralize forward torque but not so much that the headset feels rear-heavy.
- Glasses check: confirm temple clearance, center frames under the lenses, and swap to a thinner face pad if you feel pinching.
- Cleaning schedule: wipe face interfaces after each sweaty session; deep clean and inspect foam every 2–3 months.
- Motion test: perform quick head turns and jumps in-game; if you notice wobble, tighten side supports or increase rear pad contact.
- Break strategy: for sessions over an hour, take a 5–10 minute break every 45–60 minutes to relieve pressure and hydrate.
Mini-cases to illustrate impact: the Marathon Gamer swapped the stock strap for an Elite Strap with a rear battery and moved from 30-minute sessions to comfortable two-hour stretches — the battery’s rear mass shifted the fulcrum backward and greatly reduced facial torque. The Active Exerciser moved to a halo-style strap with firm side supports to prevent slippage during vigorous movement; while that strap felt slightly less snug during quick spins, padding adjustments and tapered side tension eliminated most wobble.
Next step: pick one adjustment (rear pad placement or a small counterweight), test it for 15–20 minutes, and log the change in comfort. Iterative tuning is far more effective than wholesale swapping — small shifts often deliver the biggest improvements in immersion.


Compartir:
Strap design showdown: top strap vs halo for reduced perceived weight
How Quest Two Weight Compares to Valve Index and PSVR Two