

Weightless VR: Using GraviPro and Flit Lift to Preserve Posture and Comfort in Long Sessions
Long VR sessions push the same small group of muscles for hours: neck extensors, upper traps, and the tiny stabilizers that keep your gaze steady. When a headset’s mass sits unchecked on the skull, immersion comes at the cost of fatigue, slumped posture, and stiffer hands during precision tasks. This article explains how gravity‑assisted accessories—specifically GraviPro’s torso‑supported counterbalance and flit-lift-weightless-vr-comfort/flit-lift-vs-traditional-vr-supports-a-practical-comfort-and-endurance-review" rel="nofollow noopener noreferrer">Flit Lift’s near‑head lifting module—redistribute weight to create a remarkably “weightless” feel, so you can play, develop, or test for longer without paying for it physically. ⏱️ 11-min read
Read on for a practical, developer-minded deep dive: how these systems work, step‑by‑step setup and calibration routines (including Vision Pro specifics), integration guidance for creators, and real metrics and tips from early adopters who extended session endurance and steadied their inputs. Expect checklists, calibration flows, and concrete adjustments you can make in ten minutes or less.
Understanding weightless comfort: why posture matters
Posture is more than comfort; it’s a performance multiplier. In VR, the headset becomes a moving mass perched on a column of small muscles and vertebrae that are not designed to carry static loads for hours. When your pelvis and torso align with your head, the weight of the headset is managed by larger, more fatigue‑resistant muscles. When balance drifts—chin juts forward, one shoulder hikes—load shifts to weaker muscles, and you feel the headset sooner. That creeping fatigue reduces fine motor control: steadier hands become shakier, and small gestures that matter in precision tasks slip.
Weight distribution matters almost as much as total mass. Traditional headbands localize pressure at the crown and temples, creating forward torque that neck extensors must constantly resist. That torque produces hotspots, pinching points, and the familiar “crick” in the shoulder after a long session. By spreading contact over a broader surface and moving some of the mass off the skull, you reduce both peak pressure and the net moment about the neck—meaning less muscular activation and a longer sustainable session.
Good posture starts before you put the headset on. A neutral seated or standing spine, a mildly tucked chin, and hips engaged keep your center of mass under the head. Small actions—rolling shoulders back, using a lumbar support, and checking strap balance—deliver outsized benefits. Gravity‑assisted accessories work with these fundamentals: instead of fighting the torque with neck strength, they redirect gravity into the torso or provide an active upward force, letting your core do the work instead of your neck.
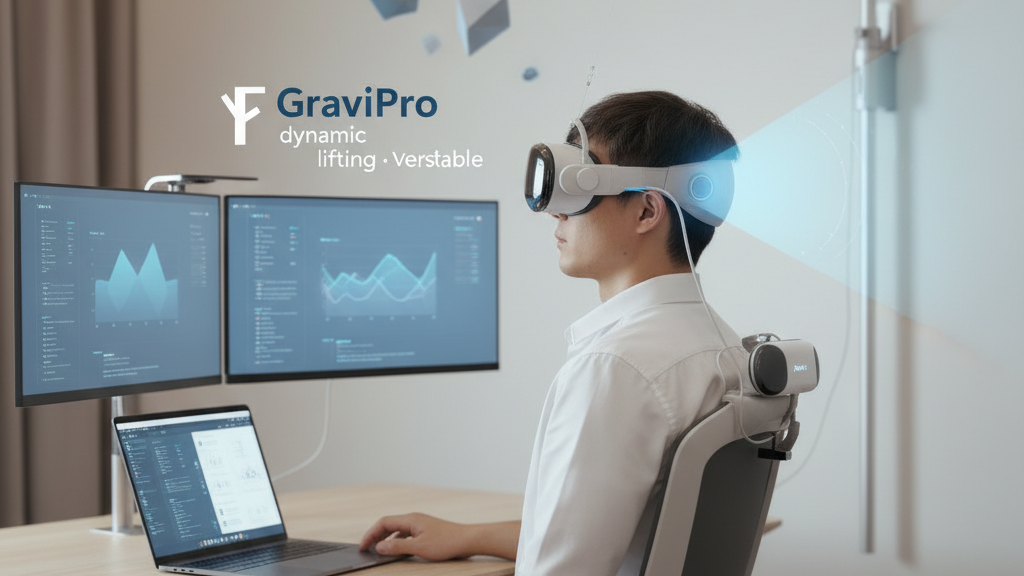
GraviPro dynamic lifting system: how it rebalances the headset
GraviPro’s core idea is simple and mechanical: move the counterweight from the skull to the torso. Its dynamic lifting system combines a torso‑supported counterweight, a sternum‑adjacent interface, and adjustable tensioning to shift the headset’s center of gravity downward and forward in a controlled way. Rather than forcing neck muscles to produce a constant counter‑torque, GraviPro lets the torso—via broader skeletal support and larger muscles—carry much of the static load. The result is a steadier head during turns, lean, and overhead looks.
Adjustability is essential because bodies and headsets vary. GraviPro provides multiple strap anchors, quick‑tension controls, and configurable counterweight ranges so you can tune the interface height, tilt, and rear bias. For Vision Pro and other heavier MR headsets, raise the interface slightly and add moderate counterweight to keep the center of gravity near your chest midline; for lighter standalone units, a lower setting reduces perceived torque without feeling top‑heavy. These changes are small—often a few millimeters of tilt or a single weight notch—but they make a measurable difference in neck load.
Practical features matter for day‑to‑day use: quick‑release attachments, secure locking points, and washable padding reduce friction during setup and maintenance. GraviPro’s rails and strap anchors are designed to accept common mounting adapters—clip‑on rails for light headsets and bar‑based adapters for bulkier models—so swapping hardware doesn’t demand a tool chest. For multi‑device setups, the quick‑tension controls let you rebalance in under a minute when switching from a Vision Pro to a lighter dev kit.
Flit Lift: achieving weightless comfort in practice
Flit Lift approaches weight relief from the headset itself. A compact actuation module mounts close to the headset and provides a gentle vertical counterbalance—an assist that feels spring‑like rather than robotic. Because it acts near the center of rotation of the head, Flit Lift offloads vertical mass without introducing awkward moments or resistance to natural motion. The assist scales subtly with head movement so you feel support when you look up or hold the headset steady, and negligible interference when you snap your head quickly.
Integration focuses on distributed pressure: the Flit Lift system nudges some of the net load to the crown, sides, and back strap in a way that reduces hotspots. Auto‑calibration factors—head size, strap tension, and headset offset—ensure the lifting force is balanced across users. In practice, this means the Flit Lift keeps the headset aligned during quick gaze shifts and reduces the fatigue associated with prolonged upward viewing (for example, inspecting a tall virtual schematic). The module compensates for small strap or padding swaps automatically, so you rarely need to reconfigure between sessions.
For daily use, learn a few quick habits: mount Flit Lift so the module sits slightly posterior to the headset’s sensor array (avoid occluding cameras), set tension to just below perceptible lift for natural movement, and test with a short head nod and an overhead look. Easy donning and doffing come from magnetic or clip anchors; confirm they lock securely before you start. When tuned, Flit Lift’s small assist compounds across hours—what feels minimal at first often becomes the difference between a 60‑minute and a comfortable 90‑minute session.
Setting up for long sessions: practical ergonomics and positioning
Preparation beats correction. Start with seating and base posture: a chair that allows your pelvis to rotate forward slightly, feet flat on the floor, and knees roughly 90 degrees creates a stable platform. If you prefer standing, set your play area so you don’t have to lean forward to reach inputs. The goal is to keep your torso aligned under your head and avoid prolonged forward neck flexion; when your torso is the anchor, the headset’s mass becomes easier to manage.
Next, align eye relief and headset position. Your line of sight should be perpendicular to the display when you’re in neutral posture—minimal chin tuck and minimal tilt. If the headset forces your chin up or down, tighten or loosen straps to shift it into a neutral plane. Use a small lumbar cushion to preserve the natural curve of the lower back if you notice slouching. Peripheral supports—armrests or a desk edge—help reduce neck and shoulder tension by giving your arms a post to rest on during long UI tasks.
Cadence and micro‑breaks maintain endurance. Alternate seated and standing stances every 30–45 minutes to redistribute load across different joints. Plan micro‑breaks every 20–30 minutes: stand, march in place, or shake out the hands for 30–60 seconds. These breaks let circulation recover and muscle fibers reset; early adopters report better focus and smoother head control when they follow this pattern. Finally, avoid repetitive micro‑motions—rotate tasks between heavy gaze activity and controller‑focused interactions to limit localized strain on wrists and shoulders.
Practical how‑to: a 10‑minute setup and calibration routine
A ten‑minute opening routine accelerates comfort and avoids mid‑session interruptions. Start on a clean surface: unbox GraviPro and Flit Lift components, inspect straps, clips, and connectors, and lay them out in their recommended orientation. Keep a quick reference photo of the harness orientation nearby—repeatability pays off on busy days. Hang your headset on its stand to prime the system; many users find it easier to balance before donning.
- Attach GraviPro harness and secure torso straps. Fasten counterweight at a mid‑range setting to begin.
- Mount Flit Lift near the headset sensor array, avoiding any camera occlusion. Set the initial lift to the lowest perceptible assist.
- Don the headset, sit or stand in your neutral posture, and initiate calibration. Perform a slow nod, a gentle shake, and an overhead look while listening for hotspots.
Fine‑tune in small increments: adjust counterweight by one notch, change interface height by a couple of centimeters, or reduce lift tension slightly. Use a mirror or smartphone side profile shot to check alignment from the ear to the shoulder; ensure the headset’s plane is parallel to the ground when your gaze is neutral. If you plan long sessions, plan a mid‑session check at the 45–60 minute mark to re‑balance straps and confirm pressure points haven’t developed. Cable routing is the final step: secure leads along the back of your chair or harness to prevent tugs during movement and maintain a clear floor space to avoid tripping hazards.
Compatibility and integration: Vision Pro and other headsets with GraviPro/Flit Lift
Cross‑headset compatibility is one of the major selling points. Both GraviPro and Flit Lift are built to adapt across standalone headsets, PCVR rigs, and high‑end mixed‑reality devices like the Vision Pro. The essential checklist before buying: confirm the adapter list for your headset family, validate that mounting points leave sensors and cameras unobstructed, and ensure that crown clearance won’t create pressure near the temples. For Vision Pro specifically, begin with a fresh room scan and sensor mapping—this reduces drift and ensures the headset’s inertial and optical systems remain stable after attachments.
Mounting approaches vary. Lightweight headsets typically accept clip‑on rails that attach to existing vent or shell features; heavier units use bar‑based adapters anchored to the shell’s structural points. When integrating with Vision Pro, use a low‑profile adapter that keeps weight distribution centralized; avoid anything that presses on the crown or blocks outward‑facing cameras. Follow the headset maker’s accessory guidelines where available, and when in doubt, perform a simple functional check: move through typical poses while observing the headset’s tracking fidelity and whether any cameras clip or overexpose.
Practical constraints matter: battery life for active modules like Flit Lift is finite—expect multi‑hour runtimes but confirm charging cycles and quick‑swap battery options if you routinely do marathons. Airflow and heat management are also important; ensure padding materials breathe and that modules don’t trap heat against your scalp. Finally, review care instructions and warranty terms—look for washable pads, replaceable straps, and clear service paths so a damaged clip or worn cushion doesn’t bench your setup for days.
For developers and manufacturers: integrating GraviPro with VR ecosystems
For creators, GraviPro and Flit Lift represent more than accessories—they’re inputs to an ergonomic contract between hardware and software. Treat integration like a predictable API: expose sensor data (pose, torque estimate, load distribution) at a consistent update rate, document units and ranges, and provide sample code for common balance adjustments. High refresh rates—60–120 Hz—are valuable so apps can feed near‑real‑time balancing loops; latency budgets should be tight (ideally below 20 ms) to prevent perceived lag in lift response.
API hooks should include endpoints for reading current counterbalance state, requesting incremental lift changes, and subscribing to safety events (overload, clip disengage). A sensible sample flow: on system startup, app queries the accessory for weight profile, requests a baseline lift setting based on headset mass, and runs a short two‑second calibration while the user holds neutral posture. During runtime, the game or app can request transient boosts (for intense overhead work) and then release to default. Make these calls idempotent and frame‑synchronized to avoid oscillation.
Safety is non‑negotiable. Define clear thermal envelopes, maximum safe lift forces, and mechanical limits in the SDK. Include fallback modes—mechanical passive support—if the active system encounters errors. Developers should also include ergonomic testing as part of QA: instrumented sessions with pose and torque logging, subjective comfort surveys at 20, 45, and 90 minutes, and automated drift checks. Certification guidelines should cover fatigue testing, connector durability, and biocompatible padding materials so third‑party manufacturers can produce compatible mounts and adapters reliably.
Real‑world use: tips from early adopters and performance metrics
Early adopters report notable improvements: testers using GraviPro and Flit Lift with Vision Pro and other headsets consistently describe reduced neck strain and longer comfortable session times. Case studies include a Vision Pro user who completed a 90‑minute session with substantially less neck fatigue and a mixed‑headset user who reported a 25–30% decrease in perceived weight during a 120‑minute trial. Objective checks back these claims: reviewers observed steadier input stability during rapid head turns and fewer abrupt posture corrections across 45–60 minute blocks.
Practical optimization patterns emerged from testers. First, take the time to calibrate: an initial setup of five to ten minutes pays dividends. Second, expect a practice curve—habitual small adjustments drop dramatically after three to five sessions as you learn the sweet spots for strap tension and counterweight. Third, monitor hotspots: small changes in padding position often deliver the largest comfort gains. If you notice numbness or significant discomfort after a session, reduce lift slightly and re‑check strap contact points.
Maintenance and charging are everyday realities. Keep a spare set of washable pads and a second battery pack for Flit Lift if you schedule marathon runs. Clean harnesses as recommended—sweat accelerates wear—and inspect quick‑release points weekly for cracks or wear. When trouble arises, common fixes include retightening strap anchors (most mid‑session slips are anchor related), re‑routing a cable that’s tugging at the shell, or dropping lift tension a single notch to eliminate subtle oscillation. With that attention, many users extended their reliable session length from 60 minutes to 90–120 minutes with less cumulative discomfort.
Next step: run a ten‑minute calibration before your next session and mark a 45‑minute mid‑session check in your timer. Small, consistent routines produce the biggest gains—both in comfort and in the quality of your VR experience.


Compartir:
Flit Lift vs traditional VR supports: a practical comfort and endurance review
Ergonomic Breakthroughs for Pro VR Posture and Weightless Comfort