

If long VR sessions leave your neck sore or the headset pulls forward, Flit Lift is the fastest path to a noticeably lighter feel. This guide walks you through a quick, tool‑light installation on a wide range of headsets—from PC‑tethered rigs to standalone sets—so you can stop fussing with balance and get back to playing. ⏱️ 12-min read
Read on for concise checks, a straightforward install sequence, precise calibration tips, cable and comfort tuning, integration notes for Vision Pro and other headsets, and practical troubleshooting. Each section is written for hands‑on VR enthusiasts who want a reliable setup in minutes, not hours.
Compatibility and prerequisites
Before you open the box, confirm Flit Lift will actually work with the headset(s) you own. Flit Lift supports multiple headset families and form factors: PC‑tethered rigs (Valve Index, HTC Vive series, HP Reverb), popular standalone headsets (Meta Quest 2/3, Pico models), and console‑tethered systems where suitable adapters exist. The fastest way to be certain is the Flit Lift dashboard or the product’s compatibility list—look up your exact model and check for any required adapter or counterweight recommendation.
Physically inspect your headset’s mounting points: is there a rigid top strap, a rail, or a face‑plate that can accept a clamp? Lightweight headbands and slim profiles need narrower clamps and shorter strut lengths; heavier, rail‑based headsets benefit from a wider clamp and larger counterweight. Plan the space too—choose a mounting surface or stand that can handle the headset weight and the dynamic load of movement. A stable surface, clear overhead space, and nearby power for USB‑C or PD are easy things to check now that save time later.
Finally, gather a few basics: a screwdriver (Philips or Torx depending on screws), a small level, and a few cable ties or clips for tidy routing. Open the Flit Lift app and make sure both headset and lift firmware are up to date; authorize the lift under your account and verify the device shows online. A minute of prep here keeps the install smooth and prevents a firmware mismatch in the middle of calibration.
Unboxing and mounting options
When you unpack Flit Lift, you’ll typically find the following items: the main lift strut (lifting arm), a clamp or mounting bracket, the counterweight, quick‑release adapters, a short set of model‑specific cables, and hardware kit (screws, washers). Newer kits often include an optional quick‑release plate that lets you attach or detach the lift in seconds—handy for shared headsets or frequent swap‑outs.
Choose your mounting approach based on headset family:
- PC‑tethered headsets (Index, Vive, Reverb): clamp to the top strap or rigid rail. Ensure the clamp sits clear of ear modules and doesn’t impede microphone or hinge movement.
- Standalone headsets (Quest, Pico): use the lighter clamp and keep cable runs short. Position the counterweight so center of gravity sits close to the skull’s balance point—this avoids a top‑heavy feel.
- Compact headbands or thin frames: use the narrow clamp or supplied adapter plate. Shorten the exposed portion of the strut to reduce bulk and preserve full rotation.
Do a quick safety check before fastening: inspect parts for cracks, confirm cables aren’t pinched, and verify all fasteners are present. The clamp should grip securely with even pressure—if you find any wobble, stop and re‑seat the bracket instead of overtightening. A gentle tug test confirms the mount will hold during play.
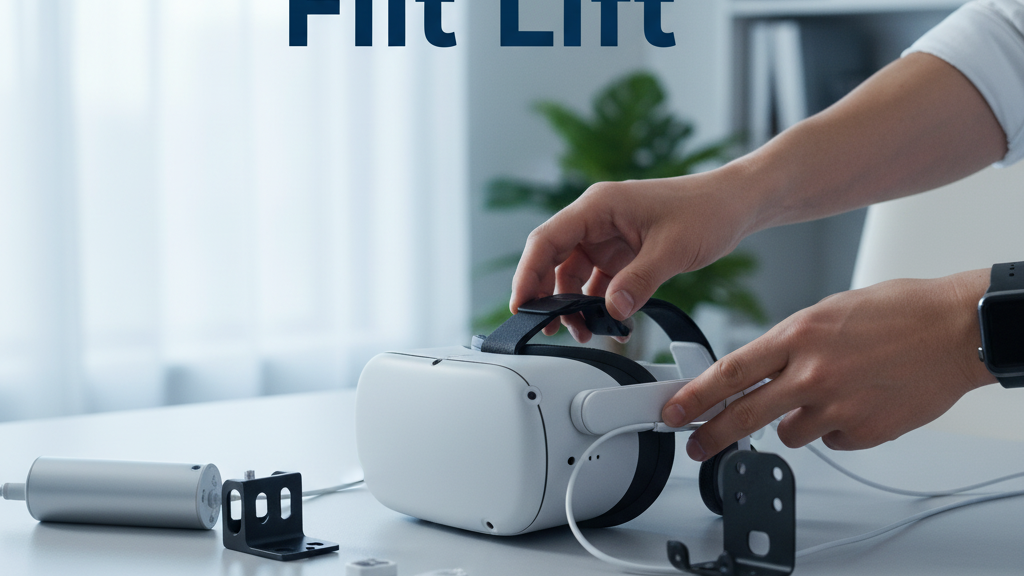
Quick‑install path
This is the fast, reliable sequence I use to get Flit Lift from box to first test in under 15 minutes. It prioritizes secure mounting and clean cable routing so you can calibrate without distractions.
- Position the headset on a soft surface (face cushion up) and align the Flit Lift bracket with the recommended mounting point for your model.
- Attach the bracket using the included hardware. Hand‑tighten screws first, then finish with a snug turn—avoid overtightening plastic parts. Use the level to make sure the lift arm sits vertically when the headset is level.
- Install the strut or lift module into the bracket, lock the quick‑release if present, and attach the counterweight loosely so you can slide it during calibration.
- Route cables through built‑in channels, clips, or along the rear strap. Aim to keep cable slack toward the base of the skull to prevent tugging during head movement. Connect power/USB—if the headset port is limited, use a powered USB‑C hub to deliver clean power and data.
- Do a basic clearance check: put the headset on, move your head through a neutral range, and look for any contact between the strut and ears, glasses, or sensors. If everything clears, perform the initial balance test described below.
The whole point is confidence: a solid mechanical mount and tidy cables mean calibration focuses on weight and balance, not patching hardware issues mid‑test.
Calibrating balance and vertical alignment
Calibration turns Flit Lift from mechanical support into a natural‑feeling extension of your headset. The goal is to have the system’s vertical axis run through the optical center so images stay steady with small head turns and nods. Start with the cradle and counterweight roughly where the manual suggests, then refine with these three decisive steps.
1) Find the optical center. With the headset on, look straight ahead and note if the display tilts. If the view skews to one side, shift the counterweight laterally or move the cradle until the lenses sit level. The aim is a symmetric weight line; you want a vertical line through the headset’s optical center.
2) Zero‑setting and calibration weights. Use the calibration weights included in the kit or the zero‑setting routine in the Flit Lift app. Put the headset in a neutral, still position and start the zero‑set so the system reads a baseline. This minimizes residual drift. After the device reports zero, hold still for a short static period and then re‑check alignment.
3) Dynamic verification. Perform gentle head motions—nods, side tilts, and small rotations—while wearing the headset. Watch for vertical drift or a forward pull. If you feel forward tilt, slide the counterweight down slightly along the rear strap; if tilt persists to a particular side, shift the weight laterally in small increments. The calibration routine typically takes 1–3 minutes and will guide you through fine adjustments; aim for minimal perceptible drift in a one‑minute test.
One practical tip: if your headset uses inside‑out tracking, do a quick posture test in a neutral room scene after calibration to ensure the lift’s mass hasn’t introduced sensor bias. Recalibrate if you notice jitter during normal head turns.
Fit, comfort, and cable management
Comfort isn’t just about vertical balance—strap tension, padding placement, and cable routing all matter. Start with everything loose, slide the headset on, then snug straps evenly so the weight distributes across top, sides, and rear. Tighten in small increments and test by slowly nodding and turning your head; if the device pulls forward, slightly increase rear strap tension and ease the front.
Position padding at the crown, forehead, and cheek points to eliminate hotspots. For example, place a thin foam pad at the crown to prevent pressure around the skull’s highest point; move forehead padding up or down until the lenses sit at eye level without pushing the brow. Small adjustments—millimeters—make a big difference in perceived weight.
Cable management is the unsung comfort hack. Route cables toward the lower rear of the headset and secure them with the built‑in clips or adhesive cable guides. Keep slack near the base of the skull so movements don’t pull the headset forward. If you’re using a powered hub for USB‑C, mount it near the base of your play stand or velcro it to the rear of a chair; a short, flexible pigtail to the headset reduces tugging. Magnetic cable guides or braided sleeves help in portable setups to prevent tangles during transport.
Finally, always check temple and face pressure after 10–15 minutes of play. If you feel numbness or hotspots, stop and adjust padding and strap tension—comfort is iterative, and tiny tweaks early save longer sessions from becoming painful.
Headset integration and ecosystem
Flit Lift is designed to play nicely with headset ecosystems—so long as you validate a few integration points. Tracking compatibility is the first stop: adding mass above the headset can affect inertial sensors and inside‑out tracking. After mounting, do a simple tracking test in a calm scene and look for jitter or drift. If tracking is stable, progress to a few rapid head turns to ensure no misread positions appear under dynamic motion.
Bind useful controls. Many headsets let you assign quick actions; use the Flit Lift’s buttons (if present) or the headset’s companion app to map a short press to recenter and a long press to toggle pass‑through. Keep bindings simple and test them in a non‑intensive scene before using them in fast‑paced games.
Power is another integration point. Flit Lift can draw power via USB‑C, and some headsets don’t supply full PD. If your setup shows low power or unstable connections, use a powered USB‑C hub that supports sufficient current and data lines. That hub also helps cleanly manage multiple peripherals—controllers, trackers, and the lift—without overloading the headset’s single port.
For Vision Pro users: Flit Lift reduces front‑heavy tension while preserving access to controls and pass‑through. Confirm the lift’s inertial sensors don’t interfere with the headset’s tracking by running a posture and recenter test. If you use GraviPro accessories—modular counterweights and adapter plates—match the adapter geometry and verify the combined center of gravity before long sessions. The modular approach keeps the system future‑friendly when you try new headsets later on.
Safety, maintenance, and troubleshooting
Safety and simple maintenance keep your Flit Lift reliable. Follow rotation limits specified for your headset and never force joints beyond their designed range. Keep fingers, hair, and loose clothing away from moving parts during attachment or adjustment. Do a quick pre‑session check: clamps tight, no cracked housings, and locking mechanisms engaged. If you spot damage or unusual resistance, stop and consult the manual or support.
Maintenance is low‑effort but pays dividends. Wipe contact surfaces and cushions with a soft microfiber after heavy use to remove sweat; avoid alcohol or harsh cleaners near pads and electronics. If the manufacturer recommends lubrication for joints, apply a very small amount of the specified product and wipe off any excess. Store Flit Lift in a cool, dry place with clamps loosened to reduce stress on materials.
Troubleshooting checklist for common issues:
- Wobble: tighten fasteners, ensure the bracket sits flush on the headset, and re‑seat any shim plates included with the kit.
- Drift or tilt: run the zero‑set routine again, adjust counterweight laterally, and verify the cradle aligns with the optical center.
- Power issues: swap to a powered USB‑C hub and confirm PD ratings; try a different USB‑C cable with known data and power specs.
- Tracking jitter: remove the lift temporarily. If jitter disappears, recalibrate tracking with the lift mounted and test in a neutral scene before gaming.
If a fix isn’t obvious, capture a short video of the symptom (show the headset mounted and the issue happening) and contact Flit Lift support with the video, firmware version, and headset model—this gives support the context needed to diagnose quickly.
Examples, setups, and case studies
Real setups show why installation choices matter. Here are three practical case studies you can mirror depending on your space and play style.
Case A — Compact living room: A small apartment owner used a wall‑mount bracket and a low‑profile Flit Lift arm. The headset mounts high on a slim bracket, the counterweight stays close to the crown, and cables run in a conduit down the wall. Result: quick access, minimal footprint, and reduced trip hazards when the headset rests between sessions.
Case B — Expanded play area: For a larger room, a floor stand with an articulated arm gave full freedom for standing and roomscale play. The counterweight was increased slightly to match a heavier PC headset; cables were routed inside the stand’s channel. The player could swing the headset into position for seated play or pull it out for full movement without rebalancing.
Case C — Mobile VR and events: A portable kit paired Flit Lift with a battery‑powered USB hub and magnetic cable guides. All components went into a padded case, and the team used quick‑release adapters to swap headsets between demos. The key was pre‑set counterweight positions and labeled cables so setup at a venue took under five minutes.
Each example reinforces a core idea: match mount type and counterweight to headset mass and your environment. Small changes—moving the counterweight a few centimeters or switching from a wall mount to a stand—dramatically affect comfort and accessibility.
Future‑proofing, upgrades, and ongoing calibration
Flit Lift is built to evolve with new headsets. The modular adapters, adjustable counterweights, and OTA firmware mean you won’t need a full replacement when the next headset lands. To keep things smooth over time, enable automatic updates in the Flit Lift app or schedule updates during downtime; most firmware changes download in minutes and restart the module quickly.
When a new headset arrives, consult the compatibility list in the app before mounting. If an adapter kit is required, verify the weight limits and recommended counterweight positions. Expect a straightforward installation: fit the adapter plate, set the counterweight according to the new headset’s center of gravity guidance, and run the zero‑set calibration. Periodic balance checks—every few months or after any hardware change—help catch drift early.
Consider accessory expansion: GraviPro counterweight packs, low‑profile quick‑release plates, and powered USB‑C hubs are common add‑ons that extend compatibility and make multi‑headset setups painless. Small investments in modular gear pay off if you frequently switch headsets or demo across different environments.
Final practical next step: before your next session, consult the Flit Lift compatibility list for your headset, perform a one‑minute zero‑set, and do a three‑minute dynamic test. If everything reads stable, enjoy a longer play session with noticeably less neck strain—then make a small comfort tweak if you feel any hotspot after thirty minutes.


Compartir:
FlitLift vs rival haptics: which device delivers stronger VR immersion
GraviPro VR Comfort Versus Standard Headsets A Practical Comparison